Forgive me Eric, I thought he was talking about someone else.
I have seen you here, but I am not aware of your talents so that might be my short coming.
Frankly, my shortcomings seem to be more revealed as the days progress.
he isn't the only "Eric" on this planet...
- Stuart -
Yes Sir he is.
That was my mistake I admit. But let us not get to full of ourselves to forget those that taught us what we now seem to speak of as our on making, like there was no one in front of us to clear this path.
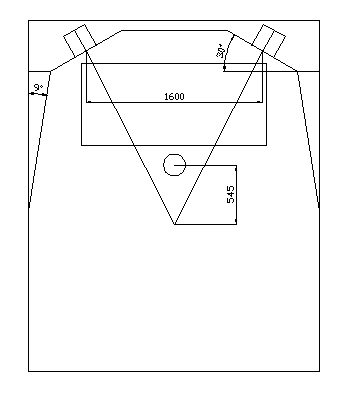
Looks good to me Janne! :) I reckon you should be fine with that, overall, although the 27° angle is a bit low, and might have an effect on your stereo image. The normal recommendation is to not go less than 30° or more than 45°. Maybe you could reduce the panel width just a little, move the speakers just a bit further apart (sacrifice a bit of the slot wall), move the mix position just a bit closer to the front, or something along those lines?
- Stuart -
Ok. I'm pretty close now, I think :D
I changed the speaker angle back in 30°. I did other little adjustments like you said.
soffit panels width are now 750mm (29,5"). Maybe I could leave it in 800mm.
Slot wall angle 9°.
I'm making 3d sketchup so I might see things more accurately...
Eric Best wrote:
Thanks for your answer Eric but I didn't quite get your point??
It was more of a thought than a point. You are going for a 31" width of wall that you are mounting on. I was think whether this would be necessary.
The baffle diffraction loss occurs when the baffle isn't large enough to contain the wave from the speaker and ends up on the side or behind the enclosure. If the walls of the room contain the wave and support it instead of folding behind like they do in a speaker, does it matter how wide the wall is? You won't get the baffle step loss like you would for a speaker that width.
I'm just wondering if since the room folds forward of the baffle will this have a positive effect on the bass (as in more , not necessarily better) like the function of a horn?
Thoughts?
Ok thanks for the clearance Eric.
I bet that everything is more critical the smaller the room is? Walls are closer to the listening position etc..
Of course these things are also important in large control rooms, but things are getting complicated when room is smaller. Am I right?
Soundman2020 wrote:
But 300 Hz does not match the speaker cabinet width! According to your formula, 300 Hz would be the right compensation for a 15" baffle, but the A7 front panel is only about 8" (guessing: don't have the exact specs on hand right now). So that kind of confuses things: by using that control, you'll be "uncompensating" starting at the wrong frequency, and by an unknown amount...
- Stuart -
I was wondering the same thing...
Is that 300Hz some kind of an average frequency you want to roll off or boost pretty much all rooms or what? :shock:
Like you said Speakers are confusing things...
-janne
OK so your speakers are currently 1-6m apart. It seems to me that if you sacrificed a little of the width of the center panel (the one between the soffits) you could slide the soffit/speaker assemblies a bit closer together, thus bringing your intersection point a bit further forward and allowing you to increase the side wall angle a bit. You are going to need absorption on your side walls anyway, since there will be first reflections there, but a slightly larger angle on those slot walls would help in general.
On the other hand, you don't want to go too far with the above, as you don't want the speakers too close together either....
- Stuart -
OK so your speakers are currently 1-6m apart. It seems to me that if you sacrificed a little of the width of the center panel (the one between the soffits) you could slide the soffit/speaker assemblies a bit closer together, thus bringing your intersection point a bit further forward and allowing you to increase the side wall angle a bit. You are going to need absorption on your side walls anyway, since there will be first reflections there, but a slightly larger angle on those slot walls would help in general.
On the other hand, you don't want to go too far with the above, as you don't want the speakers too close together either....
- Stuart -
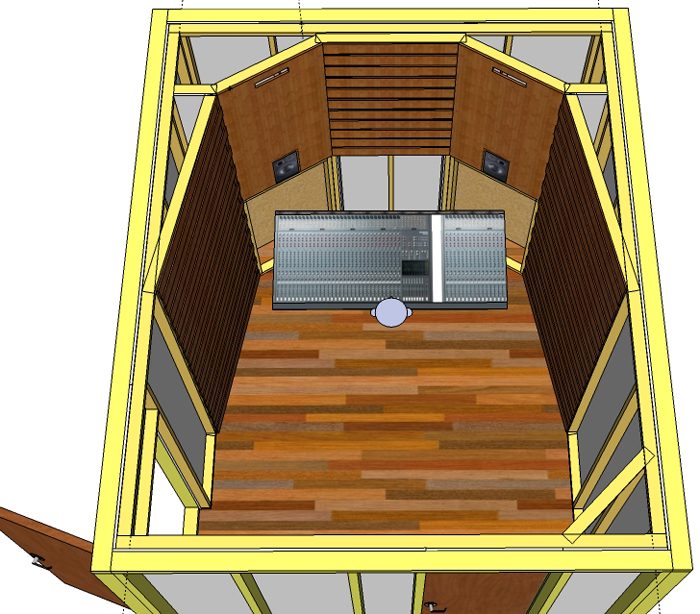
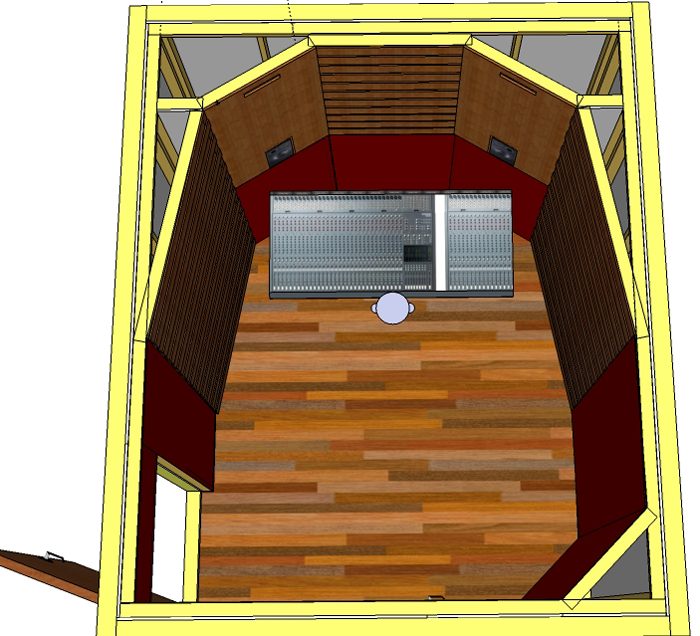
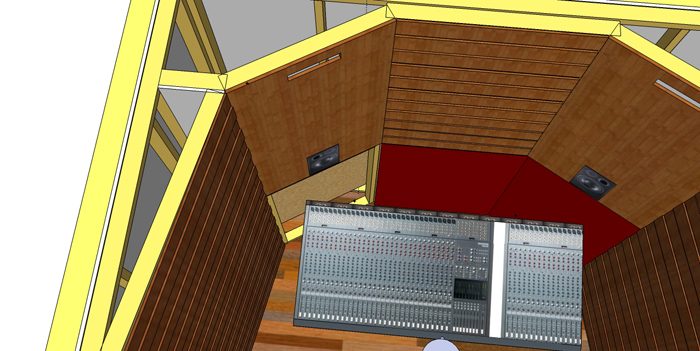
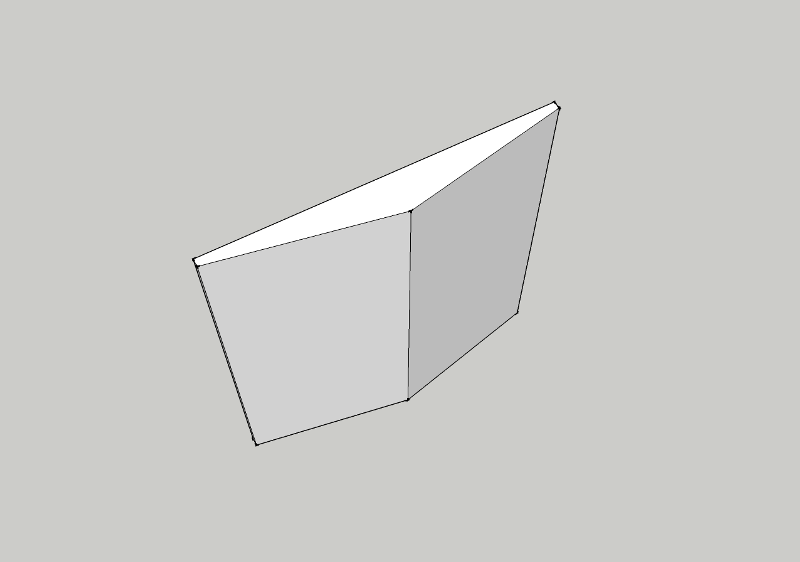
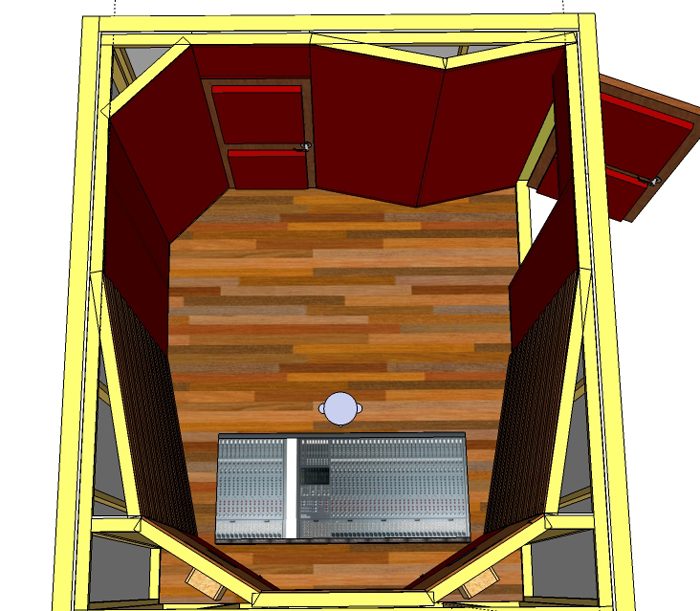
I made the 3d sketchup picture about the situation.
Speaker angle is 30° and soffit panel width is 750mm (29,5").
I reduced center panel width a bit so I could increase slot wall angle to 11°
I've to reduce the speakers distance a bit because of slot walls so they are now 1,55m apart
Also the speaker intersection point is now a little forward.
Dark red walls are absorbtive cloth front insulation.
Back wall is fully absorbtive.
Bottom corner at the right is a corner bass trap filled with insulation.
By the way, I got the change to listen pair of A7's and I liked them a lot.
If I only got some extra money.. :D
-janne
cr with slots.jpgcr with cloth.jpgsoffit.jpg
Now we be talkin'!!! :) Looking good from here!
Mackie 32-8 with sidecar? :) (Hard to be sure from the low res pics, but it sure looks like it...)
- Stuart -
What kind of absorber are you putting on the back wall? Maybe a giant superchunk. Kind of trianglar shaped coming out about 12" into the room in the center and tapering to each end? That way you won't block off the door and can still get some good low freq. absorption.rear wall absorber.png
Now we be talkin'!!! :) Looking good from here!
Mackie 32-8 with sidecar? :) (Hard to be sure from the low res pics, but it sure looks like it...)
- Stuart -
Nice to hear that Stuart :D
Yeah the console pic indeed is Mackie, but my console is actually Studiomaster Trackmix 24 with 32 channels.
I didn't found the modelling from it, so I've to strech Mackie console a bit. :)
I know that old analog Studiomaster is too big in my small control room but It's like the nice sounding family member :)
Eric Best wrote:
What kind of absorber are you putting on the back wall? Maybe a giant superchunk. Kind of trianglar shaped coming out about 12" into the room in the center and tapering to each end? That way you won't block off the door and can still get some good low freq. absorption.
Thanks Eric for your back wall absorber idea!
My plan was to build 2x3" lumber frame, fill it with rigid insulation and put the cloth in front of it.
Your suggestion is much better although :D
I'm definitely doing it like you suggested.
-janne
Back wall absorbtion plan.
-Superchunk bass trap on the left corner.
-Triangular superchunk between the storage room door and entry door.
-On the door surfaces small 30mm absorber panels.
Ceiling is going to be fully absorbtive.
70mm rigid insulation and cloth.
-janne
back wall.jpg
Thanks Eric! I'll go with the plan :D
Control room construction pics:
Pics. 1-5.
One layer of 15mm drywall attached to the walls and ceiling.
Seams caulked and screw spots mudded.
Pics. 6-7.
My temporary mixing place at the liveroom with new Adam A7X monitors :D
Last pic.
Multicore audio cables between control room and liveroom.
One 24 pair Nomak, two 8 pair Jamak and one 4 pair Jamak.
At next I'm gonna build acoustic frame in control room and pull audio cables through the pipes.
-janne
Control room framing almost done!
Pics 1-4
2x3" lumber frame mounted over the perimeter.
Audio cables between control room and liveroom pulled through the pipes.
Pics 5-8
Soffits and side wall resonators begin to shape.
Also the ceiling is framed with 2x3" lumber and it's going to be fully absorbtive.
Do I still need a cloud over the mixing position or is 50mm (2") rigid insulation sufficient between the ceiling joists?
Thanks!
-Janne
Back wall absorber frames done!
Soffits construction continues.
I've a question concerning a speaker boxes :?:
I know they must be tight fit to a speaker, but how tight? Airtight?
It's quite impossible to cut plywood pieces so accurately.
And wood lives a bit when temperature/humidity changes.
Can I make the box a little loose and use some kind of a seal at the perimeter of the speaker to seal it tight.
How do you do it :?:
Thanks!
-Janne
Thanks Eric!
I've read that thread earlier and I read it again. Includes very useful information, maybe I've to read it even third time :)
I'm doing my soffits based on John's soffit design. There's a plywood box where the speaker is. What is the point of that box?
Is it only because it holds the speaker in place?
On Barefoot's flush mounting method does not have that speaker box.
-Janne
I found this thread which deals the same issues.
viewtopic.php?f=2&t=1929&start=135
Maybe I'm making plywood boxes as tight as possible to a speaker, still that I can remove the speaker if needed.
If I understanded correctly, I don't have to seal the seam between the speaker and the bezel?
In Barefoot's design there's a small 3-5mm gap between the bezel and the speaker.
-Janne
Ok. After reading a lots of more information about flush mounting and speaker boxes. I found this Glenns comment (in Sonolinks thread viewtopic.php?f=1&t=14736) about the decoupling the speakers from the box.
gullfo wrote:
make sure they are decoupled from the box (rubber, sylomer, sorbathane, insulation, neoprene pucks etc etc) and the face plate and use non-hardening caulk or soft rubber to seal it full around the edges. also make sure the monitor face is level with the baffle plate so it works properly.
Also this comment:
gullfo wrote:
make sure they're are not so tight as to be coupled to the speaker box... your rubber or insulation decoupling layer in the box should be firm but still prevents the speaker from transferring directly to the box and the frame.
So, I got my answers :D
I attached rubber strip to all sides of the speaker box.
So the speaker is now very firm to a box but still decoupling from the box and the frame.
-Janne
Yup! That's the way to do it!
Don't forget that with the Adam you need to cut a very weird shape face plate to match the bevelled angles at the top of the cabinet.
- Stuart -
Also your going to have to pull that speaker a little bit forwards once you've got the baffle in place. The speaker should be flush with the baffle not the box. Hopefully it's not too tightly wedged. So you might want to add a cord or belt (seat belting for autos can be bought by the meter/yard) wrapped around behind the speaker so you can make these adjustments, otherwise you're going to be hard pressed to pull it out! :wink:
Yup! That's the way to do it!
Don't forget that with the Adam you need to cut a very weird shape face plate to match the bevelled angles at the top of the cabinet.
- Stuart -
Yeah, I found Hugo's thread viewtopic.php?f=1&t=16554&start=30
There is a example how to soffit mount the Adam's.
I'll have to make removable face plate so that I can remove the speaker if I need to make some sound adjustments.
BriHar wrote:
Also your going to have to pull that speaker a little bit forwards once you've got the baffle in place. The speaker should be flush with the baffle not the box. Hopefully it's not too tightly wedged. So you might want to add a cord or belt (seat belting for autos can be bought by the meter/yard) wrapped around behind the speaker so you can make these adjustments, otherwise you're going to be hard pressed to pull it out! :wink:
It's not too tight but I definitely add that belt. That's a good idea! It saves me from sweat and tears :D hopefully...
I'll have to make removable face plate so that I can remove the speaker if I need to make some sound adjustments.
There's another option: Take off the rear panel of the speaker, extend the cables, and mount it on the soffit panel, facing the room. Much easier to make adjustments like that!
- Stuart -
Soffit update again!
Pic 1.
Lower vent hole for air circulation sawed.
Pic 2.
Speaker boxes and box frame in place.
Pic 3.
Soffit baffle attached temporary.
There's a little error at the left upper vent hole, it's only in the pic so don't worry :)
Pic 4.
Ready to make hangers in the bottom of the soffits. I found soft 12mm fiberboard at the local hardware store.
Insulation is 100mm rockwool sliced in two pieces.
Pic 5.
First hanger finished.
Pic 6.
I was able to fit four hangers in soffit dungeon.
Hanger sizes are 400mm, 350mm, 220mm, 150mm. Height is 900mm.
Pic 7.
First hanger is hanging.
Pic 8.
All four hangers in place.
Pic 9 and 10.
Cable conduit from the control room to the hall. I'm gonna attach mic panel there in the hall, so I can use rest of the house as a tracking room if needed.
Our Living room is pretty good sounding room btw :D and there is also a piano!
Pic 11 and 12.
Ceiling insulation done.
Next: Insulation, insulation, insulation...
Progress! Looking good!
Just one comment on the conduit: you did decouple that in the middle of the wall, right? Cut out a section and wrap the gap with rubber? If not, then it might be a flanking path.
- Stuart -
Progress! Looking good!
Just one comment on the conduit: you did decouple that in the middle of the wall, right? Cut out a section and wrap the gap with rubber? If not, then it might be a flanking path.
- Stuart -
Thanks Stuart :D
I drilled 10mm bigger hole than the conduit is and stuffed backer rod around. Finished with the caulk.
In other words counduit does not touch the wall leafs :D
-janne