Hi Guys,
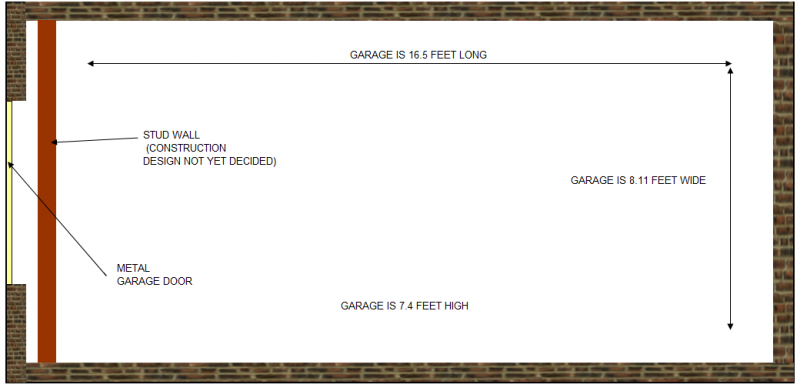
I have a detached garage which is 16.5 feet long by 8.11 feet wide by 7.4 feet long
Can someone please let me know if my designs are on the right path? I initially wanted to use a double wall design throughout but due to small size of the garage I have decided to not go ahead with that design. I also wanted to use green glue throughout but its not currently in my budget.
THE FLOOR IS A CONCRETE SLAB
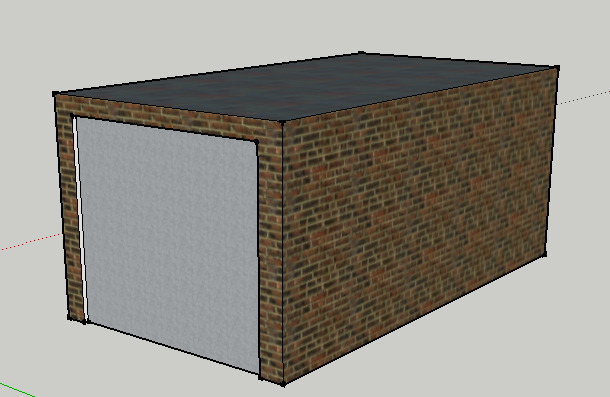
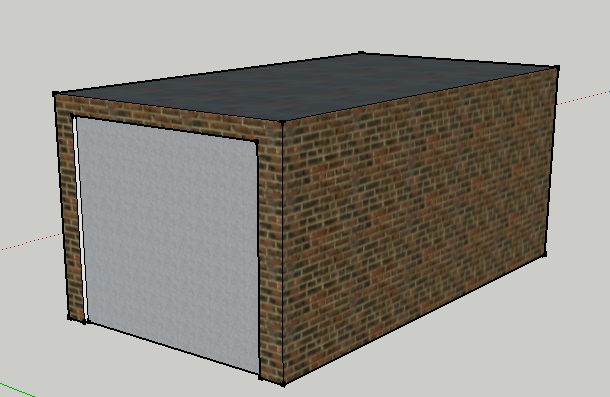
3D GARAGE ATTACHMENT SHOWS THE BASIC SIZE OF THE GARAGE
WALL ATTACHMENT SHOWS HOW I PLAN TO BUILD THE WALLS (WITH THE EXCEPTION OF THE MAIN ENTRY DOOR WHICH WILL BE A DOUBLE WALL DESIGN.
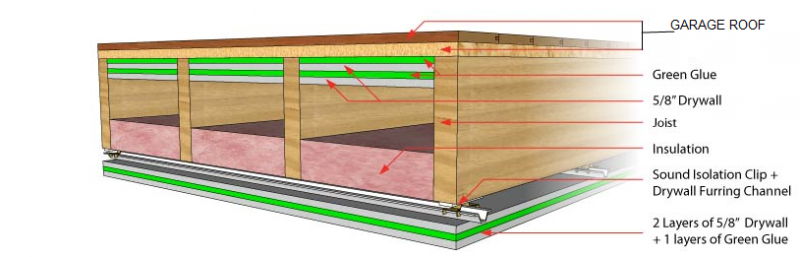
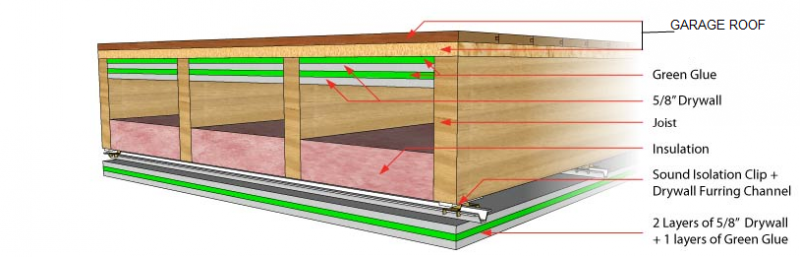
CEILING ATTACHMENT SHOWS HOW I PLAN TO BUILD THE CEILING
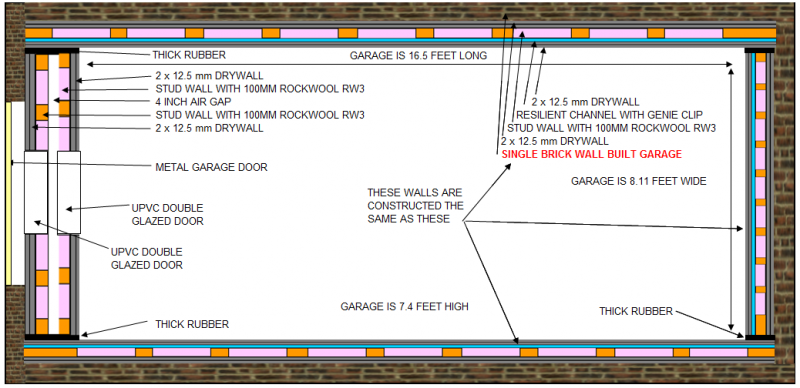
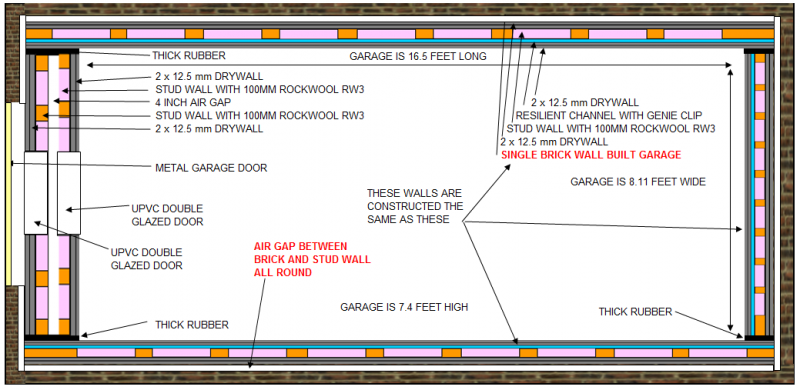
GARAGE TOP VIEW ATTACHMENT SHOWS THE DESIGN IN MORE DETAIL
Any advise or help would be much appreciated. Ideally I want to be able to record a full band so I will also need to build a small room to isolate the vocals but i will come on to that later. I just want to know if my plans will provide soundproofing. I want to be able to play rock drums so it needs to be able to handle this.
WOULD THIS BENEFIT FROM HAVING AN AIR GAP BETWEEN THE BRICK WALL AND THE STUD WALL? SEE GARAGE TOP VIEW VERSION 2
The design of the inside will come later once I have manage to do this on sketchup.
Kind regards
Craig
GARAGE DESIGN USING A MIXTURE OF PLANS
Originally posted at johnlsayers.com, topic 18301.
Hi. Please read the forum rules for posting (click here). You seem to be missing a couple of things! :) You were already reminded of this in your first post last year. That's why you got no further response to that one either.
- Stuart -
apologies, this should be deleted and I will post a new thread
You don't need a new thread! You just need to fix what you are missing ... check the forum rules that I linked you to, see what it is that you are missing, then fix that. That's all that you need to do... :)
- Stuart -
Apologies for not submitting this info earlier.
MY GOALS
Ok, ideally I would like to record bands as a part time project but only have a small space to do this. I am currently in the process of buying a new property with a single brick wall detached garage 16 foot 5 long, by 8 feet 11 wide, by 7 feet 3 tall. The garage is approximately 20 feet from my property and about 10 feet from the nearest neighbour. I have not started any construction as yet as I am not due to move into the property for 2 weeks.
HOW LOUD ARE YOU?
This is quite difficult as at present I do not have a meter to measure this. I can only approximate that this will be around 110db as rock drums will being played. Apologies If this is not sufficient, I will repost when I purchase a meter and move into the property.
DETAIL
OK, the garage consists of the following:
Dimensions - single brick wall detached garage 16 foot 5 long, by 8 feet 11 wide, by 7 feet 3 tall. The garage is approximately 30 feet from my property and about 15 feet from the nearest neighbour. It currently has a metal up and over garage door which unfortunately I cannot brick up so it will need to stay.
See attachment 3D GARAGE to give an idea of garage size
FLOOR = Typical concrete slab floor
WALLS – Single brick wall
DOOR – Typical up and over metal garage door (cannot be bricked up)
ROOF – Flat roof with 2 layers of OBS covered by Felt. Soon to be replaced by a fibreglass roof. Joints are approximately 6 inches deep
QUESTIONS
Due to the small size of the garage, I don’t think a double wall design is practical as it will reduce the size of the room even more that it currently is. I looked at using green glue throughout but I don’t think its in my budget. I do plan to use on the ceiling (see below design)
1. What is the best way to construct the walls out of the following options:?
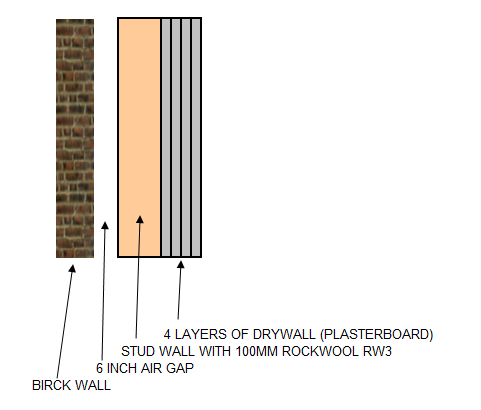
a. [SINGLE BRICK WALL] – [AIR GAP] - [STUD WALL WITH 100MM ROCKWOOL RW3] – [4 LAYERS OF DRYWALL (AKA PLASTERBOARD)]
SEE ATTACHMENT WALL 1
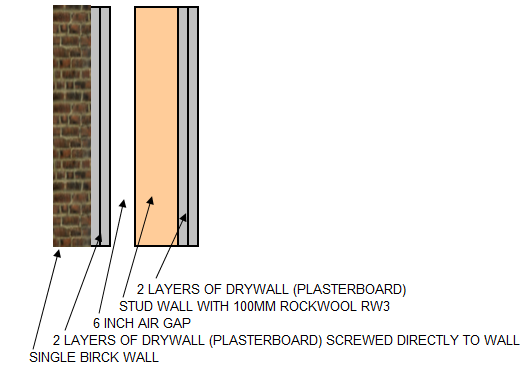
b. [SINGLE BRICK WALL WITH 2 LAYERS OF DRY WALL SCREWED DIRECTLY TO WALL] – [AIR GAP] - [STUD WALL WITH 100MM ROCKWOOL RW3] –[2 LAYERS OF DRYWALL (AKA PLASTERBOARD)] -
SEE ATTACHEMENT WALL 2
c. [SINGLE BRICK WALL] – [STUD WALL WITH 100MM ROCKWOOL RW] – [RESILIENT CHANNEL WITH GENIE CLIPS] – [2 LAYERS OF DRYWALL (AKA PLASTERBOARD)]
SEE ATTACHEMENT WALL 3
2. Is their a specific air gap needed for this size room? For example, when using an air gap, the air gap should be at least 3 inches for this size room???
3. Is there another wall construction design that I have not considered? If yes please can you suggest?
4. Do I need to use rubber between the timber studs and floor, and between the walls and walls and walls and ceiling (so walls don’t touch walls, they touch rubber first)?
5. I intend to use attachment ‘CEILING’ for the ceiling design. Is this sufficient?
6. I realise the garage metal door is an issue, but I can’t brick up. I have attached a design of the garage looking from above to give you an idea of where the stud wall will be if this helps. I intend to build a stud wall directly in front of the garage door. Which wall design suits this best? I may have the room to use a double wall design if this helps?
7. I have read that its better to have one space rather than separating a studio this small into 2 rooms. Do I need to construct a vocal booth for isolating the singer from the rest of the band when recording a full band or is there another way around this? I can DI the instruments (and re recorded will amps later) but I am concerned with the bleed from the drums into the vocal mic.
BUDGET
My budget is around £2000 UK pounds.
I hope I have included enough information, if not please let me know and I will update asap.
Kind regards,
Craig
Much better! :) :thu:
That's fine as a starting point. Sounds about right.This is quite difficult as at present I do not have a meter to measure this. I can only approximate that this will be around 110db as rock drums will being played. Apologies If this is not sufficient,
The ceiling is pretty low, so you'll need to pay careful attention to detail on minimizing loss of height for isolation and treatment.Dimensions - single brick wall detached garage 16 foot 5 long, by 8 feet 11 wide, by 7 feet 3 tall.
OK. In that case the best idea is to disable the mechanism, seal the door in place, and build an isolation wall just an inch or two behind the door.It currently has a metal up and over garage door which unfortunately I cannot brick up so it will need to stay.
Excellent!FLOOR = Typical concrete slab floor
Excellent!WALLS – Single brick wall
You mean the OSB will be removed, and replaced with corrugated fiberglass sheeting? Or the OSB will stay there, and the fiberglass will go on top?ROOF – Flat roof with 2 layers of OBS covered by Felt. Soon to be replaced by a fibreglass roof. Joints are approximately 6 inches deep
If you do "inside-out" construction, you only lose a very small amount of space, depending on how much isolation you need.Due to the small size of the garage, I don’t think a double wall design is practical as it will reduce the size of the room even more that it currently is. I looked at using green glue throughout but I don’t think its in my budget.
Whoooa! I though you said you had no space to do a double wall design, but here you are talking about a double wall design! The existing brick is your outer leaf, and the drywall-on-stud framing is your inner-leaf... Of the four systems you describe, this is the one that will get you the best isolation. But four layers of 16mm drywall? That's probably overkill, unless you have a need for extreme isolation. Most studios only need two layers, three at most.a. [SINGLE BRICK WALL] – [AIR GAP] - [STUD WALL WITH 100MM ROCKWOOL RW3] – [4 LAYERS OF DRYWALL (AKA PLASTERBOARD)]
There's no point to screwing the drywall to the brick. Drywall weighs about 600 to 700 kg/m3. Brick is about 2000 to 2500. Assuming your brick wall is a "standard" 100mm (4") thick, that makes the surface density of your brick roughly 220 kg/m2. The surface density of a sheet of drywall is about 11.8 kg/m2: So adding two sheets essentially dos nothing: it increases the mass of the wall by less than 10%. Seeing that you need to at least double the mass to get a worthwhile difference in isolation, you'd need to put twenty layers of drywall on there, ... :shock: If you leave out the two layers of drywall attached to the brick, and just do the stud frame with another two layers on it, that would be the second best option of your three, and is actually the one I would recommend.b. [SINGLE BRICK WALL WITH 2 LAYERS OF DRY WALL SCREWED DIRECTLY TO WALL] – [AIR GAP] - [STUD WALL WITH 100MM ROCKWOOL RW3] –[2 LAYERS OF DRYWALL (AKA PLASTERBOARD)] -
This is the worst of the three, since it has the smallest air gap and also the lowest mass. The RC is a good idea if the studs touch the existing walls or ceiling, but you wouldn't need it if you just leave a small gap between the brick and the frame.c. [SINGLE BRICK WALL] – [STUD WALL WITH 100MM ROCKWOOL RW] – [RESILIENT CHANNEL WITH GENIE CLIPS] – [2 LAYERS OF DRYWALL (AKA PLASTERBOARD)]
The size of the air gap depends on the amount of isolation that you need, and the frequency range where you need it, not on the room. That said, the minimum air gap is about 4". Less than that and the resonant frequency of the wall rises too high, and the thickness of the additional mass you need in order to compensate is also high. Diminishing returns.... That said, the "air gap" is the distance between the surface of the brick wall and the surface of the drywall: so it includes the space inside the stud bays... (unless you build inside out, but that's a different ball game...)2. Is their a specific air gap needed for this size room? For example, when using an air gap, the air gap should be at least 3 inches for this size room???
No, because you still need to attach the stud frame firmly to the slab, with bolts or nails, to prevent it moving: Doing that "short circuits" the rubber under the framing. You still might want to use rubber if your floor is very uneven, to get a better air-tight seal, but it won't actually "float" the wall, unless you also use proper isolation collars around your anchor bolts, and tighten them accordingly. Not easy to get right, and probably not necessary (unless you need extreme isolation).4. Do I need to use rubber between the timber studs and floor, and between the walls and walls and walls and ceiling (so walls don’t touch walls, they touch rubber first)?
Yes, very likely that will be sufficient, assuming you need moderately high levels of isolation, not extreme.5. I intend to use attachment ‘CEILING’ for the ceiling design. Is this sufficient?
Exactly. That is, indeed, the right way to do it. But you don't need such a large gap between the door and the wall: just an inch or two is fine..6. I realise the garage metal door is an issue, but I can’t brick up. I have attached a design of the garage looking from above to give you an idea of where the stud wall will be if this helps. I intend to build a stud wall directly in front of the garage door. Which wall design suits this best? I may have the room to use a double wall design if this helps?
I would. It is practically impossible to record vocals in the same room as drums, at the same time. If you plan to do that, the definitely build a vocal booth, even if it is small. - Stuart -7. I have read that its better to have one space rather than separating a studio this small into 2 rooms. Do I need to construct a vocal booth for isolating the singer from the rest of the band when recording a full band or is there another way around this? I can DI the instruments (and re recorded will amps later) but I am concerned with the bleed from the drums into the vocal mic.
Thanks Stuart, your comments are very much appreciated. I have added the following below:
I have now decided to keep the roof as it is for the time being anywayYou mean the OSB will be removed, and replaced with corrugated fiberglass sheeting? Or the OSB will stay there, and the fiberglass will go on top?Quote: ROOF – Flat roof with 2 layers of OBS covered by Felt. Soon to be replaced by a fibreglass roof. Joints are approximately 6 inches deep
Thanks Stuart, So the best solution for walls for my project would be: [SINGLE BRICK WALL] – [AIR GAP] - [STUD WALL WITH 100MM ROCKWOOL RW3] –[2 LAYERS OF DRYWALL attached to inside of wall I have read that the following will be even better for walls - Please see link. Is this the case as I know many companies suggestions are not always correct http://soundstop.co.uk/solutions/wall_s ... rofing.php Kind regards CraigThere's no point to screwing the drywall to the brick. Drywall weighs about 600 to 700 kg/m3. Brick is about 2000 to 2500. Assuming your brick wall is a "standard" 100mm (4") thick, that makes the surface density of your brick roughly 220 kg/m2. The surface density of a sheet of drywall is about 11.8 kg/m2: So adding two sheets essentially dos nothing: it increases the mass of the wall by less than 10%. Seeing that you need to at least double the mass to get a worthwhile difference in isolation, you'd need to put twenty layers of drywall on there, ... If you leave out the two layers of drywall attached to the brick, and just do the stud frame with another two layers on it, that would be the second best option of your three, and is actually the one I would recommend.Quote: b. [SINGLE BRICK WALL WITH 2 LAYERS OF DRY WALL SCREWED DIRECTLY TO WALL] – [AIR GAP] - [STUD WALL WITH 100MM ROCKWOOL RW3] –[2 LAYERS OF DRYWALL (AKA PLASTERBOARD)] -
It will work, at about the same level of isolation, but will cost you a lot more to build... :) And strangely enough, they just happen to sell the non-essential expensive parts! Isn't that an amazing coincidence? :? :roll: It works like this: you need to decouple the drywall of your "inner-leaf" from the existing brick wall, which is your "outer leaf". There are several ways you can do that: if you already have studs that are attached to or touching the outer leaf, then you can use resilient channel ("resilient bar") across those to decouple. If you don't have any stud framing there, then you can put up your own stud framing in such a way that it does NOT touch the existing structure, in which case it is fully decoupled. That's what they are showing in the diagram, since there's a gap between the brick and the studs. In that case, the framing is already decoupled, so you DO NOT NEED the resilient channel as well! It gains you nothing at all. Decoupled is decoupled. Doing it twice is pointless. Well, it's pointless acoustically, but I'm sure it has a point for the people who make it and sell it to you, even though you don't need it... :) Then there's the famous "acoustic plasterboard", which curiously turns out to be rather more expensive than plain old ordinary fire-rated drywall. It weighs about the same, but costs more. Trouble is, sound waves have very poor eyesight, and cannot read the price tag, so they really don't care how much you pay for your mass. They simply react to the number of kilograms per square meter of wall that that the hit, regardless of how much it cost to put each kilogram there. They aren't snobbish: they wont' stop any better if each kg was bought in an expensive, high-class store, or in your local back-street building supplier. They really don't care in the least about any of that: they just care about mass. The equations for calculating how well a wall isolates don't even have any place for plugging in the price tag, or the address of the seller: The only term that matters is "M", which stands for mass. In other words, just buy the cheapest mass that will do the job (excuse the rant! :) ). In most places around the world, the cheapest mass is 16mm drywall, or OSB, or MDF, or plywood, or fibercement. So take a look at how much each of those costs, and how much each weighs, then buy the one that gives you the most weight for the least money. I promise you, the sound waves will not know the difference! (But your bank manager will, and he'll be a lot happier with "cheap" than "hype"! :) ).I have read that the following will be even better for walls -
Very, very true! In this case, it's not really incorrect: it will work as shown. In fact, they give some good advice in the explanation that accompanies the diagram, so clearly they do know what they are talking about, and what they show will work. The only question is "Can you get the same result for less money?", and the answer to that is "You bet!". :) - Stuart -Is this the case as I know many companies suggestions are not always correct
HI Guys,
I'm literally weeks away from finally starting this. Can U just check that my STUD wall design is correct? I am hoping to start the stud walls next week. I currently have an existing booth within the garage so i am only completing part of the garage for the time being, until i have enough funds to complete the lot.
I have attached drawings which should give you an idea.
Can i just confirm that the drywall only needs to be on the inside of the stud wall as per diagram 6. Obliviously i don't want to put the stud walls up to find out that i need to put them on both sides. I have seem loads of photos of construction on here where there is drywall on both side of the stud wall
Thanks
Craig
Looks good to me, overall. Basic concept is fine. What I would change is the "front" wall, outside leaf: you mention just one layer of OSB on that, but since your other outside walls are brick, you need to get the mass on that front wall much higher. I would suggest setting the studs far enough back that you can get two or even three layers of 3/4" OSB on that front outer wall, to build up the mass. Also, you mention attaching the inner-leaf stud frame to both the exiting floor and existing ceiling, but if you want to maximize isolation then you should not attach them to the existing joists at all! Rather, you should leave them a bit short of those joists, then build your new inner-leaf ceiling on top of those walls, so you have a true "room in a room". And finally, you could substitute thick OSB for your first layer of drywall on the inner-leaf walls. It is almost as dense as drywall, but much stronger, so it makes the wall structurally much tougher.Can U just check that my STUD wall design is correct?
Right! Only on ONE side of the studs. Either the far side (facing the brick) or the side facing the room. But NOT both sides.Can i just confirm that the drywall only needs to be on the inside of the stud wall as per diagram 6.
Right, but those were not photos of STUDIO walls, designed for sound isolation. Those were just ordinary house walls. For studio walls, you need to separate the two "sides" of the wall, in order to get the high levels of isolation. Having said all that, it is very important that you must check all the above with our local building codes and inspectors first! There might be legal reasons why you can't do it exactly as above, and might need to modify some things. So don't build anything until you confirm that you are allowed to build this way where you live. - Stuart -I have seem loads of photos of construction on here where there is drywall on both side of the stud wall
Hi Guys,
Ok, I think I have most things covered but need to check a few things. Can I please check which ceiling solution would be best for my ceiling and a few other points? Just to recap:
• Project is for my use only and not for commercial use. Max isolation required is to isolate a rock drum kit (110 db approx)
• The garage is a single garage brick wall. This is a detached garage at least 10 feet from the nearest property. There is nothing above the garage so there will be no impact noise from above with the exception of Rain.
• Metal Garage door has been removed and replace with 3 layers of 18mm OSB (outside wall only) filled with 100mm ROCKWOOL RWA45
• Stud walls are now up and are 2 inches away from the brick walls and the new garage OSB door. These do not touch any of the walls or the new OSB garage door. Stud walls will be filled with 100mm Rockwool RWA45 and covered with 2 layers of 15mm plaster board (drywall) on the inside only
• The stud walls are connected to the ceiling joists as height restrictions prevents me from creating an independent ceiling (and cost to increase ceiling height is not an option)
• The roof is as follows:
Felt covered
2 layers 12mm of OSB on the outside
Joists (16 inches off centre and are 5 inches in depth X 2 in width (2x5's) These will be filled with 100mm Rockwool RAW45
Proposed Ceiling option 1
• Joists filled with 100mm Rockwool RWA45
• Resilient bars and genie clips
• 1 layer of 12mm plasterboard (drywall). I not sure the joists will support 2 layers of drywall with resilient bars?
Proposed Ceiling option 2
• Joists filled with 100mm Rockwool RWA45
• 2 layers of 12mm plasterboard with green glue in-between the layers.
Proposed Ceiling option 3
• Joists filled with 100mm Rockwool RWA45
• 2 layers of 15mm OSB with green glue in-between the layers.
• I have been luckily enough to get some free 15mm OSB so I am thinking this would be structurally better on the ceiling?
I have a few questions
1. Will my walls benefit a lot by adding green glue between the 2 layers of plasterboard (drywall)? Is the cost really worth it? Green glue on the walls will only be one tube per sheet of drywall not 2 tubes due to cost.
2. Do I need to put a vapour barrier over the rockwool before I add the 2 layers of plasterboard (drywall)?
3. OSB or Drywall for the ceiling? Is OSB structurally better?
3. Which ceiling option is the best?
4. If one layer of plasterboard on the ceiling for option 1 is not enough, do you think my joists and resilient bars/genie clips will support 2 layers?
5. Do you think my joists will support the 2 layers of drywall in option 2?
6. If the proposed ceiling plan is no good, can you recommend a different one, bearing in mind - The stud walls are connect to the ceiling joists as height restrictions (and cost to increase ceiling height is not an option) prevents me from creating an independent ceiling.
7. Does anyone know how I can calculate load bearing of the ceiling?
8. I am able to add more ceiling joists if this is needed as I can attach them to the walls using ceiling joist hangers if this helps?
I appreciate no one can really give me weight loading advise, but the carpenter who did my stud walls does think the joists will easily hold 2 layers of plasterboard so I just want another option without having to call an engineer (if this is possible).
Kind Regards
Craig
Sorry to bump but hoping to start this asap
thanks
Glad you did bump it, Craig! Your thread had fallen off my radar... :oops:
Ahh, but that's only one side of the equation: That says how loud you are, but you also need to know how quiet you have to be: That might be either a legal issue (local noise regulations) or a family/neighbor issue: how much can they stand before they call the cops on you, or throw rotten eggs at you! So you do need to figure out that number too, then subtract it from your 110 dB high: the result is your isolation goal.Max isolation required is to isolate a rock drum kit (110 db approx)
Excellent! That should do the job nicely. Is that well sealed to the surrounding walls? All the gaps and cracks must be filled with either proper acoustic caulk or good quality non-hardening bathroom/kitchen caulk. You'd be surprised how important it is to seal everything air-tight: Even tiny cracks matter. If air can get through, then so can sound...• Metal Garage door has been removed and replace with 3 layers of 18mm OSB (outside wall only) filled with 100mm ROCKWOOL RWA45
Perfect! One thing you could do to improve the structural integrity of the wall, is to replace the first layer of drywall with OSB or plywood: That makes the wall a lot stronger (especially in sheer), and also goves you the added benefit of having a good nailing surface all around the room for hanging your acoustic treatment later on: you no longer need to go hunting for the studs in order to hang something, since you'll have the wood right there, at all locations, just behind the drywall. So do the first layer as 18mm ply or OSB, then the second layer as drywall.• Stud walls are now up and are 2 inches away from the brick walls and the new garage OSB door. These do not touch any of the walls or the new OSB garage door. Stud walls will be filled with 100mm Rockwool RWA45 and covered with 2 layers of 15mm plaster board (drywall) on the inside only
Then you have a major problem: you have directly connected your inside leaf to your outside leaf, creating massive flanking paths and basically eliminating all the advantage you gained by building a separate frame in the first place. And if you don't put up a ceiling there, then you might as well not bother building the walls either! I don't understand the comment about not having enough height to do a proper ceiling: in your original post you showed a ceiling hung on RC, so clearly you DO have the height. Why is it not possible to use the two common techniques for low joists? Is there a reason why you cannot do an ordinary inside-out ceiling, or alternatively interleave the new joists between the existing joists? In both cases, your new ceiling would end up at the same height as one hung from RC, and with the added advantage of being fully decoupled.• The stud walls are connected to the ceiling joists as height restrictions prevents me from creating an independent ceiling (and cost to increase ceiling height is not an option)
12mm drywall is no use for isolation: It is too thin, too flexible, the mass is too low, and the resonant characteristics are too high. You need at least 15mm, and preferably something even thicker, if you can get it. The only person who can tell you if you can hang anything at all from those joists, is a qualified structural engineer. There are many factors that go into determining how much weight a joist can handle, and you may or may not already be close to the live load limit, or the dead load limit, for that floor. A structural engineer can tell you, since he will go to your place, look at the structure, measure things, calculate things, and come up with valid answers. When it comes to structural issues, guessing is never an option. The few hundred dollars that the engineer will charge you is money very well spent: It's a lot cheaper than paying a doctor to pick a 2x6 beam out of your skull! :)• 1 layer of 12mm plasterboard (drywall). I not sure the joists will support 2 layers of drywall with resilient bars?
Once again, the 12mm is just too thin, but the GG is a great idea!• 2 layers of 12mm plasterboard with green glue in-between the layers.
Yup, that's the best way to do it, but not as option 1, or 2, or 3. Rather, as option 4 (inside out ceiling attached only to the independent inner-leaf wall frames (which are no longer attached to the joists above: only to the new joists). Or as option 5: conventional ceiling but with the new joists interleaved between teh existing joists, and attached only to the independent inner-leaf wall frames (which are no longer attached to the joists above: only to the new joists).• 2 layers of 15mm OSB with green glue in-between the layers.
Yes your walls will benefit, provided that you decouple the new framing from the existing joists (if not, then there won't be any real benefit). Yes it is worth it, if you need high levels of isolation for low frequencies, such as drums, bass guitar, keyboards, low end of electric guitars, etc.1. Will my walls benefit a lot by adding green glue between the 2 layers of plasterboard (drywall)? Is the cost really worth it? Green glue on the walls will only be one tube per sheet of drywall not 2 tubes due to cost.
Perhaps. Check your local building code to find out for sure, and also to find out where in the sequence it needs to go: always against the warmer wall.2. Do I need to put a vapour barrier over the rockwool before I add the 2 layers of plasterboard (drywall)?
Here to you could do one layer of OSB and one of drywall. Yes, OSB is much better structurally, plus you'd get that benefit of the nailing surface.3. OSB or Drywall for the ceiling? Is OSB structurally better?
Probably number 5... :) That's what I'd do, if that were my space. But if there's too much op there to be able to interleave, then option 4 would be my seconds choice.3. Which ceiling option is the best?
See my comment above: only a qualified structural engineer can answer that.4. If one layer of plasterboard on the ceiling for option 1 is not enough, do you think my joists and resilient bars/genie clips will support 2 layers?
Ditto.5. Do you think my joists will support the 2 layers of drywall in option 2?
My recommendation would be to fix that problem that you have created, and disconnect the walls from the joists. Then build the new inner-leaf ceiling, either as option 4 or option 5, both of which will lead to the exact same final ceiling height. The only other option is number 6: disconnect the framing from the joists, install sway braces to keep the walls both structurally sound and also decoupled, then hang the new ceiling as one of your 3 original options. That would also be your most expensive and most complicated option. But do not: in ALL cases, the inner-leaf wall framing MUST be disconnected from the joists. Not doing that invalidates all of your isolation.6. If the proposed ceiling plan is no good, can you recommend a different one, bearing in mind - The stud walls are connect to the ceiling joists as height restrictions (and cost to increase ceiling height is not an option) prevents me from creating an independent ceiling.
Yes: You pick up your local Yellow Pages directory, turn to the section on Structural Engineers, and hire one to do it for you: :) 8) Do not try to save a few bucks on structural issues! bight the bullet, and hire a qualified guy who knows what he is doing, to do it. This is not an area that you can afford to play around with. Your life depends on it, very literally. Having a few tons of joists and drywall come down on your head is not a laughing matter. Plus, your insurance is most likely invalidated if you don't get an engineer to sign off on it: if you do it yourself and something foes wrong, even if nobody is injured, your insurance company will NOT accept your claim for repairs, and might well choose to cancel the entire policy. And if some is injured (eg, a friend, client, etc.) then you will be 100% responsible for their medical costs, since your insurance won't pay for that either, plus for any damages or other issues that they decide to sue you for. I'm not trying to scare you: just pointing out the facts. If you choose to be your own structural engineer, and are not qualified to do so, you are letting yourself in for some major issues down the line. It is far, far better so spend those few bucks, and make sure what you are doing is safe and legal.7. Does anyone know how I can calculate load bearing of the ceiling?
See above: That might be an option, but only a qualified engineer can tell you where / how many / what dimensions / how to attach them.8. I am able to add more ceiling joists if this is needed as I can attach them to the walls using ceiling joist hangers if this helps?
:) Ask him if he is willing to put that in writing and sign it, accepting all legal and financial responsibility for whatever might happen in the future.... :) That's what an engineer does with his signature: He takes responsibility for that. So if something does ever go wrong, then it's on his head, not yours. And his wallet, too.... Really, seriously, it is false economy to try to save money on structural engineers. He'll charge you a few hundred bucks for the visit, yes, but that is pocket change compared to the liability you are automatically accepting yourself by NOT hiring him. And your peace of mind is worth that much anyway. But do make the most of his fee! Prepare your list of ALL structural questions, and have your drawings and plans entirely ready, so you can pick his brains about everything related to structures. He will also know the local building code (he has to), to you can probably ask him some non.structural questions too...but the carpenter who did my stud walls does think the joists will easily hold 2 layers of plasterboard
While it is possible to build stuff without consulting an engineer, in my opinion, it is never, ever wise or recommendable to do so. There's just too much at stake. - Stuart -I just want another option without having to call an engineer (if this is possible).
That’s for the feedback Stuart, its always appreciated. I will definitely be calling out an engineer to inspect the joists and will not use 12mm plasterboard. Thanks for all the answers to my other questions Not sure if I have misunderstood something here though. In my original post I noted that the ceiling is very low only 6 foot 8 so building an independent ceiling would probably only leave me with about 6 foot in height. This is why I proposed the ceiling hung on RC which I thought was the only way around this? Are we saying that using this method is no good? This is the method I was going to follow: http://www.soundstop.co.uk/solutions/ce ... tion_3.phpThe stud walls are connected to the ceiling joists as height restrictions prevents me from creating an independent ceiling (and cost to increase ceiling height is not an option) Then you have a major problem: you have directly connected your inside leaf to your outside leaf, creating massive flanking paths and basically eliminating all the advantage you gained by building a separate frame in the first place. And if you don't put up a ceiling there, then you might as well not bother building the walls either! I don't understand the comment about not having enough height to do a proper ceiling: in your original post you showed a ceiling hung on RC, so clearly you DO have the height. Why is it not possible to use the two common techniques for low joists? Is there a reason why you cannot do an ordinary inside-out ceiling, or alternatively interleave the new joists between the existing joists? In both cases, your new ceiling would end up at the same height as one hung from RC, and with the added advantage of being fully decoupled.
RC works fine, for medium isolation, but that isn't the issue. The issue is that you are not decoupling the WALL framing from the joists. Unless you do that, you won't get decent isolation. By doing that, you are short-circuiting the inner leaf to the outer leaf, which basically negates any benefit you would gain from building that second leaf. So decoupling your inner-leaf walls from the outer-leaf ceiling is a major issue. The other issue us that you do NOT have to end up with 6 foot ceilings. As I mentioned above, there are other methods for doing ceilings that do not involve losing height. The best is to interleave the new joists between the existing joists, as shown on page 77 of Rod's book, for example, or in several build right here on the forum. If you get lucky, you could have your new ceiling surface within an inch of the bottom of the existing joists like that, and the new joists would still be fully decoupled from the old joists: the inner leaf would be fully independent of the outer leaf, all around. The other method is to build the ceiling "inside out", and there are many examples of people doing that right here on the forum. After all, "inside-out" construction is John's invention! So this forum is the home of the inside-out build... Yes, you'd have the joists to deal with inside the room, but from the acoustical point of view the actual hard surface of the ceiling will still end up just an inch or so below the existing joists. The final option, if you don't like either of those, is to hang your ceiling on RC as you proposed, but still disconnect the new inner-leaf wall framing from the existing joists above you. The safe way to do that is to use acoustic sway braces to provide the structural integrity for the wall tops while still keeping them mechanically and acoustically disconnected from the joists. There are many ways to skin a cat, as the saying goes: you just need to investigate a few more of them, beyond the ones that you have been thinking of so far! :) If you do it right, and your existing joists are 6'8" above the floor, I'm betting you could get the surface of your new ceiling no lower than 6'6"... And once again, it would really help to have photos of the existing room as it is right now, so we can see what you are dealing with, and see which methods are possible and which are not. - Stuart -In my original post I noted that the ceiling is very low only 6 foot 8 so building an independent ceiling would probably only leave me with about 6 foot in height. This is why I proposed the ceiling hung on RC which I thought was the only way around this? Are we saying that using this method is no good?
I should really pay more attention. As much of a hassle it is, I think I will disconnect the 2x4 stud walls from the ceiling and start again. I suppose at least the stud walls are all measured to fit, all I need to do is take a few inches off the height. On the bright side, better that this was discovered before I put any insulation or drywall in hey?
So, what I need to do then is:
1. Take a few inches off the stud walls so none of the timber touches the existing ceiling beams?
2. Attach new ceiling joists to the stud walls. Joists will be interleaved between the current joists but not touching them.
3. Is there a specific joist I should be using for the ceiling i.e 2x6, 2x8 etc? and do they need to be 16 on center, 8 on centre etc
4. As the old joists will be completely filled with rockwool rwa45. How do you prevent the new joists touching the insulation between the exisiting joists or does this not matter?
I'll put a sketchup soon so to ensure I have got this correct
Thanks again Stuart
Right. But the question is "how much?". You need to figure backwards from the size joists you will need (once again, your structural engineer will tell you what size and what spacing you need), and the size of the gap you want to leave between the existing joists and the new drywall, plus the thickness of your top top plates: That tells you how far you need to cut the studs down.I should really pay more attention. As much of a hassle it is, I think I will disconnect the 2x4 stud walls from the ceiling and start again. I suppose at least the stud walls are all measured to fit, all I need to do is take a few inches off the height.
:!: :thu: Right! You got lucky: you'd be surprised the number of folks who come here after their build is pretty much finished, only to find out that they need to take most of it down and re-do it correctly... Some do, and up with great results, others don't, and we never hear from them again: I wonder why... :) If you have a few minutes, it would be VERY instructive to read over the thread of one of the guys who did it right! viewtopic.php?f=2&t=17363 You can avoid some of the pitfalls that caught him out initially, and that he spent so much time and money to fix.On the bright side, better that this was discovered before I put any insulation or drywall in hey?
Right!1. Take a few inches off the stud walls so none of the timber touches the existing ceiling beams?
Right! The common issue here is that there already might be things up there that interfere with that plan, such as piping, HVAC ducts, electrical work, cross-bracing, etc. As long as your joist bays are totally free from all of that, then it is dead easy to do the "interleave". Now, before you do the interleave, you also should consider if you have enough mass on the floor above you: If not, you might need to beef that up with more mass, first.2. Attach new ceiling joists to the stud walls. Joists will be interleaved between the current joists but not touching them.
Yep ! The exact joist size you need is the one that your structural engineer prescribes in his report! :) 8) You can get a rough idea by looking at span tables, but those are only useful if you understand the concepts of dead load, live load, deflection, and the load carrying ability of the different types of wood that joist are available in, in your area...3. Is there a specific joist I should be using for the ceiling i.e 2x6, 2x8 etc? and do they need to be 16 on center, 8 on centre etc
There's no problem with the insulation, as long as it is not jammed in place. Provided that you just place it in normally, so if just fits the gaps without being forced in, then you are fine. Insulation will not flank unless it is compressed a fair amount.4. As the old joists will be completely filled with rockwool rwa45. How do you prevent the new joists touching the insulation between the exisiting joists or does this not matter?
Perfect! :) - Stuart -I'll put a sketchup soon so to ensure I have got this correct
Thanks Stuart
so am I correct in saying this is what yo mean by interleave the new joists. Apologies for the rubbish sketch
I've found this but it looks as if the insulation is weaved between the both joists so not sure if this is correct?
Would it be ok to use 50mm insulation between the existing joists and 100mm between the new ones?
thanks
Perfect! :thu:so am I correct in saying this is what yo mean by interleave the new joists.
Your suspicions are well founded: not so correct. You COULD do it that way: it will still work but your way is better. - Stuart -I've found this but it looks as if the insulation is weaved between the both joists so not sure if this is correct?
awesome.
Last question hopefully. Would it be ok to use 50mm of RWA45 between the existing joists and 100mm between the new ones? Or do i need to use the same mil for both
Put in as much as you can, on both sides. More is better here. You could even consider putting additional insulation in the vertical spaces between the existing joist and the new ones, to fill as much of the gap as possible. The only thing to watch out for is to not compress it much. Compressing it by 10% or so won't do any harm, but compressing it 50% probably will!
But do try to fill as much of the gap as you can, and as much as your local building code allows. The purpose of the insulation is to damp the internal resonances going on inside the cavity, and also to change the way the air behaves as sound moves through it. In effect, by filling the cavity entirely, to sound waves it appears to be 1.4 times BIGGER than it was empty... yup... this whole acoustics thing is not intuitive! Who would have thought that by filling up a gap you make it bigger, not smaller? Sort of like Dr. Who's Tardis (if you happen to be a fan of that series): "It's bigger on the inside!". Yup. :)
- Stuart -
Sorry about another email but I just want to check everything before i go any further. I have now taken the stud walls down, ready to be cut in so i can place a separate ceiling on the studs as discussed earlier. The inner frame will not touch anything. My engineer has advised on 2x7's for the new ceiling 16 oc which he said will hold 2 layers of 15mm plasterboard no problem. Ive added a few more sketchups to address some more issues.
Oh, the joys of ventilation. Like most people, Im struggling with this. I believe I need two baffle boxes with fans. One to bring fresh air in and one to take the air out. Please see diagram baffle boxes. If I'm correct, the air will be taken directly from outside into the internal room, and air taken from the internal room to the outside. I understand that this will ventilate the inner room.
Questions:
1. Do I need to ventilate the void (air gap) between the inner and outerleaf? I'm not sure if i need to drill holes into the brick and cover with normal vents in order for air to circulate this area. Please see diagrams outerleaf ventilation 1 and 2. It seems important to have some sort of air moving around this void (air gap) but it also seems silly to have holes or gaps in the brick work which sound could easily pass though. Or do I just completely seal the outerleaf and hope it will vent itself with the air available to it. This is really confusing me.
2. If I do need to ventilate the air gap (void), can the baffle boxes be placed as per diagram – see diagram “BAFFLE PLACEMENT 1” so there air is taken from inside the garage. Or do I need to just go with “BAFFLE PLACEMENT 2”
You will also see from previous sketches that there is a current vocal booth already build within the garage. This does not touch any of the walls or ceiling but will be attached to the new frame. You can see from the diagram that there is a area all the way around the vocal booth which I intend to use for small storage. I can walk around this section so its about 2 feet gap all the way around.
3. For access to this area, do i need to build 2 doors as per diagram “doors” or will one suffice. Not sure if building 2 doors will then create a tripple leaf.
4. Can you have a look at my baffle boxes? I’ve seen many on this site which are in the ceiling but I will need to have mine in the walls as there is no room above. I have yet to find any that go through a brick wall so I need to check:
• The placement of the baffle – do I place this directly through both walls and attached it to the brick wall? See Baffle 1. This way seems to re-couple the inner and outerleaf which is obviously bad. Or is Baffle 2 better? Or are both of these rubbish?
• Is any of these fans the correct sort of thing? Please see links
http://www.amazon.co.uk/Manrose-100mm-Standard-Mixed-Flow/dp/B005J3334I/ref=cm_cr_pr_product_top
http://www.ebay.co.uk/itm/HYDROPONICS-6-150mm-VENTS-TT-2-SPEED-INLINE-DUCT-TUBE-INTAKE-EXTRACTOR-FAN-/281117624171?pt=UK_Baby_Baby_Feeding_Bottle_Warmers_Coolers_LE&hash=item4173ea876b
http://www.charlieshydro.co.uk/store/Vents-150mm-6--2-speed-fan-396.html
http://www.justfans.co.uk/silent-acoustic-inline-mixed-flow-duct-fan-tdsilent-p-197.html
and is the placement of the fan correct and can this be used for both intake and out take? I’m assuming I can just turn the fan to suit the air direction?
• I intend to use this ducting. Is this correct?
http://www.ebay.co.uk/itm/FLEXIBLE-ACOUSTIC-INSULATED-DUCTING-Hydroponics-Heat-Recovery-6-150mm-x-10m-/261219773670?pt=UK_Baby_Baby_Feeding_Bottle_Warmers_Coolers_LE&var=&hash=item3cd1e96ce6
• Lastly, the vocal booth will is currently ventilated so I do not need to run any air in there (using a very basic design, but does the job very well).
Many thanks
Craig
My eyes are aching from all those neon-bright colors!!! :)
Can I suggest that you download SketchUp and use that for your studio design? It's free, is fairly easy to use, and is a very powerful, useful tool for designing studios. (And the colors don't zap your eyes! :) )
2x7's? That's an unusual size: I didn't even know you could get such a dimension. Joists normally come in 2x6, 2x8, 2x10, 2x12 etc. Is that a special order, or can you get that anywhere in the UK? I wish I could get that here: it would save on waste from trimming down larger sizes...My engineer has advised on 2x7's for the new ceiling 16 oc which he said will hold 2 layers of 15mm plasterboard no problem. Ive added a few more sketchups to address some more issues.
Here's some encouragement for you: the more you learn about HVAC, the WORSE it gets! Each tom you think you are finally getting somewhere, and you can see light at the end of the duct... errr .. I mean tunnel, you look up one more minor little reference and find yourself blown all the way back at square one, with a whole new bunch of stuff that you have to learn and never even knew existed! :)Oh, the joys of ventilation. Like most people, Im struggling with this.
You can probably get by with just one fan: When the door is closed, the room basically becomes an air-tight sealed system except for the HVAC ducts, so placing one fan at any point will force air through the entire system. I usually put the fan on the exhaust box, outside the outer leaf, so it is sucking air through the system. But you could also put it on the supply box, outside the outer leaf, blowing air in. The most important point is to size the ducts and silencers correctly for the volume and speed of air that you need to move, estimate the static pressure of the system, then find a fan that is able to move the right amount of air for that static pressure. Also, for high levels of isolation, you probably need a silencer on EACH leaf for EACH vent: In other words, one box on the outer leaf and another on the inner leaf for the supply vent, and ditto for the exhaust vent.I believe I need two baffle boxes with fans. One to bring fresh air in and one to take the air out.
Right.the air will be taken directly from outside into the internal room, and air taken from the internal room to the outside.
No. That is a "dead" space between the two leaves. Since both of the leaves are sealed absolutely airtight, there's no need to ventilate it. That said, there still might be a need to install a vapor barrier: consult your local building code on that.1. Do I need to ventilate the void (air gap) between the inner and outerleaf?
That would destroy your air-tight seal on the outer leaf, and therefore would destroy your isolation.I'm not sure if i need to drill holes into the brick and cover with normal vents in order for air to circulate this area.
Why? It's an empty space, sealed off from both the outside world and from the studio interior. It is no (conceptually) from a typical stud wall with drywall on each side. You don't need to drill holes in that to ventilate it, so why would you need to drill holes in an MSM wall?It seems important to have some sort of air moving around this void (air gap)
You seal BOTH leaves hermetically, not just the outer leaf. Airtight seals are critical to isolation, and both leaves must be absolutely air-tight, not even a tiny crack or pinhole anywhere.Or do I just completely seal the outerleaf and hope it will vent itself with the air available to it.
You don't and cannot ventilate the air gap, so neither of those diagrams is correct. Assuming you need high levels of isolation, you would put one silencer box inside the inner-leaf, another silencer box outside the outer-leaf, cut the holes for the ducts, and couple them across the gap with a flexible coupler, NOT a solid coupler: There can be no solid connections across that gap at all: not a single nail, screw, wire or duct. Everything must be resilient, flexible, and calculated carefully to not cause any flanking between the two leaves. If you do not need such a high level of isolation then you can probably get by with just one silencer box per duct, in which case it can go either inside the inner-leaf or outside the outer-leaf, whichever works out better, but you still need the flexible coupling across the gap.2. If I do need to ventilate the air gap (void), can the baffle boxes be placed as per diagram – see diagram “BAFFLE PLACEMENT 1” so there air is taken from inside the garage. Or do I need to just go with “BAFFLE PLACEMENT 2”
So that booth is not going to be decoupled from the inner leaf? That's fine, as long as it is not connected to the outer leaf anywhere, provided that you understand that it will not have much isolation from the room. If it is just for storage, that's fine, but it would not be very useful as an isolation booth.there is a current vocal booth already build within the garage. This does not touch any of the walls or ceiling but will be attached to the new frame. You can see from the diagram that there is a area all the way around the vocal booth which I intend to use for small storage.
Seems like a lot of wasted space! There must be some way you could put that to better use?I can walk around this section so its about 2 feet gap all the way around.
One door is fine, since it is part of the inner-leaf and therefore not isolated from the room. The only real purpose of that door is aesthetics: to hide the stuff you are storing.3. For access to this area, do i need to build 2 doors as per diagram “doors” or will one suffice.
This might help: viewtopic.php?f=2&t=15430&start=45 viewtopic.php?f=2&t=1929&start=74 viewtopic.php?t=8425&start=2 viewtopic.php?f=1&t=11542&start=5 viewtopic.php?f=2&t=9761&start=0 viewtopic.php?f=2&t=11485&start=98 viewtopic.php?f=2&t=11508&start=157 viewtopic.php?f=2&t=13821 viewtopic.php?f=1&t=15378&start=44 viewtopic.php?f=2&t=18202&start=164. Can you have a look at my baffle boxes? I’ve seen many on this site which are in the ceiling but I will need to have mine in the walls as there is no room above. I have yet to find any that go through a brick wall so I need to check:
Hard to say, since it doesn't even give the most basic data that you need to know!!!! Such as how much air it can move (normally measured in cubic feet per minute), and what static pressure it can operate at (measured in inches of water) while moving that much air. You can't guess here: you need to do the math. You need to figure out your room volume, how many room changes per hour you need, what that works out to in air volume (how many cubic feet per minute do you need to move through the room), what size duct you need to move that amount of air at the correct speed (slower than 300 feet per minute), how long your total duct length will be (including silencer boxes), what static pressure that length of duct will present to the fan, and based on all of that you can then find the right fan that can move the amount of air you need against the static pressure you will have. It is REALLY important to get this math right!Is the fan I am using the correct sort of thing? Please see link
What you show is an in-line fan, that is placed in the middle of a duct someplace. That's fine, but don't forget that you will need access to that fan, in case it needs cleaning, repairing or replacing, so you cannot have it inside your wall! Also, if it is inside the wall, or placed in line BEFORE the silencer, then you will hear fan noise coming back down the duct. It might be better to use a fan on the far end of the exhaust duct, on the other side of the silencer.and is the placement of the fan correct and can this be used for both intake and out take? I’m assuming I can just turn the fan to suit the air direction?
Perhaps, perhaps not. You HAVE to do the math to figure it out. And flex duct will NEVER give you the nominal flow in the real-world, since it is practically impossible to install it such that the full interior diameter is maintained throughout the entire length: You normally need to go up at least one size, and often two sizes, to get it right. So if you calculations say that you need 6" duct, for example, then you should use at least 8" duct, and even better would be 10" duct. Flex duct is not to be trusted, unlike rigid duct.• I intend to use this ducting. Is this correct?
How is it ventilated? That is very likely an issue here. Whatever you are using to ventilate it right now must, by definition, cross over the air gap between your new inner-leaf and the outer leaf. So that will need to be fixed too: if it is rigid, it will need to be decoupled, and if it does not already have silencers on it, then it will need silencers, just like the ventilation for the new room. - Stuart -Lastly, the vocal booth will is currently ventilated so I do not need to run any air in there (using a very basic design, but does the job very well).
Thanks again Stuart
Yes, 2x5, 2x7 and 2x9 are standard in the UK as well as 2x4, 2x6, 2x82x7's? That's an unusual size: I didn't even know you could get such a dimension. Joists normally come in 2x6, 2x8, 2x10, 2x12 etc. Is that a special order, or can you get that anywhere in the UK? I wish I could get that here: it would save on waste from trimming down larger sizes...
Its mainly due to cost, i simply cannot afford to soundproof the whole garage and as its only for personal use, I dont really need it any bigger Thanks for the links to the baffles, awesome I've just noticed an issues with the current vocal booth. I presumed it was only touching the concrete slab and nothing else. However, the roof of this is pitched and one section of it is slightly touching the existing garage joists. 1. Is this a major concern? If yes, would It be better for me to Essentially, use the vocal booth as a stand alone stud wall as per new sketchups? 2. So the vocal booth and stud walls attached to them become the outer leaf and the inner leaf remains completely decoupled from it? 3. If this is the way to do it, how would the stud walls walls attached to the vocal booth need to be constructed? would it be as per diagram "walls" and 4. Is the vapor barrier in the correct place? 5. Also, does the joists section above the vocal booth need to be filled with rock wool? See diagram new walls 2 the area highlighted in red? thanksSeems like a lot of wasted space! There must be some way you could put that to better use?
Really sorry to bump so early but I was hoping to order my timber for the weekend?
Apoligies