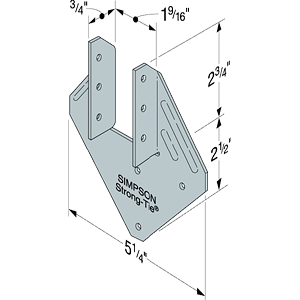
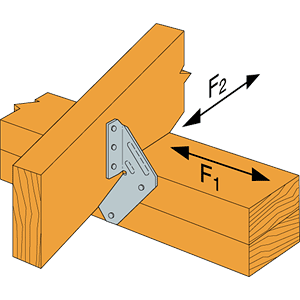
Ceiling Corner, outer leaf details:Problem is the existing wall between my family room and studio only has one single top plate. There is a gap which varies from 1 1/4" to 1" between bottom chord of truss above to top plate. There is a 2"x 3/4" (actual dimension) furring strip just shoved in place on the family room side attached to bottom chord of truss which family room ceiling is attached to. It just overlaps the top plate and is not parallel with top plate, it varies from not being over the top plate at all to a 1/2" overlap.
The pics below should describe better then my above words. :roll:
Also notice the top of concrete block wall I removed. I am planning to correct this uneven top of wall with grout filled all the way to new drywall ceiling. :twisted:
Funny thing about this wall having only one top plate, it's where my electric service panel used to be. I choose to move panel to another wall in the garage which had 4 horizontal 2x4's in the top of the wall, a couple on there side. :roll:
Does my solution look OK? :oops:
Also see the brace pics. Again I'm going around the entire perimeter of outer ceiling installing these cause I've removed all the furring strips from ceiling and want to keep bottom chord of truss in place and more importantly so I can shove backer rod and caulk all in and around these corners to get a good seal. Part of the reason is also to allows truss and wall movement and have a flexible seal all around and have new walls cause no uplift on truss.
Think I'm on track with this? Maybe over kill? :twisted:
I may or may not add the ceiling corner bracing above the family room/studio wall shown in below pic and drawing... but on this walls corner detail I think there is less of a need.
Marc :twisted:
Keith,
Yup I could do it that way, a little bit easier.
I still got to fill 3 or 4 badly cut, ragged edged holes in the that single top plate where all electric service panel wires used to be. Thinking behind getting drywall above the top plate is to help seal the holes.
The inner leaf wall near this corner will be an angle wall. So at the far end I'll have room for the extra drywall on side of the top plate. BUT on the other end where this 2x4 top plate comes closer to the inner leaf wall the distance decreases. I will be grabbing every inch of space I can for the room... I'll have to carefully think this out and see if I can plan inner ceiling 2x6 joist to stay out of the way of the drywall... OR just figure it out another way.
This is a detail I'm going to "think" about for a while.
Forgot to mention using some compressed Rock-wool in any gap/void I'll end up... as suggested by Rod in many parts of his book.
Marc
AAAAAAAAAAAAAHHHHHHHHHHHHHHHHHH
I got to submit yet another revision to my plan, and Lenny or Peter has to redraw (or more like Delete stuff) again.
Now remember I'm building a storage room (to code), getting final inspection then converting to studio... and this SUCKS.
In reviewing NEC, I found that a storage room only needs one outlet and one light with switch. My current plan has one light with switch and 4 outlets. To minimize waste and cause as little damage (like drilling holes through top plates) I want to remove 3 of the outlets and install the one outlet at the light switch.
Current plan has all exterior walls insulated and all walls covered with drywall on the inside, which of course I do not want to do. APPARENTLY the inpsection proccess has changed in my area from the time the drawing was made and Lenny and I talked all this through... before I would have had only 2 inspections and I would be done, the drywall would not have to have gone up. I'm not sure of the changes BUT now inspections I still have are insulation, electrical and drywall screw.
SO, the redraw will remove the outlets, remove insulation and drywall from exterior walls AND have insulation and drywall on the one walls of this room that is adjacent to house, required by code becuase house has AIR.
Fortunately this will not be a time delay for me as I have so much other work to do. The redraw and approval should not take longer the the amount of work I have to do.
Marc
Bummer... If it had just been an outlet thing, I'd think you'd be better off just doing the work and undoing it later... But drywall too? Yeah, go with amending the plan. :roll:
--Keith :mrgreen:
YES,
AND I wrote that last post before I went to see Peter with the list of what I think are simple deletions and he said "I need to charge you something for this revision by Lenny". He must have seen steam starting to come off me as I started with "would you like to argue this out... I clearly explained and argued my intentions with Lenny from the start" not to mention part of Lenny's deal was they the price I paid takes them with me till the final inspection. Peter backed off pretty quick, did not rebuttal... and that I found disappointing. :twisted:
This final screw up pretty well makes a perfect score for Lenny who for designing a simple storage room screwed up: the drawing itself, footer/slab, header/exist truss above, 2x4 wall assembly (missed braces gave wrong direction for straps and ties), placement of walls, the drywall on ceiling, electric, insulation and drywall on walls. The only things he did not screw up: my house did not fall down when I removed the CB wall and he got the design for exterior sheathing to stucco correct.
SO I can't wait for my final inspection for I will then be able to write a letter to Lenny and Peter, outline all this stuff with the goal of making them feel like the morons they sure present themselves as.
Marc
Update,
Progress has been painstakingly slow. Xmas decorating house has been time consuming. Sometimes I've only been able to work less then a hour in one day on room.
All corner bracing in ceiling for outer leaf, has been installed.
Bracing down center of room in ceiling joists/truss installed.
Ceiling is ready for drywall.
Revision has passed, still needs to be picked up.
Some of electric mess from moving panel is cleaned up, still have more mess to clean up.
Have purchased all I need to complete electric for "storage room".
Returned and got refund on a bunch of stuff I did not end up using. :D
I'm refining design of my single room, here are some ideas should anyone care to comment before I draw and post:
1. Use the space between walls from making inner wall 6 degrees off from outer to make a very small machine closet between my walls for computer and other noise makers, to live in. I would have to run Air ducts to and from this closet.
2. Run extra 2nd set computer control cables (monitor, keyboard, mouse & headphone jack) through conduit (or install and empty conduit raceway) from new studio room to my family room. This way I could leave, lets say a vocalist in the room and have limited control to record them from family room using voice communication, no visual. I would monitor from headphones in the other room which is not set at all to sound good. I would have no access to physical knobs on gear just on computer screen. Anybody think that's a bad idea?
3. I've been trying to gain more room with my ceiling design.
- I was planning on 2x6 rafters resting on new inner walls, drywall attached below.
- Was thinking to maybe make the ceiling inside out, mount drywall in joist bays and would leave 2" in bay for ceiling clouds.
- BUT now I'm thinking to maybe use one double 2x8 beam across the middle of my room and use 2x4 joist. This would be similar to Eric, orangenumerik ceiling. My room is not that big, max allowable 2x4 joist span is 7'3". I'll only need 7'2" or less to make it across to front and back of room. This would alter the direction of joists (from the 2x6's) so I have to modify somehow to let air duct run into room. And the perfect solution is to angle the front half of ceiling 6 degrees or more, making the room for ducts.
This would take care of a few things. :D
I know all 3 above maybe easier to understand if I draw a pic, and YES I am working on it. Will post later.
Marc
Wooooot? we're even gonna spam within existing threads now? Darn....
Yup "they've" been doing that for a while. 1st hit for my thread and I'm disappointed, it's not a well designed trick download virus or spy-ware it's just spam for "make your D%^" bigger. At least they got a doc on the website to verify results :roll:
I made some progress tonight. I rewired/split an existing circuit to separate my living room from family room, so that Home Theatre equipment and the family room computers are on different circuits. Still got some easy work/clean up to do electric wise: secure a few boxes, shorten some cables and staple a few things down.
Creating that new circuit though took me 5 hours (3 trips into attic) and was the last larger electrical task I wanted to get done before/as I run wire into room.
Thing is, when I get the electric inspection for the simple storage room I am permitted to build, I am going to point the inspector to my work adding new circuits and cleaning up the mess the electricians who moved my panel left. The inspector could fail me on wiring having nothing to do with the room, and if I did something wrong then yes I'll gladly fail the inspection and fix it.
Marc
PROGRESS,
Finally got some work done on my room. Plan was to get some work done around Christmas because I had a few open days, almost a vacation from paying gigs BUT, family stuff, new baby & Christmas prep/tear down/set up new gifts got in the way...
See my house lights here: Happy holidays to all
Got a lot new tools/toys, I walked around Sears & HD tool section with my cell phone camera and sent the pics to my wife :D . Most useful things:
- Safety glasses LED flashlight built in... great for crawling through my attic,
- Drill holster for tool belt.
- Work table with clamp
- Roller Stand
Oh yeah, progress:
- Cleaned up rest of electrical mess from moving electric panel
- Did a couple of "other home repair" things done in attic which I wanted to get done before installing stucco.
- Installed electric for storage room (which will be removed after final inspection of storage room :twisted: ) one outlet, one switch and one light ready for rough inspection.
- Made a trip to Lowes to purchase Lath with building paper attached, corner lath and other Lath stuff
- Got 25% of the lath installed.
I'll take some pics of the lath once it's all up. It's kinda of nice seeing the white Tyvek disappear, but then again I got used to it and the Tyvek looked kinda nice all by itself.
Regarding a thought from last post:
1. Use the space between walls from making inner wall 6 degrees off from outer to make a very small machine closet between my walls for computer and other noise makers, to live in. I would have to run Air ducts to and from this closet.
I've tried to design this with an access door to closet out of the way of a desk and a speaker soffit wall and come to conclusion it's to much of a PITA to even try. Maybe in a bigger room someone could try it.
My double 2x8 beam and short 2x4 joist ceiling design is working out. Still haven't finished the sketchup, but will post.
And side notes:
- Just upgraded to Windows Explorer 7, I tried the Beta last year and really did not like it BUT the actual version is really good, like it a lot and keeping it. Love tabs and the better view of everything.
- I am in the market for a new smart phone I got a Nokia 6200 with Symbian OS. Been doing a lot of research. Today Apple introduced the IPhone OMG WOW, that thing is the bomb... go to apple.com and check out the Iphone intro video... I am going to wait until it's released in June to upgrade, even told my wife I will not get any other not needed toys until then. :D
Marc
regarding IE7 - better, but it's still too stupid to actually remember passwords even when you tell it "yess, please remember my password" - so I'm still using Firefox. Hope Vista is more of an improvement on XP than IE7 was on IE6 :cry:
Congrats on your "stick-to-it-iveness", Marc - you're a beacon to us all... Steve
What kinda work table and roller stand didja get? Got pix??!?
Steve, see attached pics.
Here's the Roller Stand
Couldn't find a link for the table with clamp but it was $100.
I've not used either table or roller stand yet, in fact they are still in the box.
Also got a Hydraulic Seat and had to put it together :D
BTW Steve while you're looking...
I am planning on sloping the front half of my single room (TR & CR) ceiling, from the front up to the middle similar to orangenumerik I'm planning to use same type of beam accross width of room.
You said on that page
I would do at least a 1:10 sloped HARD inner ceiling up to the cross-beam, leaving ceiling height at full behind the beam
1:10 would be 6 degrees. BUT basic rule of "splay" of parallel surfaces should be 12 degrees off. I know John has suggested this many times as well as others like Kendale.
Is there a reason you said only 6 degrees (1:10) instead of 12 degrees (1:5 slope). Or should I just pay more attention to the words "at least" in your statement.
:D
Marc
Marc, it's hard to be sure why I said something a couple hours ago, much less months :?
But after re-reading thru eric's thread I think the main reason I recommended at least 6 degrees would have been lack of ceiling height - I tend to get claustrophobic in low ceilinged rooms. Also, I may have ass-u-me'd that Eric would still be using a cloud over the mix position :oops:
Other reasons why this would pose less of a problem than in a live room (yes, I know you're doing a single-room setup)
In a live room, typically several tracks are recorded at different times and then mixed down to a final stereo or surround mix, then (hopefully) mastered.
It's not uncommon for people to stop treating the LR when they can't hear any "rainbarrel" effect when clapping hands in the room - all that's happened at that point is that flutter has been reduced to the point where it's no longer obvious to the ear using that test - it doesn't mean that flutter is GONE, just reduced in level.
Now, if you record 10-15 tracks in that room at different times, each track will have some flutter component that, by itself, isn't audible - until you MIX them together, that is... :cry:
This is part of why a dedicated live room needs to have even less flutter (and other bad things) than a CR - in a dedicated CR, you usually aren't recording but listening. So there's no build-up to worry about; if you can't hear it, you can't hear it.
In a single-room setup, for optimum results you need some flexibility/tuning options in order to get the best of both worlds - for one thing, if you have anywhere near enough headroom at least the section of ceiling from the front to maybe 2 feet behind your head should be a full 12 degree slope upward to the rear - if there's room, the entire room should be that way.
If necessary, putting a peak just behind your head and then sloping back down to the rear is semi-acceptable - but within 2-3 feet of that peak, a cloud will be needed to avoid "focussing" caused by the convex at the peak - but if you don't have the headroom to continue the ceiling's upward slope, this would be better than a flat level ceiling.
Because of the multiple use required of a single room, it's more important that you do as much of the acoustic tuning with shape as possible (rather than with absorption) - this way, you can build movable absorbers to re-tune the room for each purpose - more live for recording, deader for mixdowns. One way of accomplishing part of this is a mounting method for wall absorbers I drew a few years ago -
http://www.johnlsayers.com/phpBB2/download.php?id=1391
I don't remember what your available headroom is, but if possible I'd recommend that you shoot for the full 12 degrees up to at least a couple feet behind the mix position, then if there isn't enough headroom to continue that slope bring it back down in the rear at the same angle - I'd also go for some mounting rails around the room, maybe 5 feet off the floor, for movable wall absorbers. I'd build at least 6-8 of these (see the link above for partial detail) and then start listening/measuring the room.
If you use the reverb calculator at the top of the Acoustics forum, this can get you in the ball park for how much absorption you'll need to get the room to "live" specs - shoot for around 0.4 seconds or slightly less.
Once you're there, make whatever notes/marks, etc, necessary to repeat that - this will be "recording" mode for the room.
Recalculate the RT/absorption requirements to reduce the room to under 0.3 seconds, and start adding treatments (extra wall panels, maybe a ceiling-mounted "poly" that, when hinged at one side could be dropped down to expose the rear, absorbent side) - when you get things to a relatively even .2-.3 seconds across the spectrum, take pix/make notes/make marks, whatever - this will be your mix setup.
In case it's not been mentioned lately, the reason you want shorter RT in a mix situation is so you won't hear reverb in the mix that "isn't there" - IOW, the CR needs to be drier than the LR or you may mistake the live characteristic of the CR for something that's actually "on tape", and end up making a drier mix than you thought/wanted.
Disclaimer - no, this is NOT as easy as I make it sound - but it IS what you should shoot for... Steve
Hi Marc & Steve
Well, i though i'd jump in. This topic obviously caught my attention. I slopped my ceiling as to Steve recomendation knowing that 6 degres is a bare minimum. See a long time ago i'v asked Steve about the best ceiling angle and his answer was this :
http://www.johnlsayers.com/phpBB2/viewt ... highlight=
Now that being said, let's just see why i did go for a 6 degres ceiling (7degres in reality...). Well it was a matter of space and "feel" of the room. Slopping the ceiling at 15 degres would have set the front height of the CR at 6'6" wich is way too low ( buiding code thing) and at 12 degres it would have been 7'3", i could have use that but..... at 6 degres (what i have now ) the front of the room is at 8'1-1/2" wich is about the height of most ceiling houses these days. Eventhough now the front of the room is at standard height, when one stand in that space you definitely have the impression that the ceiling is only 6' high at the front, wich give the room a small visual feel. Even if the highest point and all the back of the room is 9'3" high. It's hard to describe. Now imagine a front at 7'... Steve would get very claustrophobic in that space :wink: . Even at the height i have now i had a hard time getting use to it, after all i am going to spend long hours in there. This is something that count for me as much as acoustic, for my own sanity.
The other thing was room volume, how to slopped without loosing too much cubic volume. These were my considerations for choosing 6 degres. And as i wrote in my thread even that small angle does make a very noticable acoustic difference.
Now it's your call, but i though you'd like to know before taking a decision.
This won't apply if you have a wide room with a 14' ceiling of course, but i think it is not your case. If you already have only 9' of height or so, be carefull. You might try to hang somehow panels i the air just to give you a feel of the room and see if you can live with it.
My 2 cents
We wanna see the sketchup, we wanna see the sketchup, we wanna see the sketchup.... :)
Steve & Eric
Yup thanks for replies. Sketch up pics coming shortly, my design is basically done I just want to "rethink" it before I post for comments.
Besides angling the ceiling for acoustics, I also have to angle it hard enough to fit an air duct in there and run a ways in between outer and inner leafs of ceiling... at the front (of room) where the greatest AIR space will be... this would be way easier to explain with a pic. I still have to figure out what size duct I am going to use... hence the delay in posting.
I haven't had to much time over the past week to think. Lots of gigs. Had issues at some gigs. Had to quit one regular gig and say by to some friends, not fun. Then I had to cram style learn a show to back a national act.... my brain is fried... I'm on auto pilot for the rest of the week :D
This music biz can sure beat you up sometimes :roll:
Marc
OK time for an update, see pics below:
PIC 1. I got all the lath up... lesson learned is to wear gloves. I have at least 5 cuts on my hands from handling and cutting the metal lath.
But who took the pic with me in it?PIC 2. I had a visit from SHARWARD today. What else would someone want to do on there Disney vacation (on the other side of the country) but go help someone you've met on the internet put Stucco on there new home studio?
Even if the pic below looks like Sharward is posing, he really did work helping me apply the 1st layer (scratch coat) of Stucco, a task neither of had done before. He mixed & applied stucco and even carried a few of the 80lb bags from my van. And a fine mix of stucco he produced carefully adding little water at a time.
Since I was working on the top (more time consuming section) with a smaller trowel Sharward was able to apply at least 1/3 of the stucco (that got put up today) with the bigger brand new trowel. With Sharward working below me I was not able to accidentally drop any stucco on his head. I'm sure Sharward would agree I dropped a lot of Stucco. Sharward was also able to salvage most of the Stucco I dropped.
Never before has someone asked me "do you have any blue tape so I can cover my new shoes so they don't get dirty"... luckily I had an old pair of hard toe sneakers for Sharward to borrow (as well as latex gloves, work gloves, goggles and knee pads) so Sharward could work in a safe fashion (and not ruin new shoes).
Best parts of today was that Sharward was able to participate in a significant transformation of exterior of my room and I made sure he left my house DIRTY!!!!
Lesson learned stucco is a messy job and it's really easy to drop excess amount as you apply it, BTW Sharward (I think dropped much less then I)
OH yes and of course I could not get through the day with out an inspection by Sharwards alter ego "The Permit Nazi" (nicknamed by Knightfly) Apparently I passed as he didn't complain about much.
All pics today are from Sharwards Camera and I'll let him/ expect him to post pics I've not posted as he got a bit creative today with the stucco in wheel barrel.
PIC 3. Shows off my work clothes.
PIC 4. My son explaining something to Sharward and I am positive it went over Sharwards head :lol:
My bottom line report on Sharward:
A great worker.
Very detailed.
A very friendly, courteous and pleasant person to converse with as you work.
Thanks Sharward. :D
Marc
Image not preserved: lath-up.jpg
Image not preserved: obsessive-studio-builders.jpg
Aloha Marc (and Keith)
No wonder Keith hasn't been moderating much, lately. :D
Hey, it's looking good there, Marc. Glad to see you're making progress in spite of your busy schedule.
Keep up the good work, be safe.
Aloha 8)
Hey Marc,
My family will be going on the Disney Cruise in April. We'll get in on a Saturday morning, but don't have to board the ship until 4:00 pm. What'll you have lined up for me and my wife and kids? I'm sure they wouldn't mind at all... :lol:
The work looks great. And, man, that is a *huge* lamp in the shot of you and Sharward.
- Andy
Thanks guys :DRo,
Yes tedious but I'm saving around $600 by not hiring a contractor. Have not made up my mind whether I like stucco or drywall installing better... so far concrete dust wins over drywall dust for taste.
Kendale,
Yup keeping safe, although Keith did mention he would have preferred to have his hard hat :D
My schedule has kinda changed so hopefully I will get a bunch of work done in February.
Bass Rocks,
The Disney ships dock a 15 minute drive from my house AND you will pass within 1/4 mile of my house when driving to the port, my guess is you'll be on one of them Disney bus.
IF my schedule kind of stays the way I want it to till April, AND IF I get to work at my studio room at the pace I want to, I should be really close to being done by then... I will not make any bets on that.
If your that close to me and have some time to kill, depending on your transportation method from airport to boat and your "waiting location" you are welcome to drop by and take a look, maybe even get dirty :twisted: . I'd even pick you up at the port and promise to get you back in time.
AND if you decided to bring the whole family I got enough tools for everyone I always have a project going in my house. :twisted::roll:
Marc
Inner frame drawings done. See below.
Only thing I may do is drop the angle of front half ceiling more so that I can fit air duct perpendicular to those joists.
Marc
Hi Mark !
Getting good with sketchup, nice. If you can do it, placing somekind of ledger board perpendicular to your ceiling rafters at each end ( see graph) this would keep the ceiling acting as a whole, and keep the rafters from curving or twisting over time. Do you intend to use joist hangers where the rafters and central beams meet ?
just some toughts
Eric,
Thanks...
Dang I knew I forgot something, I've been working on that Sketch-up for to long and thought I just better post it.
Yes I do intend to "keep the ceiling acting as a whole, and keep the rafters from curving or twisting over time"
I am planning to use Simpson Strong Tie's H1 Seismic Ties just like Sharward did.
Recovered from web.archive.org — originally hosted at http://www.strongtie.com/graphics/products/large/H.gifRecovered from web.archive.org — originally hosted at http://www.strongtie.com/graphics/products/large/H17.gifAND put some braces perpendicular to the joists to keep them from moving. I am planning to not have room to fit anything above these joists on the back end with only 1" clearance to the outer ceiling above it.
IN the front end where it slopes down I think a ledger board is a great idea. I had dropped the idea of using ledger boards at all because previously I was not going to angle the front of ceiling and would not have room. Thank for bringing that back "in" as it will be a time saver and a slight isolation increase (I think).
AND I did get some PROGRESS TODAY, I got some of the 2nd layer of Stucco up, the outer wall and ran out of time.
Marc
Well, we're back from our Disney/Stucco vacation, safe and sound.
Marc, again, it was great getting sharing stucco moments with you. :P Thanks for the positive and complimentary "bottom line report on Sharward." It's amazing what a car rental and an afternoon of free manual labor will inspire one to write about you. :lol:
My bottom line report on guitardad72:
A meticulous craftsman 8)
A courteous Marlboro man ;-)
Swears like a sailor :P
Honest and direct, yet always tactful :D
Curious, yet not nosey :D
Someone you'd definitely want on your side when the chips are down :mrgreen:
I'd also like to add that his wife is a sweetheart, his baby daughter is precious, and his son is a great kid whose storytelling skills are downright mesmerising -- provided you know the context and/or have a parent nearby to translate. ;-)
Overall, it was the best studio-building experience I've ever had, aside from my own of course. (Let alone the fact that it's the only studio-building experience I've ever had aside from my own. :twisted:)
As Marc hinted, I did have some fun with the stucco mix...
--Keith :mrgreen: