You're too much, Marc! :lol:Wow! Check out the hair on that kid! :) Great photo! :-)
I'm so glad for you that everything went smoothly and that Cami is healthy.
How's mom doing? That C-section is pretty invasive... Mom will be healing for a while, I'm sure... I hope she's not in too much discomfort. :roll:
Now, quit typing and give that lady a hug. :-D
--Keith :mrgreen:
Keith,
Mom is doing well. This time around was 100 times easier then 1st, physically, mentally and financially.
Decided to take a chance in the name of PROGRESS:
I called for inspection tomorrow. Hopefully inspector will show up before I get the call from wife to pick her and Cami up, which depends on the baby doc. Mother in law is coming over to help for a few days. SO hopefully I will be able to go to lumber yard for OSB and house-wrap tomorrow afternoon. Will also have father in law around for a few days to in-list as a grunt worker.
Gee whiz, this must sound horrible BUT my wife is cool with it. Without inspection tomorrow I will not make any progress till Monday, 4 days of downtime. Even if I fail inspection, at least I can fix "what ever" and get a start on some other things.
BTW, my recent loss of regular gigs has almost been made up for with new gigs.
Marc
Congratulations! Not to take the focus off of other exciting news, of course... But I'm sure you're feeling really good about having the framing inspection out of the way so that you can "officially" move forward.
Your wife is very supportive and deserves a huge hug!!!
--Keith :mrgreen:
PROGRESS:
(as well as picking up wife and taking care of important business for the day)
I got OSB sheathing and started installing to exterior.
Price shopping between Lowes, HD and Lumber Yard I found out HD is the only ones who still carry Tyvek (locally) in 3' by 100' rolls, which is all I need. Other wise I'd have to by a 9' by 150' roll which would be way too much. Have to go back to HD for the Tyvek.
I should finish OSB sheathing tomorrow.
Marc
HAPPY TURKEY DAY... to those who celebrate it today.
PROGRESS:
Today I got most of the OSB up. Just have the middle strip left to install. To stuffed and tired from eating to much Turkey to finish. Plus it got dark right after we ate.
Marc
PROGRESS:Now I feel like I am working on a room :D:D
- I got all the OSB sheathing up in about 1 1/2 days of work. See pics. That was a lot of nails. :roll:
- Made HD run and got Tyvek (smallest roll was 3' by 165' I'm going to have way to much), Flashing and all the other stuff to put up 1st layer(s) of vapor barrier. The only other layer of paper with be the black stuff pre-attached to the lath and is required by code for stucco finish over wood sheathing.
- Made decision on which type of flashing I'm using, I got the 9" wide, polyethylene with rubberized asphalt adhesive stuff. Comes on a roll, easy to cut, easy to bend and is meant for the what I am using it for. I got exterior Liquid nails (again recommended) to provide extra adhesive to my little concrete ledge which is not perfectly smooth. I decided to use this instead of galvanized metal flashing because metal would be to hard to bend to the odd shaped area I had. Plus this stuff provides protection from critters such as termites (doubt it's complete protection but some is better than none). This is the bottom seal (or bottom shingle if comparing to roof shingles) for my vapor barrier. Since I had to buy too much I may flash other parts of wall.
- Started to install flashing on non critical area to get the hang of it. Came up with plan using caulk line to get the rest installed correctly. :twisted:
- Before installing flashing I had to start to take care of some of my "off cuts" or small gaps in my OSB. After going through Tyvek install directions, they suggest that gaps larger then 1/8" and especially between dissimilar materials (concrete and non PT wood like sheathing) need to be caulked with backer rod. I got almost all of that done too as I only have a few bad cuts and 2 edges of OSB that meet concrete block walls.
- Got cement board screws to re fasten the edge patio ceiling (made of green board and stucco). This got damaged during demo. I screwed (with no need for pilot holes :D ) right through stucco and green board into the furring strips, which are now properly supported by that new header. It was almost magic watching the ceiling level out. Now I just got to stucco patch over the screws.
I'll take pics as I get the vapor/moisture control system up. :twisted:
Marc
If framing completion was satisfying, I imagine sheathing being done is even more so: :-)
Damn, I'm going to have to get off my ass and get busy on my own project! :lol:
--Keith :mrgreen:
PRoGReSS :D
Following pics show how my exterior will look till I am done banging around on the inside of frame for electric, some demo and brace support for drywall ceiling so that I get a good seal.
- I placed backer rod and caulk in gaps larger than 1/8" (or so) which was mostly where new 2x4 frame walls meet CB walls. This was recommended by Tyvek.
- Then put flashing in all along where frame meets slab. 8)
- Then Tyvek. :twisted:
This stuff is 3' wide (3' in vertical, normal rolls are 9'). It took basically 4 rows to make it to the top on account of the 6" min overlap. The 1st 3 rows took less then and hour with two people (one of the two, ME doing most of the work).
The 4th top row of Tyvek took me almost an entire day because I had to "shingle" it under the existing building paper above. This took several approaches working from either side of the wall to get the best overlap AND lot's of tyvek band-aids/patches. Standing in the room on ladder to work other side was easy. Wrapping the header, tucking both sides of new Tyvek (paper) under old paper (and stucco with lath) took a long time AND a few trips into the attic.
I'm very happy with the way it has turned out so far. Although I've never done this before, found very little direction on internet... I think I got it 95% correct. There are a few areas where I missed less then an inch of wood coverage with paper and in order to fix I would cause more damage. The previous install has lot's of direct contact from stucco to wood, it's lasted for 40 years in the Florida climate and these spots where I missed are near the attic space (non air conditioned) AND this part of the wall very, very rarely gets wet becuase it's right under over hang roof SO I'm not worried about it.
Only thing left for tyvek is to make the final cuts where it meets CB walls AND maybe...
ANYONE with Tyvek experience feel free to respond:?
...wrap some more tyvek tape around areas (especially header, see pic below) to get the paper more "tight" before installing lath with felt paper.
Next up for me is install door with a Grout sub sill as per recommendation by Sandersd, thanks. Then demo the rest of the existing ceiling.
Marc :twisted::twisted::twisted:
:roll::roll::roll::roll:
PrOgrE..,sS
huh,
arh,
F%&^
OK,
Got the ceiling tore down above garage side of new room. See 1st PIC.
See 2nd pic, electric mess left by electricians that I have to clean up. This work passed electrical inspection when I upgraded and moved my panel. This was actually the bigger reason to tear down ceiling. Doing the work needed to secure all those J boxes (non of which have the clamps in the them to secure wire) to something solid & sorting through them all from inside the 1 1/2 foot high attic space was not a pleasant thought. AND of course now with a new outer leaf ceiling I'll be sure it's sealed.
ThE DoOr, F%^& ME
3rd pic. I still have to cut off shims and generally clean up, but the dang thing is in now.
And remember my aggravation with this door comes from not having a level slab in the 1st place... Sharward suggested new level slab... and I let my architect bring me down this route...
OK SO...
I CAAAAAREFULLY thought this through forgetting/not noticing one thing. :oops:
I cleaned etched uneven patio slab under door sub sill area. 8)
Spread some concrete bonding adhesive for grout to stick to concrete. 8)
Mixed the Grout in 5 gallon bucket with drill and 5 gallon paint mixer attachment. Got grout work-ably thick. :lol:
Now STARTS the 25 minute count of working the grout before it hardens. :)
PRE all this I measured and marked all 6 fastening spots on each side of pre hing door jamb and the 3 on top too. Specs call for #8 2 1/2 wood screws, I used that spec of deck screws cause I already have them. :P
I had door lying on work horses ready to go. :D
I packed the under side of door sill with grout completely filling the space. 8)
Also PRE all this I placed a small board as a form on inside of door frame, fastened to bottom plates on either side of door. Had the 2x6 sub-sill I had custom cut on the outside to use as a guide for spreading grout evenly. I pencil marked the inside of door frame and slab in front of door for mark points. 8)
I placed grout into the sub-sill area just a little high of where I wanted it so we would squash it out with the door.. leaving no voids under door sill.
I had my father in law to help, and my 4 year old son was kind of helping too. :wink:
We picked the door up and tilt it into position using the 2x6 sub-sill to rest the outside bottom edge of door. :D
I got on the inside, father in law and son on the outside.
We tilted/lifted door into position and were able to accurately drop it into the grout.
At this point I was very happy... slightly wet grout, door sill full of grout and door was very close to plumb and level. :twisted::twisted:
I plumb the door hinge side 1st, then other side and we are plumb and level. 8)
Install instructions say leave the braces on the door, get it into position, square, plumb etc... then remove braces to open door to check swing and further adjust.
At this point I'm still very happy. :D:D:D
Father in-law pulls braces off the door. 8)
DOOR will not open. :?:?:?:?:oops::oops::oops::cry::cry::cry:
HUH. It's actually kinda funny. :lol: I'm stuck in the room. We can not open the door and banging/hip checking the door is not getting it open.
The grout is drying. :roll:
Turns out there was one F'n screw from jam to door right in between the door knob and dead bolt. Father in law could feel it with screw driver but could not unscrew it without removing part of the door.
So I undid the non hinge side of door and pushed it out a bit. 8)
He needs a better screw driver, goes to garage. :roll::roll::roll::roll:
I need a drink and a smoke. Wife passes me cigarette through door knob hole. To entertain my son and make a memory for him I had my wife get an Ice Tea with straw and stick the straw through the door know hole.
I calmed down a bit. :wink:
Father in-law struggles with screw for at least 5 minutes. :evil::evil:
Door pops open. :roll:
Grout is hard under door and in the 5 gallon bucket. :evil::x:x:x
I had a gap under the door in the grout. Part of leveling the door meant lifting it. :roll:
I then spent an hour stuffing running grout into the hole and making a little ramp on outside of door for my dolly with gear on it. :roll:
OK I told somebody, now I feel better.
Lesson learned: TAKE THE SCREWS OUT OF PRE HUNG DOOR BEFORE INSTALLING. THE BRACES MAY NOT THE ONLY THING HOLDING THE DOOR TO JAMB.
At least now I can lock my tools into my room, which was motivating to install the door... not to mention I am tired of moving the door around finding a storage spot for it.
Next up is general clean up of all the work I just did and then electrical for a storage room, which will get torn out after final inspection BUT hopefull I can install electrical so that I can re-use and not have to much wasted material and work time.
Marc :twisted:
Don't feel bad Marc, I did the same thing, except the screws in my double doors were hidden on the top jamb. I also had to remove the doors to access the screws. :roll:
I used asphaltic roofing cement/sealer instead of grout to seal the threshold.
Looking good, Marc!
Except... The hinges on that door are on the "up" side of the slope... Are you going to be able to open that door all the way without the bottom outside corner of the door coming into contact with the uneven patio slab? If not, I fear you'll damage the door or its seals and/or reduce clearance, since your 32" doorway will only allow about 29" to 30" with the door open at 90 degrees.
For these reasons I think it would have been better to have used a door with the hinges on the right.
If you "luck out" on the outer door and end up being able to open it all the way, you may not be so lucky on the inner door when that time comes.
--Keith :mrgreen:
OK, I won't feel bad. I figure you and I are not the only ones to forget/not see the screws in a pre hung door. But we're probably of the few who choose to place door sill in goopy mess of grout or roof sealer. :roll:sharward
Except... The hinges on that door are on the "up" side of the slope...
YUP, and that's one of the reasons why instead of just raising the low side by 3/4", I raised the high side by 1/2" and low by 1 1/4" minimums. Raising the high side was also so that I would have a min of 1/2" sub sill material underneath entire door sill, the fear being eventual cracking of material either PT wood, or what I choose grout.
Because of the missing the screw holding door to jamb spectacle the sub-sill ended up 3/4" on low side and 1 1/2" on high.
I measured slope of slab with level, took into account the height of bottom of door from door sill pre install, actually when making the PT sub sill. AND the door opens all the way. 8)
If you "luck out" on the outer door and end up being able to open it all the way, you may not be so lucky on the inner door when that time comes.
No luck needed... (hmmm well I am not having the best luck with doors :roll: )
Other door will open the other way. Outer door = right-hand out-swing. Inner door = left-hand in-swing. PLUS the floor will be leveled before inner frame is installed with an undetermined combo of grout or mortar with self leveling concrete.
Marc
Marc,
Excellent progress so far! A question about the door. Is this door accessible from outside the house? If it is, I think the hinges should be inside the room for security reasons. If you are planning to close the space outside the room then it should be ok.
OK, that's good news.
In my project, the door hinges will be on the same side (east) and will open 90 degrees (outer door will open more than 90 but definitely not 180). That's one of the reasons I plan to use 36" doors, as clearance will be reduced by the thickness of the doors themelves.
--Keith :mrgreen:
Marc,
Excellent progress so far! A question about the door. Is this door accessible from outside the house?
YES. The door will be accessible from outside through a new screen door in screen wall which will be located under that 12' long header I put up.
If it is, I think the hinges should be inside the room for security reasons.
Well... thank you for pointing that out...............SH$T. :lol:
I'm gonna have an inner and a outer leaf door so the outer door has to swing out.
Got to figure this out. Screen door in a screen wall will not be secure.
....... OK you got me off my butt to inspect door hinges which appear to be a security type. When door is closed it looks like door could be popped off via hinge pins. But when opening the door the hinges have a lock type thing where they meet when door is closed. Hinge part on the door has a little hook that sticks out, hinge part on the frame has a hole for for the hook. If someone were to pop the pins out of hinges the door would still be held in place via the hook(s) in the hole.
How secure these hinges really are I do not know. I am going to have to explore options of other out swing "security hinges"
Have to also consider another lock on inner door which will be in swing, hinges on inside. BUT the inner door I want to be super door to make up iso loss from my limited choice of outer/exterior door. I don't want a hole in the inner door for a knob, just want a latch and handle.
I'm to tired to figure this out now,
Shaz thanks for pointing that out.
EDIT, ADDITIONAL:
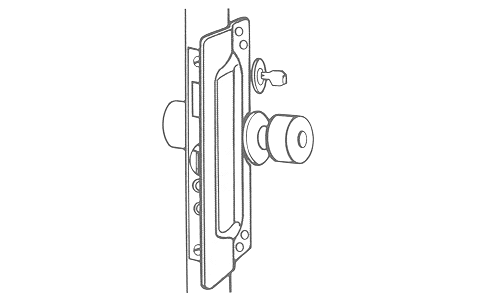
Security Hinge Info (and diagram added below) :D
Satin brass finish. Door hinge is designed to provide security for outswinging exterior doors. Outswing doors are commonly found leading from the home to garage interior. Locking tab feature: Locking tab in 1 leaf of the hinge projects into hole in the other leaf to help prevent unwanted door removal when hinge pin is removed and door is in the closed position. Steel brasstone finish. Maximum door weight: 2 hinges equal 110 lb., 3 hinges equal 165 lb. 1 each per card.
Hey Marc -- if your inner door will swing inward (and I know that it will), and if it will have a lock on it, then you've really got nothing to worry about. :) Someone would have to go to pretty sizable lengths to pull the pins, pry the door off (in spite of the security hinges), and then have to deal with that inner leaf door!
Heck... If someone really wanted to get into that outer door badly enough, they'd just smash out the window! :roll:
The security aspects are definitely worth pointing out (kudos to you, Shaz)... But given the other mitigating circumstances, you should be fine.
For good measure, you might consider adding a latch guard on the outside of the door to protect against the use of a crowbar to pry the door open at the latch...
Recovered from web.archive.org — originally hosted at http://www.chown.com/MrktPics/GIF480/M10024.GIF...but, again, the window is the weakest link, so it might not be a big deal.
--Keith :mrgreen:
Yup... IF they want to get in they will. The inner door will be solid so valuables will be out of sight and inner door may at least look intimidating/to much effort to break down.
I'll end the topic of secure door by posting action shots of door going up, my son looking through the door hole as I had just screwed myself into my room :roll: AND final his shear amusement by situation.
I had just screwed myself into my room :roll: AND final his shear amusement by situation.
Man, that's precious! :lol:
It reminds me of Len's experience, drywalling himself into his vocal booth!
len-morgan wrote:
Take the time to think about how you're going to build. I know, I know, the smell of sawdust and joint compound bekons like a long lost lover but resist the urge! When putting up the last sheet of dry wall across the door way in my vocal booth both my carpenter/electrician helper and I got in there - him to screw it down and me to hold the sheet in place (it has to be raised about 3/4" or so off the ground to meet the ceiling). Don't get ahead of now. As soon as we put in the last screw, he asked me to hand him the Dremel tool to cut out the door opening and I said "What Dremel tool?" I took quite a while with his pocket knife (the only other tool we had besides the drywall screw gun) to cut a big enough hole so I could get out and get the Dremel. Now while you are all ROFLing, at least I didn't paint myself into the corner! Perhaps a better way to do this would have been to put up the door opening FIRST so that we could have just pulled down the insulation and walked between the studs. (Source)
Progress is slow but...
- Installed most of 2x4 bracing around perimeter of outer leaf/ existing ceiling rafters (bottom chord of truss) and walls. A completely tedious task. This is not to support drywall (though it will help) it's to create a corner for backer rod and caulk to sit nice in and get a good seal. I think Dan F had to do something similar.
I got a weird spot I'll post a pic and diagram later this week for opinions.
- Bought a Black & Decker Home Wiring book and downloaded a copy of 2005 NEC. Turns out I did not know as much as I thought I did about wiring. I'm still preparing to wire my room as a storage room... then rip it all out after final inspection BUT trying to figure out how to cause as little damage as possible and waste the least amount of material. I'm going to use armoured 12-2 cable for most of the storage room wiring Also decided to add some dedicated circuits for my house Xmas lights since I'm in an electric mood.
- Done a general clean up from all the work I've done since ripping out the pony wall. Been on a mad dash to in close the room so had to clean up a few piles of mess. I recycled some 40 year old 2x4's and furring strips.
Right now I'm exhausted and dripping in sweat from a trip through the attic to check out possible circuit runs.
Marc
Already got one, have to confirm actual "surprise" and solution then post the concern in appropriate thread.
Concern is recessed lights in a cloud or other DIY acoustic contraption and type of wire used to run lights.
Code is that wire can not be exposed must be behind drywall, in conduit, etc...
Part of recessed light code is that if light fixture has a separate connection box or J box (which is attached to light assembly) then the wire which runs from box to fixture must be armored cable, this is how they come out of package.
Also note armored cable is typically used to make last part of run from wall to a water heater and other spots in a typical house because it bends much easier that rigid conduit.
SO I'm going to suggest that the recommendation for wire type inside a cloud or other DIY contraption should be armoured cable rather than NM (regular) cable. AND care should be taken to use the correct gauge wire to match the rest of circuit lights are connected to.
Marc