Problem is, the more layers of drywall that will be going on the walls (in my case, 3 layers of 5/8", plus 3/4" T&G OSB), where's the starting point of the yardstick?
Maybe I'll use a dot of glow-in-the-dark paint on the baseboards. :twisted: Then I can use my laser level to shot a line up the wall. 8)
--Keith :mrgreen:
Hi Sharward,
I've been thinking more about how you are going to treat this room acoustically. The Superchunks/RFZ/cloud concept is good.
But I think if it were me, I'd do something like this:
1. Once the room is finished, and with superchunks installed on as many corners as you plan to do, but without any additional acoustic treatment installed, I'd experiment with where in your room your drum kit sounds best. Start walking around the room with the floor tom, tuned up, hitting it solidly. It will sound different as you walk through the room. Once you find a sweet spot that you like, drop the floor tom, and set up the rest of the kit around it.
2. Then, I would cover the furthest wall from you with lots of thick absorption.
3. Next, I would build John's angled side wall absorbers and place them along the walls near where the drum kit will be, with the angles facing toward the wall with tons of absorption, so that the reflections will be aimed toward the absorptive end of the room.
4. Lastly, I would cover the wall opposite the absorptive wall with a slot resonator tuned to one of your problematic frequency ranges (should be able to calculate and/or measure this).
This would keep a liveness to the room, but the echoes will tend to settle in the rear of the room where they will be absorbed.
Just an idea.... I also love the look of slot resonators if they are done well, and obviously your attention to detail would make it look really good. That nice woodwork with an acid stained concrete floor... mmmmmm.
Sharward,
John's angled side wall absorbers are basically what Kendale built except Kendales are portable.
Since you are not planning on mixing anything at present in the room, maybe the simplest solution way down the road would be a version of Johns Bedroom plan attached below.
Sharward, got to say though I am disapointed you did not take the splay/acoustics issue to the extent you have of other parts of your room :cry: Since your room is so close in size to mine you might have saved me some work :twisted: ahhh but oh well I've got to get back to my drawing table sooner or later.
Looking forward to more pics.
Marc
Marc! :lol: You crack me up! :D
Hey, I've been thinking a bit about using DOORS on hinges attached to the long walls, absorbant on the back and reflective on the front, which would allow for any combination of square footage clearance, liveness, and/or deadness... :roll: Oh well -- I'll cross this bridge when I get to it! And when I do, I'll definitely post plans and seek y'all's input. :twisted:
--Keith :mrgreen:
Sharward,
As far as marking your stud locations (something I wish I'd paid a little more attention to in my studio), why not put masking tape on the floor (just temporarily). You could also use pencil marks (nice dark ones!)
Then when you put down your baseboard, make sure you put a nail in exactly in the center of the stud (yes, I know you nail into the bottom plate but put the nail in so the center of the stud is right above it. When you go back to putty over the nail heads, use a different color of putty on those nails that indicate stud positions. It shouldn't be too hard to locate those nails later when you need to mount something to the walls.
Alternatively, I found a little "tool" at some hardware store that looks like a small pencil sharpener. There is a little yellow bar mounted in a groove that swivels back and forth and there is a magnet in the end of it. When you run it along a wall, it is laying to one side. As you approach a nail head, then end of the yellow bar starts to stand up. When you are right over the nail, it's standing straight up. This will only work on the last layer of screws and it would be very helpful if you had written down exactly how high the screws are from the floor. You can waste a lot of time "wandering" around the wall trying to find a nail in two axises (sp?). If you know the nail is 6" off the floor, you only have one axis to worry about.
I should note that this little tool is totally worthless for finding nails in the ceiling since it is always hainging straight down.
len
Hey Len,
I may do something very similar to what you're describing. I'm actually thinking of maybe using a tiny brass brad (similar to the kind that come with picture hooks) to mark the baseboards where the studs are located.
Anyway, obviously I'm quite a distance from reaching that point, so we needn't go on about this too much at this point! ;-)
I'm afraid I didn't get a chance to do anything with framing this past weekend. I was helping a friend clear out his apartment on Saturday and I had work-related stuff on Sunday. Hopefully this weekend I'll be back to framing madness! :twisted:
--Keith :mrgreen:
Progress. :) I worked on framing today. I got the fourth inner leaf wall mostly done (jack studs, header, and cripple studs left to do) and all four walls are now attached to each other partially and are mostly plumb. I hope to be done with wall framing tomorrow.
Attaching upper top plates is rather difficult. There's only 12" of clearance up there. There are quite a few claw marks on the ceiling! :oops:
Not bad today, considering the fact that I was working solo. ;)
--Keith :mrgreen:
Hey Kieth, why don't you pre pocket bore the studs and screw the studs to the plate from undernieth. Its real easy. Although you're probably done now. Frankly for studio stuff, I HATE noils. I screw everything. Another thing I use is RECESSED SQUARE HEAD screws. They sell em in bulk at the Ace out in Orangevale...er...they used to. Don't know if they still do. But man, you can drive a #8 right through a 2x4 no prob. Most of the time I drill a pilot hole though. Makes everything pull up really tight.
fitZ
Hey Kieth, why don't you pre pocket bore the studs and screw the studs to the plate from undernieth. Its real easy. Although you're probably done now. Frankly for studio stuff, I HATE noils. I screw everything. Another thing I use is RECESSED SQUARE HEAD screws. They sell em in bulk at the Ace out in Orangevale...er...they used to. Don't know if they still do. But man, you can drive a #8 right through a 2x4 no prob. Most of the time I drill a pilot hole though. Makes everything pull up really tight.
fitZ
fitZ,
remember that Keith is doing this by the book - which means inspections - and the code doesn't allow for screws in framing - only nail schedules.......
Unless the inspector wasbrain dead - he would end up having to nail them afterwards as well - which is sometimes a bi*ch because with too many fasteners things start spliting..........
The only way any inspector (worth his salt) would approve the use of screws would be if it was specially designed / sealed & stamped by a structural engineer - with supporting structural calculations - as an "equivilent alternate design".
Sincerely,
Rod
Really? Hmmm, learn somethin new evera day. :shock: Not to sound irresponsible or argumentive, but I believe the architects who called for screws in ALL our walls for Macys musta been out to lunch when they passed these codes. :?:wink: Well, thanks Rod. I'll remember that. ]
fitZ
Indeed. I had hoped to use screws, but I called my building department before I started framing to find out if it was OK, and they told me it was not permitted. I discussed this back in July, which led to an interesting screws vs. nails discussion.
I must say, fitZ -- I agree -- nailing sucks!! :evil: But, alas, after lots of bent nails (yes, even the 16d common nails were bending on me! :evil:), and some downright unhumanly awkward contortions I had to twist myself into, I present to you all...
Completed inner leaf framed walls!(Only ceiling joists remain...)
Wide angle...
Rod, thanks very much for staying tuned! Knowing you've got my back on all this gives me a lot of peace of mind. :-)
Next week: hopefully I'll get the ceiling josts up, and then I'll be finished with framing -- quite an exciting milestone if I can say so myself! :twisted:
--Keith :mrgreen:
cadesignr,
Screws V.S. Nails in framing varies by local code and whether frame is exterior, interior/partition, load bearing, shear rating etc...
IF you go back a few pages in this thread Keith and others discussed nails VS screws over a few pages of posting. Bottom line: nails are stronger then screws.
Keith is building by the book in California with code for seismic (earth quake) shear.
For my project I have to use nails in exterior walls for wind shear BUT Florida code sates almost nothing for interior walls. Engineer who put stamp on my plan said I could use (deck) scews all I want for interior walls and it will pass inspection, how ever I decided to use nails... that is once Keith pointed it out Nails VS screws to me. 3 years ago the frame under my air handler was made with all screws and it passed inspection.
Keith,
Attaching upper top plates is rather difficult. There's only 12" of clearance up there. There are quite a few claw marks on the ceiling!
That does not sound as bad as the space I had in beetween my air handler and drywall.
Hitting the nails with side of hammer might help. You'll get more swing and less chance of clawing ceiling. Your hammer might not look as pretty when done, but it's a hammer.
Your probably using some clamps to hold those top plates in place. That will help too, especially if you got enough clamps to hold the entire top plate in place to wall and the corner overlap onto other wall.
Marc
Marc, your advice and observations are always welcome, even if you are late. ;)
I did use clamps, by the way, which was helpful in straightening slightly warped 16 foot long 2x4s. I also angled most of the nails by about 15°, which did cut down on the nail bending a bit.
I imagine if the lumber hadn't dried out so much, the nailing would have been much easier.
--Keith :mrgreen:.
In what way? Screw a small piece of stud and plate together with two 3" drywall type screws and try to knock the plate off with a hammer. Now try it with nails :roll: After 40 yrs of building things, I'll NEVER believe nails are stronger. Nails may bend instead of break, but do you know what it takes to break two of these screws? Try knocking a piece of 1/2"plywood off a frame thats nailed. Now try it with 2" screws. Try to nail mdf:lol:
Codes may call for nails in certain circumstances and I'll buy that, but can someone please explain the logic other than time and expense. On second thought I'll go back and read the discussion. Frankly, I was a journeyman millwork builder and installer for many years and NEVER saw a nail used ANYWHERE. Yea, we used large staple guns in some places simply because it was fast but the fastener of choice is screws, because they pull things up WAY tighter than nails. But to each his own. For me its screws...EVEN in framing. At least in my home. "Screw" the code. :lol:
fitZ
Ps. After inspecting the attic in my current home, I saw EVERY rafter, joist etc, with loose joints caused by warping pulling the connection loose from
nails being EASILY pulled by simple twist. I had to SCREW them to pull em up tight. And that ain't the half of it....nails my ass.
From what I have been reading, nails are superior to screws for wood framing. Bear in mind that there are four properties to a nail and screw: shear strength, tensile strength, yield strength, and resistance to pullout. While screws may typically win over nails in regards to pullout, think about the others. . .
The Northridge quake was one of many pivitol points in the evolution of building codes in our state. "Post-quake investigations revealed that some structural specifications did not perform as well as expected. Because of this building codes were revised" (Source).
fitZ, with all due respect, it's been covered already, and while you're certainly entitled to your opinion and position to "screw the codes" (pun intended I'm sure ;-) ), using screws for framing is for the most part not an option for those who choose to comply with the law.
--Keith :mrgreen:
After 40 yrs of building things, I'll NEVER believe nails are stronger.
fitZ,
Then you would be both wrong and right.
The word "stronger" is subjective - and that's what you seem to be missing.
Your hammer test is not reflective of the types of forces that take place in seismic or wind events.
Perhaps you can apply hundreds of pound of force per square inch in a hammer strike - but a seismic event creates insantaneous forces in the thousands of pounds per square inch - and with heavy wind loads the forces are also in the thousands of psi on a building envelope.
Any wood screw that does not require you to first drill a pilot hole (i.e. deck screws, drywall screws, etc.) are made of case hardened steel.
The steel is (by its very nature) extremely brittle – and does not respond well at all to shear forces.
This is one of the reasons that (quite often) if driven into a very dense area of a piece of wood – a case hardened screw will shear off just through the act of being drawn into the wood.
So although (from one perspective) you might be right about a screw being stronger than a nail – with that perspective being ONLY that the screw will handle a much greater load for withdrawal than a nail – you are very VERY wrong in making a general statement of a screw being stronger (in and of itself).
Interestingly you also help – in your last comment – to prove the point of using nails in the fastening of structural members.
You said:
Ps. After inspecting the attic in my current home, I saw EVERY rafter, joist etc, with loose joints caused by warping pulling the connection loose from nails being EASILY pulled by simple twist. I had to SCREW them to pull em up tight. And that ain't the half of it....nails my ass.
And this proves the point exactly………..
Even though the rafters and joist did some twisting as they aged over time – the nails did the job they were designed to do – which is that they held the building together regardless of the fact that the wood was not in a state of constant contact – the shear value of the nail was the only thing stopping a collapse – and it sounds like they did their job well.
It is understood in engineering that structures move constantly – and this is especially true with wood structures.
Not only does a wood structure move with wind and seismic loads……… The wood swells up with every rise in humidity and shrinks when those humidity levels drop.
I’ve seen studs shrink as much a 1/4” in length between the start of a framing project to the end – when the frame is completely closed in.
Screws are not going to stop this from happening – nor are they going to work with it when it does (as you noticed with your nails in your comment above).
Screws won’t stop wood from swelling and contracting – nor will they stop if from twisting during the process (if that is in its nature) – but the head of the screw will tear through the wood when that does happen – which not only weakens the screw – but weakens the wood as well………
There have been years and years of engineering research done on the best ways to go about fastening structural wood members together – and you can’t change that just because you believe “A” to be better than “B”.
Sincerely,
Rod
looking good keith ... your progress is really inspiring me to get my ass in gear on my project. seems like it won't be too long before you're wailing away on the skins. i know, i know, knock on wood and all that :)
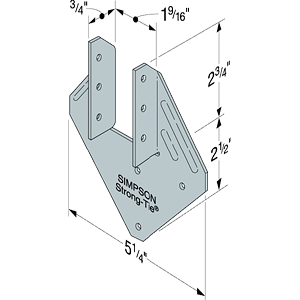
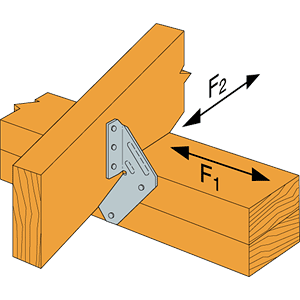
Hey Rod and Steve -- I had planned to use this type of seismic/hurricane tie to fasten my ceiling joists to my top plates...
Recovered from web.archive.org — originally hosted at http://www.strongtie.com/graphics/products/large/H.gifRecovered from web.archive.org — originally hosted at http://www.strongtie.com/graphics/products/large/H17.gifSimpson Strong Tie's H1 Seismic Tie(Note: above illustration shows a notched and angled joist/rafter. Mine will not be notched.)
Note that "H1 can be installed with flanges facing inwards" (Source).
My reason for using these instead of doing conventional ridge boards and end nailing of joists into them is the lack of clearance to toenail the ridge boards. I'd also prefer not to have to toenail the joists to the ridge board.
I can also install blocking between the joists if that would be necessary to keep the joists straight and/or to keep them from flopping over under load. (Credit goes to Steve for raising that concern a long time ago.) Another option would be to run a 2x6 or some kind of strap along the top of the joists.
Here is the framing drawing that I included with my plans to the city, which was approved "as is":
(Note the diamond-shaped connectors where the ceiling joists meet the top plates.)
Any thoughts? :roll:
I'll need to get my hands on the connectors this week if I'm going to do the joists this weekend. Hopefully I can find them locally. (I think I've seen them around.)
--Keith :mrgreen:
Haven't used those (Oregon is just now starting to realize that we're not immune to seismic) but should be fine - unless Rod brings up something that none of us has considered, but seems obvious AFTER he mentions it :wink:
Definitely use blocking tho.
Also, another "too late" tidbit -
http://www.epinions.com/hmgd-Tools-Pneu ... alm_Nailer
One of these came in the box with my last framing nailer, hadn't used one before. I nailed a shelf into the back board with it when there was only about 6" of headroom... Steve
Well, I guess its better to have a glass half full of beer than totally empty, eh Rod. :lol: Unless your in a hurricane. :roll::wink: Ha! Hey Rod, thanks a million for the insight. I may be hardheaded sometimes but at least I get the point when someone explains the logic. And even if it isn't intuitive, like acoustics, once I understand some things, then I learn. Regardless, I still don't like nails. :wink: At least framing nails.
BTW, heres a BLURRY pic of my soffet framing. See anything unusual.? :lol: Thanks again.
And sorry for the subject extension Kieth. I haven't read your WHOLE thread yet. All 73 pages of it.. :shock: for ONE room. :lol:
fitZ
Awesome! 8) Maybe I'll pick up the ties on my way home from work tonight! :twisted:
Thanks again Rod, and Steve! And fitZ. And Marc. And Dan! :)
And fitZ, I see several unusual things about that framing... Some kind of plywood block thingy, an funny angle to the vertical piece, and, uh, strange dimensions of lumber throughout? :roll: Hrmmmm... :?
--Keith :mrgreen: