FINISHED IN 2020! Sharward's Partial Garage Conversion

Started by sharward on 3 January 2005. 1,541 replies, 2005–2020. In the Library under Build diaries. Key posts in this thread.

Originally posted at johnlsayers.com, topic 2921.

Renamed from "BACK IN ACTION IN 2018! Sharward's Partial Garage Conversion" on 2 July 2020... Renamed from "Rehearsal Studio Plan - Partial Garage Conversion - Advice??"... Renamed again from "Sharward's Rehearsal Studio Plan - Partial Garage Conversion" on 27 November 2005... Hoping for some advice. Bought (kind of) new home last Spring w/ very spacious 3-car (tandem) garage, with intent to build a rehearsal studio in rear left corner. I plan to play my drums loud and eventually have band rehearsals/writing sessions in this space. Some amateur recording may occur in the future. Left half of garage is about 38' deep -- about 8' deeper than right side. Width of left side is about 10'. Perimeter of build space is about 10' x 17.5' with no vents, windows, doors, or access panels on the existing walls of that space. When the studio is built, there will still be 20' of clearance on left side to acommodate a vehicle on that side -- two cars will fit side-by-side towards the front of the garage.
External image, not preserved — original: http://sharward.com/studio/fromstreet-small.jpg
External image, not preserved — original: http://sharward.com/studio/fromcorner-small.jpg
External image, not preserved — original: http://sharward.com/studio/fiber-small.jpg
External image, not preserved — original: http://sharward.com/studio/straightwide-small.jpg
Goal: Expecting to generate 110dBA and hope to achieve outside levels of 40dBA, requiring STC of 70. Local noise ordinance requires no greater than 50dBA. Definitely need to stay under legal limit and not disturb neighbors. Nearest neighbor is 10 feet away (their garage is inverse configuration as mine -- about 38' feet deep on right side). We're the "new guys on the block." Challenges: High STC rating required. Limited overall width of space. Very cost conscious (but not "cheap"). Garage door remains intact so cars can come and go (considering replacing door with one of better quality). Existing Construction: Left wall is uninsulated 4" with 5/8" unfinished gypsum on garage side and stucco on exterior side. Existing rear wall is insulated 4" with 5/8 unfinished gypsum on garage side and finished 1/2" or 5/8" textured gypsum on interior side (office). Existing 8' long wall on right is same as rear wall (laundry room). Ceiling is just over 10' high, 5/8 unfinished gypsum on garage side, no insulation -- attic space above. Floor is concrete with expansion joint around entire perimeter of garage. Preliminary Plan (High Level): "Room within a room" w/ 2 doors (one swings out on outer wall, other swings in on inner wall). HVAC: Planning to use ductless system, such as Mitsubishi's Mr. Slim line, exterior unit at back of house, about 30 feet and 3 rooms away from garage. Questions I have Should I plan to rip off the existing gypsum, then insulate those walls, and leave them uncovered (since there will be another set of walls erected alongside of them? (I'm thinking probably so, since I assume I don't want three wall "skins" so relatively close together, due to risk of resonance.) Should I / will I need to invest in an insulated garage door and/or a better quality side access door? These doors are not actually connected to the studio space, but they're might be the last chance to catch sound leakage. Existing doors are cheap quality but servicable. Studio doors -- what should I use? 36" wide preferred. Location of door marked in photos with the fire extinguishers. Anything I can/should do to reinforce the doors (i.e., sand, extra layer of material added to one side, such as plywood, etc.)? I'm really unclear on how to go about ceiling... Should I (a) Partition the "inner" walls all the way to existing ceiling, then string new ceiling joists across the new "inner" walls; or (b) string new ceiling joists across the existing "outer" walls and the newly constructed "outer" walls, then partition the "inner" walls up to the new ceiling; or (c) something else entirely? Whatever the answer to the above question, how do I hang the ceiling and anchor the walls in a decoupled manner? Is the "expansion joint" around the perimeter of the garage sufficient "decoupling" of the floor? Or should I do some kind of floating or raised floor? Sorry I don't have any fancy CAD drawings. I have hand-drafted some designs, but they're no longer valid after all my research. I've learned so much -- lots of it right here too! Looking forward to your comments, questions, and input... Thanks so much!
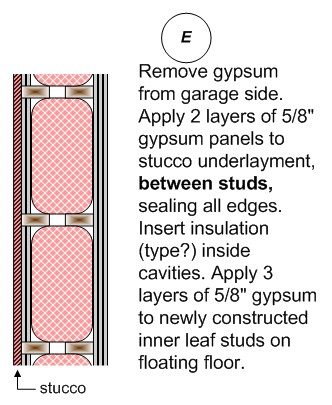
Been trying to catch up on my own life for a few days, and have about 18 posts to answer so I'll have to keep this first one kinda short; First, forget STC - for what you want, low frequency TL will be the deciding factor. This can ONLY be accomplished (especially with your width limitation) by sticking to the "2-leaf" rule, which means removing your inner gypsum from walls, beefing up the outer leaf from the inside, and building a second, independently framed, floated room. At lower frequencies, the threshhold of human hearing is around 55 dBa - so, if you're generating 110 dBa, you'll need about 50 dB MINIMUM TL at 50 hZ - this isn't easy but you can get close by using your removed wallboard as inserts between studs and against your outside sheathing - two layers of 5/8 against the sheathing between studs, CAULKED fully with NO AIR GAPS between outer sheathing or between layers, then fully insulated air space, then insulated inner stud frame, then 3 layers of 5/8 wallboard, will give about 45 dB TL at 50 hZ, which means that sounds around 100 dB will just start to be audible on the outside wall. Ceiling - I need to know EXACTLY (sizes, materials, spans, etc) how your roof is built, including ceiling joists dimensions - you may need to beef up the ceiling joists where they pass over your space, because here again you'll need 3 layers of 5/8 wallboard for your OUTER leaf (I'm assuming your roof is vented, so can't be considered part of the soundproofing - even vented, it will detract a bit from your two FUNCTIONAL leaves so they need to be heavy) Once the outer ceiling leaf is solved, the inner will need to be floated on the inner walls, which need to be resting on a floated floor. If you do a search on floated floors, Aaron's thread (many pages) will come up - see what you can learn about mass, m-a-m resonance, etc, and be prepared to put some $$$ into this part - for your requirements, I wouldn't recommend anything less than 3-1/2" of CONCRETE floated on PT 2x6's over EPDM pucks - you need lots of mass, a wide air gap, and high density rockwool fill under the floor if you're to kill things enough to not alienate the neighbors. Gotta go for now, hope this gets you started... Steve
Thanks, knightfly, for the great feedback. :) The more I learn, the more I discover there is to know! :shock: I will research the attic construction over the next few days, then report back with distance between joists and such. I think (hope? :?) that they're trusses. And, yes, the attic has small vents in the walls where the eaves pass over them. I'll be researching floated floors as you recommended. I admit, this is one of the areas in which I have the least knowledge. :? If anyone else has any ideas, or if you (knightfly) have anything else you'd like to add when you come up for air again, I will be most grateful! :D
I popped my head into the attic today. :roll: The existing garage ceiling consists of fire rated gypsum attached to metal furring channels - unknown what gauge (and I'm predicting you'll need to know that). The furring channels are attached to the joists, which are attached to the bottom chord of roof trusses. The trusses are made of 1.5" x 3.5" lumber and are 24" O.C. (or closer in some spots), while the furring channels are 16" O.C. The trusses run east-west, while the furring channels run north-south. (The front of the house faces north.) I'm guessing that the metal furring channels were used to mitigate likelihood of cracks in the fire rated ceiling. Following are some photos I took in the attic above the garage.
External image, not preserved — original: http://sharward.com/studio/overgarageeast1-small.jpg
Facing east. Distance between trusses is about 24". Distance between furring channels is about 16". Vents are just out of view to left and right. (ENLARGE THIS PHOTO)
External image, not preserved — original: http://sharward.com/studio/overgaragenortheast3-small.jpg
Facing northeast. The bottom of the "Vs" is roughly where I will be constructing my north-south wall(s). (ENLARGE THIS PHOTO)
Recovered from web.archive.org — originally hosted at http://home.surewest.net/sharward/studio/furringstrip-small.jpg
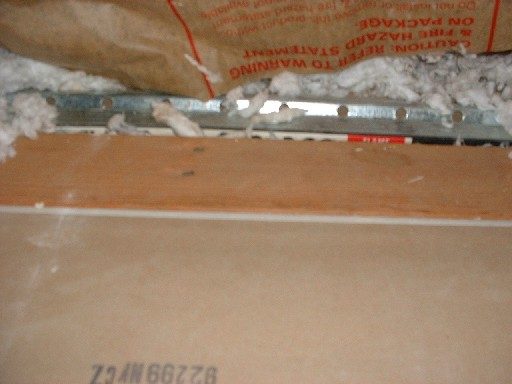
Close-up of metal furring strip. From top to bottom: (1) Underside of fiberglass insulation, which I temporarily lifted to expose the materials. (2) Blown-in insulation, which is throughout the attic above the living space (but not the garage). (3) Metal furring strip to which garage ceiling is attached. (4) Edge of gypsum board - notice the word "flame" is visible in white lettering on red background. (5) Header of wall that separates laundry room from garage. (6) Gypsum ceiling over laundry room -- apparently no furring strips used in this area. (ENLARGE THIS PHOTO)
External image, not preserved — original: http://sharward.com/studio/overgarageroof2-small.jpg
Top cords of roof trusses. (ENLARGE THIS PHOTO) My apologies if I'm incorrect or confusing in any of my terminology... I'm still "learning the lingo." I'll also be happy to provide additional details if needed. While I await your reply (knightfly), I'll continue to read up on floating floors. Many thanks to you and all for the help!
OK, I just finished reading all 21 pages :shock: in Aaron's Floating Floor thread. WOW -- more than a year in the making! I especially studied Aaron's photos of his floor construction. knightfly, you mentioned: "...I wouldn't recommend anything less than 3-1/2" of CONCRETE floated on PT 2x6's over EPDM pucks..." Are there any other options on the table? Although I can afford the headroom, I'm somewhat averse to using so much concrete.
You can go for less mass in a floor, but will lose isolation at lower frequecies when you do; I chose 3-1/2" because it's easy to use 2x4's on edge for the edge forms while pouring this slab on your floating framework - anything you do to lessen the mass, or narrow the air/insulation gap below it (above the garage floor) will negatively affect your isolation. People have had fair success using heavy multi-layer plywood, but these days it's just as expensive and NOT as good as concrete... Steve
Thanks for the clarification on the floor. I'll definitely give it deep consideration. Now, how about that ceiling? I posted some pics (above) and details of my attic space. You rock, Steve! :D
Reading, reading, learning, rereading... I think I know what you (Steve) are going to say. In reviewing the Complete Section - (Temporary "FAQ"), you wrote:
I don't think I would personally feel too comfortable in a room with 3 layers of drywall overhead mounted on ANYBODY's RC - I would personally tend more toward the heavier leaf of a 2-leaf wall or ceiling being mounted solid to the studs, and just putting two layers of 5/8 firecode sheet rock on the RC. It kind of depends on how much isolation you really need, and whether you can MATCH it with your glass, doors, HVAC, flanking noise, etc - if not, it's a moot point at best.
So, I'm thinking that maybe I should put just one additional layer of firecode sheetrock on the existing ceiling (which is mounted to some kind of metal furring strip, as noted in my post above), which is the outer leaf. Then, on my inner leaf, I'm figuring on using 3 layers of 5/8" sheetrock mounted directly onto new joists that will sit on top of the inner walls. And, of course, rockwool insulation sandwiched liberally between the leaves. Bear in mind that I will be able to afford more air space between the ceiling leaves than the wall leaves, so perhaps that will offset some of the lost TL by using less mass in the outer leaf. (Yes?) :? I know: illustrations are due here, and I hope to have some after this coming weekend! In the meantime, perhaps you can comment on this concept so I can know if it's sound (no pun intended). Thanks a million, Steve! :D
Yeah, you're on the right track; no need slappin YOU with a wet noodle... :wink:
At last, some illustrations I'd like to share for your feedback...
garage.jpg
garage.jpg
flooranatomy.jpg
flooranatomy.jpg
ceilinganatomy.jpg
ceilinganatomy.jpg
Continued...
wallanatomy-sw-s.jpg
wallanatomy-nw-n.jpg
wallanatomy-e.jpg
wallanatomy-e.jpg
In addition to feedback on the above illustrations, I'd like to ask about firestopping -- specifically, where the air gap between wall leaves meets the air gap between ceiling leaves. I have reviewed Fire stops in walls can provide both fire resistance and sound isolation on the Canadian IRC Web site, which states:
These findings indicate that, from an acoustics perspective, the best way of satisfying the code requirement for fire stopping is to use a double-stud wall with sufficient insulation so that the width of the air space in the wall is 25 mm or less. This approach does not reduce the effectiveness of the sound isolation of the wall assembly, and can actually improve it if the wall cavity is less than full to begin with.
Does this mean that I just have to ensure that there's no more than a 25 mm gap in this area, and that if there is, to just use more insulation around the outer perimeter of the ceiling? Also, I would like to know, if possible, whether this is likely to satisfy my local building department. (I suppose I should ask them, but I'd like to get an idea of how strong the argument can be if they give me any trouble over it.) Here are the codes that my municipality use:
15.04.060 Adoption of uniform codes. The following publications are adopted by reference and incorporated in this code, except as expressly amended or superseded by the provisions of this code: A. The Uniform Building Code, 1988 Edition, and Chapters 1, Div. 1, 7, 11, 49, 55, and 70 of the appendix thereto, as published by the International Conference of Building Officials (amended by this chapter and Chapter 15.20 of this title). B. The Uniform Plumbing Code, 1988 Edition, including appendices A, C, and D, and the Installation Standards, as published by the International Association of Plumbing and Mechanical Officials (amended by this chapter and Chapter 15.24 of this title). C. The Uniform Mechanical Code, 1988 Edition, including Chapter 21 of Appendix B and Appendix C as published by the International Conference of Building Officials (amended by this chapter and Chapter 15.28 of this title). D. The National Electrical Code, 1990 Edition, as published by the National Fire Protection Association (amended by this chapter and Chapter 15.32 of this title).
Man, first of all I have to say that your drawings are far and above the best drawn, best researched I've seen in the time I've been modding this forum(other than Rick's, and that's his occupation) - I'd probably have a lot more free time if they were all this good, thank you - I'd like to say that you've just won the "best drawings of the year" award - it's an all-expense paid, 1 week vacation for two in beautiful downtown Vallejo... (the SECOND place winner gets TWO weeks... ) :twisted: It's 3:30 AM and I've been at this for the last 9 hours straight, plus I don't want to goof up after giving out all those "atta boys", so I'm gonna have to catch the (few) things I'd change in your plan tomorrow; I know you're anxious, but I'm fighting a cold and need my full 5 hours or I get cranky - I'll try to wrap yours up at breakfast... Steve
So, the floor recommendation is 3 1/2" of concrete. As I mentioned, I'm a little turned off of that idea (but I remain committed to doing it, if that's what it takes). Given that sand is less dense, and therefore, offers less isolation than concrete... I was thinking... What if I built a very beefy floating frame structure, and then instead of pouring concrete over the top of it (or, rather, hiring someone to do it), actually using concrete bricks on it, with dry sand as a gap filler? I would use bricks similar to these, laying on their sides (so they were 3 1/2" tall and 2 1/4" wide). I would also divide the brick layer of the floor into sections about 3' x 3', with 1 1/2" x 3 1/2" lumber dividing each section. Then, one or two layers of OSB or something on top of the bricks. Another advantage to doing this is that if for some critical reason I had to gain access to the floating floor framing structure, I could do so via the top surface without resorting to using a jackhammer and destroying the entire structure in the process -- I would just have to empty one or more 3x3 cavities of all of the bricks and sand, do whatever needed to be done, then restore it all to its original state afterwards. (Granted, it wouldn't be fun, but it's conceivable that it could be done.) Each brick costs about 25¢ at Lowe's and includes 16 7/8" square inches of coverage when turned on its side. Figuring on a 9' x 16' room (32,256 square inches), that's about 1,900 bricks, for about $500 with tax. I also figure I might get a better price and/or delivery if I shopped around. Does the weaker characteristics of the filler sand negate the affect of using the denser bricks? (Is it a "lowest common denominator" thing?) Or would I simply need to do my best to ensure the least amount of sand and the most amount of bricks in the layout? Another twist on the idea is using more fashionable bricks (like, maybe this red clay brick) in the same 3x3 sections, using wet mortar, and then not covering it with OSB afterwards... I think that would look great, but would not afford the same level of access opportunity. I hope y'all don't think I'm trying to "creative" my way around physics and tried-and-true solutions here... Rather, I'm trying to apply what I have learned in a way that is compatible with my skills and budget, respecting all those physics laws we all have no choice but to obey. :wink: I can't fathom doing the concrete work myself, but I can picture myself doing the brick thing all by my lonesome. (Note: Looking forward to feedback in response to previous posts in this thread. :))
ON fire stopping - your local building codes department is your best and easiest source on this. It doesn't matter what the IBC or any other document says, if your local bureaucrat says NO - I would recommend simply printing off the canadian stuff and walking into your local BCD with it, and asking point blank whether they allow this for sound proof construction since it's been proven effective; If they say no, there are other ways of fire blocking without degrading the wall performance - 2 layers of sheet rock fastened only to ONE frame and "sliding" on the other works almost as well. Floor - yes, you can float a "sandbox" instead of a slab, just fill the form created by the 2x4's with your sand, or blocks and sand, top off with sand flush to the top, add floor (2 layers minimum, preferably) and (as you mentioned) you have easier access than using a jackhammer. Can you restate just your (un-answered)questions so I can cut to the chase? Thanks... Steve
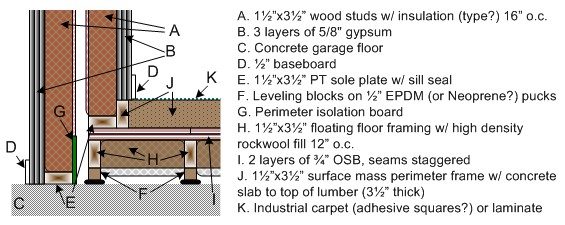
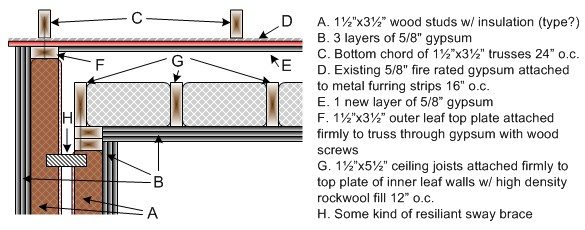
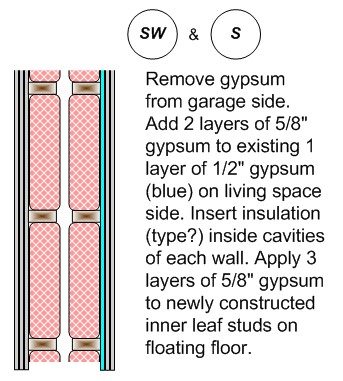
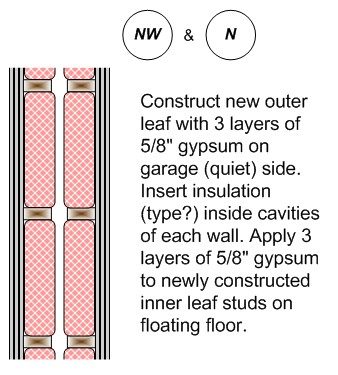
OK, here goes -- three revised illustrations for your review. I've changed some things, beefed up some things, and (hopefully) refined some things. Although not represented in the illustrations, the finished height inside the inner room will be 8 feet, plus or minus an inch or two. (My condolences to those working in basements or garages without the luxury of a 10' foot ceiling like I have in my garage! :() Although it goes against my "sandbox for fairly easy access to framing structure" idea, I'm leaning heavily towards using brick and mortar as both my mass and my finished floor surface, in 3' x 3' sections separated by redwood 2x4s. You'll also notice that the subfloor beneath the bricks and mortar is completely within the walls, making it conceivably easier to cut through the subfloor floor to the framing structure if the need arose. (It's hardly an "easy" method, given the bricks and mortar I'd have to chisel through... But it beats ruining the entire floor -- only one or a few 3x3 sections would need to be sacrificed. Looking forward to your thoughts on these revised illustrationis. Steve, you mentioned you had some ideas to improve upon my old ones, and I'm hoping I read your mind on some of them.
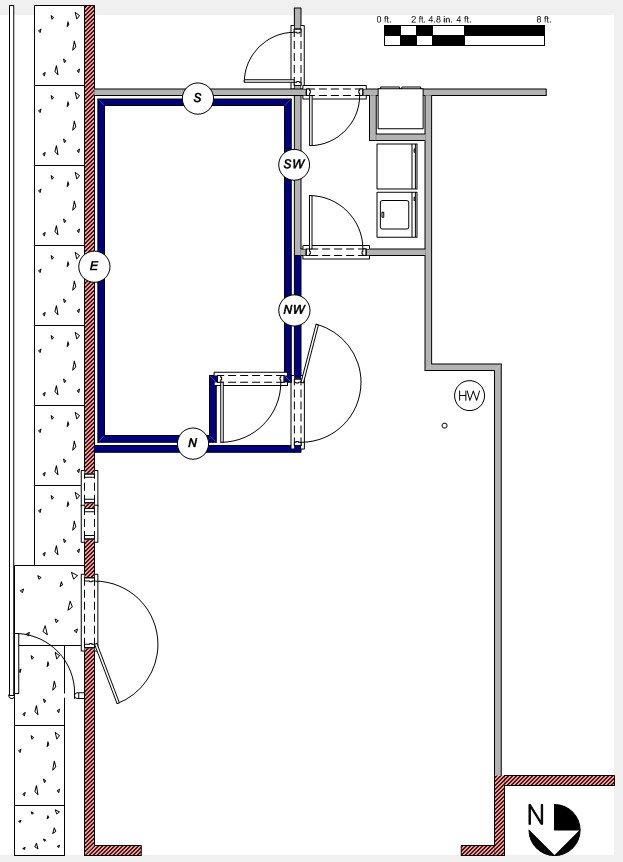
    1st illustration: Anatomy of the walls close up. There's a 3" gap between the wall framing. I decided to cut strips of gypsum to go between studs on all the existing walls, not just the outer wall. This additional work will eliminate my need to add drywall to the living space walls inside the house, including texture, paint, baseboard and casing adjustments, and trimming carpet in one of the rooms. I'm assuming this method is equivalent to that effort; if not, please let me know, and I'll bite the bullet if need be. 2nd illustration: Anatomy of the floating floor structure and the ceiling. I don't think it would be wise to add more than one layer to the existing sheet rock on the outer leaf. Hopefully the 9" gap between leaves is sufficient to make up for this. Biggest change is in the height of the floating floor, using 2x6s and anticipating up to 3 1/2" of leg height, accounting for the slope of the garage floor. 3rd illustration: Updated floorplan. I was trying not to have the door open towards the cars, but for ease of entry and exit, especially when loading/unloading gear, I decided to make it a straight shot. The door swings open in the corner and should miss the front of the car parked on the left side of the garage. Note that the "step" serves as both a split of the 15" hight to the inside room floor surface as well as a sound lock between the doors. Please let me know if this is sufficient, or if I should separate the doors more, or do something else entirely here. I plan to use two solid core 36" doors, the outer door being fire rated to meet code for separation between the garage and living space.
Thanks so much for all your help on this!! :D
Image not preserved: wallsclose.jpg
Image not preserved: wallandceiling.jpg
Image not preserved: floorplan.jpg
Top pic - no changes I can see; for in-wall insulation, the fluffy stuff works about as well as the more expensive kind - if this is used, stay with UN-faced and fill to about 1-1.5" over, then compress with inner wallboard for damping. Where/what is your vapor barrier on the stucco wall? Inner walls - if space will be same temp as house, no vapor barrier needed as there will be no air infiltration without temperature delta. 2nd pic - no changes. 3rd pic - no changes, other than "weakest link" question - is the wider gap due to construction necessities? If not, other walls (and ceiling) will probably negate the extra inch and a quarter. 4th pic - ceiling - how new is this construction, and have your trusses already lifted as much as they are likely to? This is cause to use clips to mount ceiling wallboard to top plates, so trusses can "lift" as they cure - this can be over an inch in some cases, and will crack ceiling wallboard if improperly done. For this reason, paragraph F may be a bad idea. Sway brace - one commercial version - http://www.kineticsnoise.com/arch/kwsb.html Mason industries has others IIRC, or there's the DIY approach in Aaron's thread, about page 16-17. 3 layers wall/ceiling, inside leaf - stagger joints leaving 1/4" gap each time, caulk as you go, so you have a zig-zag joint with multiple caulk seams. Point G - I'd save the rockwool for acoustic treatment inside; unfaced standard fiberglass slightly overfilled will give within 1-2 dB of the same performance at less cost, and the rockwool will be needed for corner killers, etc, inside the room and under the floor. 5th pic - floor detail - have you done a moisture test yet? Tape a piece of plastic against the floor for a day or two, pull it up - if there's a drop of moisture on it, seal the floor. If not, seal it anyway... I would leave the gap between inner and outer door frames porous, so the wall cavities can breath - if you run a dehumidifier, leave the outer door closed and inner one open when not in use. The porous gap between doors will keep from having a high vacuum making the doors hard to open as well as allowing some moisture escape. Guitars and pianos, etc, like a constant humidity of 40-42% - you can get an inexpensice and accurate humidity meter here (most are either expensive or crap) http://www.natlallergy.com/allergy/prod ... eadid/1526 I bought two of these; they read within 1% of each other in the same location, usually exact. Use them to "dial in" the useless knob on your dehumidifier to a REAL 40%... If you can match your walls with good doors/seals, you should be able to have a kick drum at around 95 dB inside before it will be audible outside on a quiet night - hearing threshold @ 50 hZ is around 55 dB, the TL of your walls @ 50 hZ will be roughly 42, with an STC of around 72-75. So even though it might not be a good plan to play death metal at 3 am, I doubt your neighbors will be calling the cops under normal circumstances... Steve
So much to cover, so y'all forgive me for getting a little "quote happy" here. ;-)
knightfly wrote:
Where/what is your vapor barrier on the stucco wall?
I don't know yet. I'll find out when I tear off the existing gypsum off that wall though!
Inner walls - if space will be same temp as house, no vapor barrier needed as there will be no air infiltration without temperature delta.
Define "same temperature." I wasn't planning to run the HVAC in the studio unless it's occupied.
3rd pic - no changes, other than "weakest link" question - is the wider gap due to construction necessities? If not, other walls (and ceiling) will probably negate the extra inch and a quarter.
I'm tweaking the images so that the gap is consistent around the perimeter. Previously, I had planned on going with 6" between frames. However, I'm adjusting it to 11 3/4" between leaves, which means the distance between frames will be either 4 3/4" or 6", depending on whether or not I'm doing the "gypsum strips between studs" trick.
4th pic - ceiling - how new is this construction, and have your trusses already lifted as much as they are likely to? This is cause to use clips to mount ceiling wallboard to top plates, so trusses can "lift" as they cure - this can be over an inch in some cases, and will crack ceiling wallboard if improperly done. For this reason, paragraph F may be a bad idea.
House first sold in March 2000. I actually ran across an article in my framing research about the truss uplift phenomenon. For what it's worth, it rarely gets below freezing in my world, and summers are not humid here. Also, the garage is not heated, and the space between leaves won't be directly temperature controlled. I have a neighbor with the same exact floorplan as mine. He framed a wood shop in the corner of his garage -- almost the same footprint as my studio plan. I can ask him how he did his walls and take a look at them -- that might give us a hint about how much, if at all, we should be concerned about this.
Sway brace - one commercial version - http://www.kineticsnoise.com/arch/kwsb.html Mason industries has others IIRC, or there's the DIY approach in Aaron's thread, about page 16-17.
I saw the illlustrations and later photographs of the DIY brace -- very cool. My situation is a little different in that I need to mount the brace to the opposing wall stud, rather than a ceiling joist like Aaron did. Crazy ass idea: What if I temporarily fastened a horizontal 2x4 to each wall's opposing stud, then made 2 cuts about 7/8" apart, leaving a 7/8" gap (kind of like this: ||= =|| ), then wedged a piece of 1" thick EPDM inside the gap (kind of like this: ||=0=|| )? Then I could wrap the concoction with plastic or tape to keep the wedge from getting loose and dropping out. Do you think that would work without risking turning it into a flanking path?
3 layers wall/ceiling, inside leaf - stagger joints leaving 1/4" gap each time, caulk as you go, so you have a zig-zag joint with multiple caulk seams.
Yeah, I knew you were going to say that. ;) (I've seen illustrations of that on other threads lately, so I know exactly what you're talking about.)
Point G - I'd save the rockwool for acoustic treatment inside; unfaced standard fiberglass slightly overfilled will give within 1-2 dB of the same performance at less cost, and the rockwool will be needed for corner killers, etc, inside the room and under the floor.
Thanks for the tip! You're saving me $ already...
5th pic - floor detail - have you done a moisture test yet? Tape a piece of plastic against the floor for a day or two, pull it up - if there's a drop of moisture on it, seal the floor. If not, seal it anyway...
I haven't yet, but I will. FYI, the blue masking tape on the floor that marks the outer perimeter of the studio space has been stuck on the floor for months, and it's stuck pretty good. (Does that stuff breathe?)
I would leave the gap between inner and outer door frames porous, so the wall cavities can breath - if you run a dehumidifier, leave the outer door closed and inner one open when not in use. The porous gap between doors will keep from having a high vacuum making the doors hard to open as well as allowing some moisture escape.
Excellent idea! How about pegboard as a "fake wall" in the "between doors" area?
Guitars and pianos, etc, like a constant humidity of 40-42% - you can get an inexpensice and accurate humidity meter here (most are either expensive or crap) http://www.natlallergy.com/allergy/prod ... eadid/1526 I bought two of these; they read within 1% of each other in the same location, usually exact. Use them to "dial in" the useless knob on your dehumidifier to a REAL 40%...
Great tip! Thanks...
If you can match your walls with good doors/seals, you should be able to have a kick drum at around 95 dB inside before it will be audible outside on a quiet night - hearing threshold @ 50 hZ is around 55 dB, the TL of your walls @ 50 hZ will be roughly 42, with an STC of around 72-75. So even though it might not be a good plan to play death metal at 3 am, I doubt your neighbors will be calling the cops under normal circumstances...
STC of 72-75! :mrgreen: (I know, STC isn't the be-all-end-all number, but it's bragging rights! ;-) ) How much you think my nudging the inner frames to 11 3/4" will improve the low end TL? Do you think it's worth the precious few inches I can barely afford? (With the adjustment, it looks like the finished room width will be about :shock: :shock: 8' 3" :shock: :shock: not counting treatments. There's also the unpleasant fact of my having the width almost match the height. I'm willing to sacrifice sound quality within the room to achieve higher TL, but I want to make sure I'm not shooting myself in the foot somehow. Thank You Thank You Thank You Thank You Thank You Thank You
In another thread, David (Godskid) wrote:
You know what I really hate (and love) are nights when I am at my whits end having sweated over my plans for hours and I see no hope in sight. Then I post my -- Impossible Problem -- on the fourm here. The next morning I check my mail and our host Mr. Sayers or one of the other Moderators has posted the perfect solution to my impossible problem. it's especially effective with Mr. Sayers posts -with his full color to scale drawings detailing my fix. (Of course followed by his monaker "Cheers" )
Amen to that!!! :D
Updated per above feedback...
Image not preserved: wallandceiling.jpg
Image not preserved: wallsclose.jpg
Sway bracket - maybe this, from Kinetics - These are offset 1-1/2 inches (how convenient; same thickness as a 2x4 :wink: ) You'd just need to offset the inner wall studs by3'" (along the length of the wall plate), then put this between an inner and an outer stud near the top of the wall, probably one every 4 feet or so. Sorta like this... Steve I'll wait til you re-compile your Q's after phone consult for the rest... Steve
Image not preserved: SWAYBRAK-WalApp1.JPG
knightfly wrote:
Sway bracket - maybe this, from Kinetics...
I've checked the Architectural Noise Separation on the Kinetics Web site, but I don't see the product that you described. While I understand the overall concept, I'm not clear on how that contraption will resist tipping towards the outer leaf wall. It looks like it would resist tipping away from the outer leaf wall, but that tipping towards would cause the two pieces to slide apart. What's your impression of my "crazy ass idea"? ;-)
I wrote:
What if I temporarily fastened a horizontal 2x4 to each wall's opposing stud, then made 2 cuts about 7/8" apart, leaving a 7/8" gap (kind of like this: ||= =|| ), then wedged a piece of 1" thick EPDM inside the gap (kind of like this: ||=0=|| )? Then I could wrap the concoction with plastic or tape to keep the wedge from getting loose and dropping out. Do you think that would work without risking turning it into a flanking path?
Beautiful drawings. In "Floating Floor Anatomy" do you have two parallel horizontal vapor barriers ? In Ontario Canada it's against building code to have presure treated lumber indoors. We have to put something between concrete and wood instead ( like thin foam ) because otherwise the wood sucks moisture out of the concrete.
z60611 wrote:
Beautiful drawings.
Aw, shucks! ;) Thanks for the kind words. :)
In "Floating Floor Anatomy" do you have two parallel horizontal vapor barriers ? In Ontario Canada it's against building code to have presure treated lumber indoors. We have to put something between concrete and wood instead ( like thin foam ) because otherwise the wood sucks moisture out of the concrete.
Actually, I believe it's OK in California to use PT lumber indoors. If not then we're in deep sh%* because my house is full of it! ;) Over the summer my wife and I suffered a plumbing disaster due to a defect in a toilet supply line: Half our house got flooded while we were out to dinner! :( I took lots of pictures over the course of the deconstruction/reconstruction, including the attached photo that shows a pressure treated soleplate dividing our living room and my wife's office, taken the night of the flood. Nevertheless, based on Steve's suggestion (above a few posts) and other advice I've received, I'll probably seal the floor before any walls go up. And I'll probably also use PT for the soleplate, just to be extra safe. By the way, the house is all put together now after the flooding, and looks terrific. It even passed a $1,000 mold certification with flying colors. :) We had to live in a hotel for 3 weeks, our animals had to be boarded for 4 weeks, and it took about 8 weeks for everything to be 100% completed, the builder filed a :shock: :shock: $75,000 :shock: :shock: claim against the manufacturer of the defective part, and our homeowners' insurance wasn't ever involved. If that water intrusion hadn't happened, the freakin' studio would have been built by now! :evil: Oh, and on the floating floor, I do plan to use plastic sheeting between the masonry floor and the subfloor it will sit on. I'm planning to use redwood around the perimeter of the masonry and within the field to separate the brickwork into sections. (Redwood is, of course, naturally less prone to decay, and I think it will "fly" with the inspector -- I'll definitely make sure though!) Thanks again for the tip, Z. And I also welcome any/all other feedback, as I'm still very much in the "pencil" stage on this thing.
Image not preserved: ptclose.jpg
Image not preserved: livingroom.jpg
I wrote:
I have a neighbor with the same exact floorplan as mine. He framed a wood shop in the corner of his garage -- almost the same footprint as my studio plan. I can ask him how he did his walls and take a look at them -- that might give us a hint about how much, if at all, we should be concerned about this.
I was able to see my neighbor's wood shop today and talk with him about what he encountered. The north wall he built is just a few inches farther north than mine will be, so he missed the truss when he fastened his top plates. I think he said he secured his top plates directly into the hat channels that run north-south on 16" centers perpendicular to the trusses. Although his taping job was a little worse than average, I did not see any signs of movement where the new wall met his ceiling...... yet..... ;)
Hey Bob, if you put a floated floor on TOP of PT lumber and float WALLS on THAT, isn't the PT stuff technically as "outside" as your sill plates are? Just a thought; haven't seen the actual "language" on that one - it may also be in the IBC, hafta check that when I'm on nights soon, I have the entire IBC and NEC on my laptop just for things like this... Steve