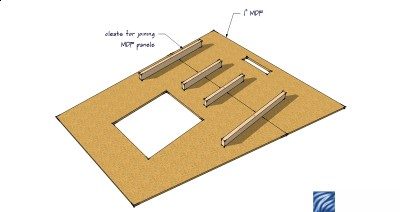
i'd just add additional 2x4 blocking towards the top and use 2 pieces of 1" MDF. use the full width on the bottom of the angled face and the smaller piece up top near the vent. optionally connect them together from behind so the panel cleats sits between the supporting frame members.
i would leave a gap and bead and caulk it. you will need to secure it from tipping and reduce any vibration movement though so consider isolation brackets.
inside the speaker box use 1/2" carpet padding or better Sorbothane and make sure the speaker fits snuggly but is still allowed some flexibility. NOTE: carpet padding - use the heavy polyethylene closed cell type, not the lightweight padding.
Studio Design for New England area
Originally posted at johnlsayers.com, topic 11508.
Thank you so much Glenn!!!!
Glenn, In regards to holding together the soffit, how would I go about using the iso brackets and where? I cant seem to find any links on the subject. Also, would it be a poor idea to mount a piece of drywall over the mdf of the soffit for added mass and a clean seal between the 2 sheets of mdf?
the soffit assembly is actually thought of as a single unit. the next step is to erect it and keep it in place. several options exist: one is the entire assembly is self-supporting, two it's attached securely to the walls and ceiling. in the latter case, you could directly attach it to the walls or using a variety of isolation clips (WIC, RISC, etc) to secure it. first lag bolting the necessary framing members onto the walls and ceiling and then either joining the front portion of the soffit framing directly or via the isolation mounts. if you go the direct route, another consideration is using decoupled anchor bolts to attach them to the walls. using a layer of neoprene or equiv. helps decouple and seal (when necessary).
adding the drywall i think has a similar issue that the MDF has - limited sizes for the sheet material means seams somewhere. maybe several MDF layers with overlapping seams to create (effectively) a single massive panel. gluing together 3x 1/2" MDF with overlapping seams would provide a substantial panel.
Now Glenn, how will this constitute considering I have already put up the drywall, and the floor is still concrete??
You have studs in the wall? You have a drill? Should just take a bit of measuring and planning to make it work. You were going to attach your soffits frames right? :wink:
In all honesty, my first plan that i drew out was a standalone soffit that wasn't coupled to the adjoining walls, and I was just going to backer and caulk the joints to seal them up, but I guess I can give it go, I might have to add more studs of the room to align with the soffit frame itself.
my concern, maybe i have it incorrect, is that if you build out your soffits so they're angled out over the floor in front, the weight needs to be stabilized somehow. maybe you have a different plan to stabilize them?
So This is how far I have gotten. I have my concrete floor, and drywall up. Since the soffit is just an extension of the speaker itself it needs to remain inside the leaf, therefore attaching it to the frame of the room is out of the question. Knowing that the soffit is also angled down, gravity will obviously try to take over and pull the soffit frame down and forward.
So how am I able to produce a soffit stable enough that it wont tip, without being coupled to the frame or drywall?
One thing I was thinking was attaching Iso sills (http://www.acoustiguard.com/Iso-Sill-Isolation-Pad/) to the ceiling drywall, yet I most likely believe this would reduce my isolation. ??????
My idea is to build sort of a skeleton frame that is attached, screwed and glued into the drywall, but adjoining corners would not meet, so the wall could stay decoupled, then, use the iso sills to connect soffit frame to the skeleton frame.??
My other idea would be to construct some sort of concrete weight. Perhaps using 16x8x4 inch concrete blocking I can bolt a support frame into the blocks, pulling the soffit back, and holding it upright. Yet this would keep the sides from being supported.
Just some ideas, any input would be welcomed. I have no idea where to go from here hahaha
the isosills are effectively the decoupled anchors i was referring to in terms of connecting the soffit frame through your drywall and into the supporting frame and floor. the counter weight idea isn't really going to be safe.
Thanks for your quick response Glenn, my concern is if the iso anchors will decrease isolation by being mounted through the drywall? If this is not the case, you are saying I can just secure the soffit frame to the drywall via iso sills and anchors?
i don't think you'll lose out since you're attaching to your isolation frame and any penetrations will be caulked to ensure a seal.
Two Questions:
1st - can/do/should I mud and tape the adjoining edges over the backer rod and caulk: in every corner once my last layer is up? I found this and was assuming it is still valid - http://recording.org/studio-construction-and-acoustics-forum/16158-mud-tape-last-layer-90-degree.html
2nd - I am using sorbothane to decouple my speakers from its box in the soffitts. I know it needs to be compressed 3-20% in order to be effective yet I am not sure on how to determine this factor, does anyone happen to know?
Thanks Everyone!
total load divided by how many isolators used.
100 pound monitor/ 4=25
Things that modify this will be what is the shape of the isolator and what is the Durometer.
They can answer that for you...it's like their job :)
http://www.sorbothane.com/contact-sorbothane.php
Thanks Brien, you're right it is like, their job, I'm gonna call them manana
So I have all the supplies and I'm dying to start on my speaker soffits, let's hope this construction goes smoothly. Just to give a little info on how exactly my construction on these will be, I have included a couple sketchups for review.
-mounting front ported Event Precision ASP 8's
-floor to ceiling height - 8'2"
-listening height 4'
-soffits angled at 5 degrees downward to ear level, pointed at 90 degrees
-the soffit consists of 2 frames, an outer 4x4 frame and an inner 2x4 frame
-iso sills and washers will be used to decouple the frame of the soffit from the room
-fastening the soffit: At given locations a .5" diameter hole will be drilled through the inner 2x4 frame/ an iso washer will be placed in this recessed hole, flush against the 4x4 frame/ the screw will then pass through the recess hole (2x4), through the 4x4 frame, into the iso sill, through the 2 layers of gypsum, and into a newly placed stud on the frame of the room. WHOOO That's like a 6 inch screw!!!
Here's a little more -
PS - seems my previous question might have been overlooked but should we still be mudding and taping the perimeter of the room on our final layer over the backer rod and caulking???? THANKSSSS
"should we still be mudding and taping the perimeter of the room on our final layer over the backer rod and caulking????"
It gives a clean finish that is easier to paint...so yes, please do. You may have to push the backer rod in to at least elevation so as to prevent a bulge or maybe cut it out with a sharp utility knife if it gets really unsightly.
Thanks Brien!!! I just wanted to verify before I go beyond the point of no return. :shock:
Do you or anyone else have any suggestions/critiques/concerns/feedback on my final soffit models on the previous page??? I am also bumping the angle up to 8 degrees.
Soffit Construction starts tommorow so wish me luck!!!!!!!!!!
What do you guys think about this, I was thinking about using the auralex mo pads underneath my monitors inside the box housing them to the soffit. This will help the speaker from sliding out of place, yet reducing some friction to make them easier to push back and forth. I can also set the angle of the pads at 8 degrees and cut the front off to make them flush with the monitor. Just thinking, I'm not sure how well it would isolate the bottom portion of the monitor, but I also am wondering about leaving the gap between the pads, I want a air tight cabinet right??? Bad Idea???????
i would use agglomerated foam, soft rubber, sylomer, sorbathane, etc to get a reasonable snug but decoupled and sealed fit. use a packing strap or heavy string around the monitor to allow you to pull the monitor back out. on the back side of the speaker box - you'll need some opening for the wiring and if its powered, you want ventilation.
Glenn, i did end up getting sorbothane for the monitor, I jus thought the mo pads would be a more useful base, but easier isn't always better :wink:
So I finished the lower inner and outer frames of me soffits, but after 3 days of pulling out my hair, I decided to hire a carpenter to frame me out the top angle portions. I am amazed by how sturdy the Iso Sills/Washers hold the frame so far - hard as a rock :D Anyhow, it will be two weeks until he can get to my project so in the meantime I wanted to ask a few more questions.
I was wondering what is a more best and/or feasible way to add the soffit baffle to the frame
1)
figure 1 - with the baffle flush to the soffit frame and box itself
or
figure 2 - with the box protruding, the baffle against the frame flushing to the box, and the a less than 1/8" bezel surrounding
or perhaps any other methods??
2)
figure 3 - shows my idea on how to ventilate the speakers inside the soffit. I'm thinking about using my left over flex duct and attaching it from the speaker vents to the room outlets in the top of the frame and bottom of the soffit trap. This way air can still circulate behind the speaker without the insulation suffocating the flow. Is this needed or not?
3)
On regards to my soffits and bass traps, I have so much extra pink fluffy insulation, can I use this in replacement of 703, or is rigid insulate the best option?
Slight bump perhaps???
Looks like no response in a while! So let me offer my $0.02Slight bump perhaps???
Personally, I would try to keep the front panel of the speaker flush with the soffit panel. I guess you could put a bezel around it if you want, for decoration, and I doubt that 1/8" is going to make much difference, but I would try to keep the speaker and baffle on the same plane.I was wondering what is a more best and/or feasible way to add the soffit baffle to the frame 1) figure 1 - with the baffle flush to the soffit frame and box itself or figure 2 - with the box protruding, the baffle against the frame flushing to the box, and the a less than 1/8" bezel surrounding
Looks like a good plan to me! All you need is enough cross section to ensure free flow of air past the cooling fins on the rear of the speaker, and that looks like a good way of doing it.2) figure 3 - shows my idea on how to ventilate the speakers inside the soffit. I'm thinking about using my left over flex duct and attaching it from the speaker vents to the room outlets in the top of the frame and bottom of the soffit trap. This way air can still circulate behind the speaker without the insulation suffocating the flow. Is this needed or not?
Pinky fluffy is just fine, IMHO. - Stuart -3) On regards to my soffits and bass traps, I have so much extra pink fluffy insulation, can I use this in replacement of 703, or is rigid insulate the best option?
agreed all around. using approach #1 is better but sometimes if the speaker has a complex face and/or you have a massive soffit face, it's easier to do the bezel.
Good To Hear from you both Stuart and Glenn, and thank your for your input. Currently the soffits are still going up, yet a slight crossroad with a broken saw, held me back today.
I'm am trying to keep the speakers on the same plane as the soffit face, but the soffit panel itself is so massive and hard to keep exact to the speaker cabinet itself. So I think I might have to attach a bezel. On that note, is there a certain size that I should not exceed when it comes to the thickness of the bezel????
I drew up a short little sketch on how the box will line up with the plane of the soffit face, as well as progress pics and what I used to decouple the soffit frame from the leaf itself.