Ok, back in the saddle today... we made some good progress. Finished up the 3rd layer of drywall on the upper ceiling, and got through most of the green board, which is the 2nd layer on the exterior. I also managed to finish up the beef-up wall including a couple putty pads... I couldn't do all of the them because the caulking wasn't dry around the last two.
A word on putty pads. Leave that second piece of paper on as long as you can. That stuff is sticky and hard to get in place with your fingers. And then after you do pull off the 2nd paper, continue to use it to work the pad into where you need it. The paper sticks WAY less than your fingers.
Tomorrow we get a new load of lumber. All the materials for the the inner wall frames and joists. Yee haw! Glad to get back to some framing and away from the caulk gun for a bit. Though, I guess I'm going to need it, as we're going to have to build the inside out walls of the Tracking Room first, and they'll have to be caulked and ready to go before we scoot them into place.
Side note: I've decided to go with mostly Mogami AES cabling throughout. The exception is the long run through the house to the Piano Room (where the Yamaha C3 will reside). This will be rarely used, so I'm going to go with Redco's "house" analog cable, which is made to the same spec as Mogami's cable. Thoughts and opinions?
And now, the pics:
Wow, Stick -- you're really kicking butt!!
Thanks for the tip on the putty pads. Good stuff.
I'll bet you're really digging that drywall hoist, huh? :twisted:
Hey, that makeshift scaffold you're standing on -- it seems there's very little overlap where the board goes over the steps on the ladders. I'm worried that the board could shift or the ladder could wobble and cause the board to collapse. :shock: How about putting the ladders closer to gehter so that the board sticks out past the opposite sides of the ladders from now on? :roll:
--Keith :mrgreen:
Yeah, we're making progress!
Don't worry about the plank thing... there's a lot more hanging over than looks from that photo, and we're on a sidewalk there, so it's very stable. It works really well. Again, using that plank is something I'd never thought of without Jeff, the contractor.
Sorry, Stick -- I'm still not convinced it's safe. ;-)
Maybe some screws or nails driven into the plank half-way, facing down, so that they "catch" the step, would make the plank less likely to slip off the step...?
--Keith :mrgreen:
Well, you'd have to try it first hand to believe me then. :D
The nails are a fine idea, but then moving the plank up and down the rungs is a pain, and storing them in the driveway is a hazard for the kiddos...
Ok, off to stand on a plank. :wink:
Well, I'm afraid of heights, so that wouldn't be a good idea!! :lol: I don't think I could stand up there like that without my knees wobbling like a 7.0 Richter! :shock:
It's all good. After doing the ceiling joists inside up on the same plank, I was enough used to it. I guess now that the green board is up, the last time we'll pull out the planks is to hang the siding on the house. Maybe a low one for screwing in the inner ceiling, though I can reach an 8' ceiling.
Anyway, change of plans. We're going to deal with the unlevel floor before we lay the plates for the new walls. We've got to grind down a couple spots and then pour some self-leveling epoxy stuff. We're going to go get it at lunch and figure out what we need. Probably we'll pour it tomorrow morning.
i guess you're a big boy huh. :wink:
that is a good tip though, making a scaffold ... i can use that technique on my ceiling beef up. that should make it MUCH easier. ... thanks for the idea.
i'm not going that high though :)
Yeah, those planks are not your standard 2x10s, they're micro-lam. Basically really thick plywood. Much stronger than regular lumber. If you are going to try regular lumber be sure it doesn't have knots in it to weaken it, and don't span very far.
Hey Stick! I'm getting progressively closer to adding a layer of drywall to my outer leaf ceiling! 8) It definitely won't be any earlier than the beginning of August though, so there's time. And if I need to wait a little while for my gracioius opportunity to borrow that beautiful drywall lifter of yours, so be it -- I'm flexible! :D
--Keith :mrgreen:
That actually sounds about right... we're framing the inner walls, though we're about to take a week and half off, as I'm out of town. But, when I get back, we'll be finishing the frame, and doing the inner leaf drywall. Though, we're going to drywall each layer, walls and ceiling, and then go to the next layer so we can stagger the joints. But, regardless, all the drywall in there is probably only 5 days or so. Anyway, point is, we ought to be done with the lifter that first week of August or so. (He says optomistically.... :wink: )
Pics tomorrow night hopefully... too tired to do 'em now. We're making good progress, and starting to see the room shapes coming into focus.
Ok, finally back to work this week. First it was a conference down in LA, then 3 days at golf school in Monterey (OH YEAH!), and now back to the grind. Unfortunately, it's BLAZING hot here this week. My cheap thermometer on the house said 106° in the shade this afternoon.
So, I'm a little behind on pics, so I'll try and get some tonight of where we are. The floor is leveled, the inner walls and ceiling are framed, the exterior windows are in, the electrician wired the place up, including the rough for the low voltage cans that will go in the clouds. Yeah, I had to come up with that pretty quick, but I think it's going look cool. See the plan below. We papered the outside today, and ordered the siding. We're waiting now on the HVAC guys to come and put in the cans for the vents into the inner ceiling, and then we'll be ready for our next "rough" inspection. After that, drywall!
It's really cool to see the room shapes and the window frames and all. I think the rooms are going to turn out great. We're now trying to deal with a lot of the finish details. We've picked a great wood floor. We still need to figure out fabric and paint colors, as well as the entire scheme for the bathroom tile and sink and whatnot.
On the clouds and lighting, I decided to go with low voltage halogen spots and an ambient light via some rope light that will go up in the clouds where you can't see it directly. I think the clouds will hang down a couple inches to make room for the light cans, and then we'll use 2 or 3 inch Roxul for the absorbtion. This should have the desired effect of eliminating the ceiling from the reflection equation. So, on the plan below, each different color of dots is a separate switch, so that I can control the amount of light without dimmers. And the rope light will all be on one switch. So, 6 switches in the Control Room and 3 in the Tracking room. Should look pretty cool. These are probably the lights I'll buy: http://www.ylighting.com/model1137.html. We'll just have to leave some space around them so the insulation doesn't come in contact with them.
I guess that's where we are. The cement fiber siding might show up tomorrow, in which case I'll be staining it (110 12' lengths) so we can put it up in the near future. It'll be something between the Redwood and Mahogany color near the bottom of that page.
Pics: The lighting plan... the white sections are the clouds that hang from the ceiling. They'll be a wood frame with Roxul in the middle covered in fabric.
3 layers: That's the inside out wall, but with the layers overlapping so the joint will be staggered.
Before the inside out wall.
After the first inside out wall. It was real fun sliding that thing over. We built it out about 18" from it's final spot and slid it over with a pry bar and some muscle.
The inner wall frame start.
The last pic is a shot I took on our last round at golf school... yeah, yeah, it's a rough life, but someone has to do it.
Nice work on that inside-out wall! 8) That must have been a royal pain. :shock:
Glad to see you back in the saddle... But be careful in this heat. Keep yourself hydrated and try to call a quits earlier in the day through this heatwave.
--Keith :mrgreen:
Not a lot of progress today, but I finally took some pictures to catch you all up to where we are.
Tar paper's on. Did the bathroom step. Caulked the windows.
We spent some time trying to get the siding ordered but ran into problems when the cement-fiber trim seems to be hard to get here for some reason.
That's about it.
Looks like we're going to have a meeting of the NorCal Studio Builders Support Group on Saturday... Sharward and Dan F are going to swing by for a little Stickhouse tour. That'll be fun to put some faces with the building threads.
Day off tomorrow... we're waiting on the HVAC guy to come and put the cans in for the second ceiling, and the hot mop guy to come and do the shower pan. Then we'll slap the exterior door in and have an inspection Friday or Monday. Then we drywall.
Image not preserved: 7-25 windows-low voltage wire.jpg
Looks like we're going to have a meeting of the NorCal Studio Builders Support Group on Saturday... Sharward and Dan F are going to swing by for a little Stickhouse tour. That'll be fun to put some faces with the building threads.
Yeeeeeah! 8) We're really looking forward to seeing your place, Stick -- and our timing couldn't be better, because you'll be just days away from hiding all the beautiful framing work with layers upon layers of drywall! :shock:
I decided to bump the "Northern California Studio Projects Unite" thread that you started in freakin' April of 2005! Remember those days? :lol: Heh! We were just babes then! :lol:
--Keith :mrgreen:
"All good things come to those who wait." -Grandma
"Even better things come to those who are patient and do most of the work themselves!" -Sharward
--Keith :mrgreen:
Hey Stick
I had a question to ask you. (forgive me if it's covered in earlier post by you)
The base on your frames...I notice they're black. Is that some special type of 2x4 wood you used there?
Just curious...may be something to it I need to consider.
Thanx...
The base on your frames...I notice they're black. Is that some special type of 2x4 wood you used there?
It's pressure treated lumber -- it offers some resistance to rotting and wood destroying pests. It's required by code when framing on a slab on grade.
You can see it in my soleplates as well...
It simply AMAZES me the difference in code from state to state...county to county...city to city. I don't believe that's required here because in all the construction I 've seen (even in my area...they're still building) the lumber that's anchored to the basement slab floors are just regular 2x4 studs. Even the NEW construction here is that way...(that is unless the lumber is treated in a way that the "color" doesn't change)
Interesting...
It could very well be that it is pressure treated but just doesn't look the same as the stuff we have here in Northern California. There are sometimes environmental regulations that may prohibit certain kinds of additives for fear that they will be dangerous to humans.
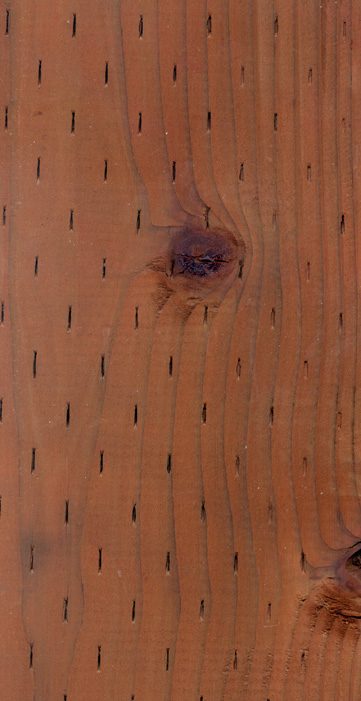
Here's what pressure treated lumber looks like, regardless of color.
Recovered from web.archive.org — originally hosted at http://www.environmentalhomecenter.com/images/products/cba_incised.jpgThere might also be local provisions that allow for the use of naturally rot resistant woods for soleplates, like redwood.
--Keith :mrgreen:
Man...that rotted wood that was outside looks pretty bad Keith! (Via the Pressure Treated Lumber link you gave)
I guess I'll inquire into this (just to be sure). I have a feeling that because I'm inside a house, in a basement, and the fact that I've never seen any "different colored "base" studs" that they'll tell me it's not required. BUT...one of the many things I've learned on here is if not sure...check it out!
Hey, thanks for the pics/insight/info Stick & Keith...it's one of those things I never would have thought of to ask/check into! :)
Thanx!