Thanks, Axe! For those who aren't aware of the latest, she's home from the hospital for the third time in five weeks and seems to be doing well.
In one sense, I'm relieved.
in another, I'm waiting for the other shoe to drop and watching for symptoms that preceded her last two crashes and burns.
I'd like to get some studio stuff done this weekend, but we'll see.
--Keith :mrgreen:
I met with two inspectors at my city's building department counter this morning to go over my situation and to seek advice on how to go about correcting it.
It took a while to come to the conclusions, but I'll summarize it as follows.
This method of transitioning Romex to water-tight flex conduit is bogus.
It needs to be a junction box.
Assuming I have enough conduit slack in the attic to work with, I can fix this without too much trouble.
I also need to replace the stripped Romex wires within the conduit with the regular stuff that comes on spools.
They said they don't have a problem with the way I ran the refrigerant lines inside the PVC downspout material. They also said they don't have a problem with the fact that the electrical water-tight flex conduit share the PVC downspout with the refrigerant lines.
This means that I have some work ahead of me to redo the electrical connections, but (unless Rod rains on my parade ;-)) at least I don't have to rip down that downspout thingy and mess up all the finishing work I did on it. I had been mentally prepared to have to do that, and I'm quite relieved not to have to.
It's quite amazing the contrast of feelings I always have before and after my interactions with the building department staff... Before: confused, unsettled, worried, anxious. After: clear, relaxed, comfortable, motivated. I realize this is in contrast to what many people fear or have experienced themselves.
In Mom news, she's been home for four days and is doing (knocking on wood) really well. :)
Barring unforeseens, I may have some progress pictures to show by the beginning of next week.
--Keith :mrgreen:
that's a relief, i thought the way you hid the refridgerant lines so nice and tidy in the downspout was quite inventive, i had a feeling the inspectors would give it a pass, glad you didn't rip it out before they saw it.
Today's studio work was a complete waste. :evil:
Yesterday I went to Home Depot to buy proper wire and stuff.
Today I went into the attic and ventured all the way into the southeast corner, where the lines enter the attic, and I was pissed to discover that the water-tight flex conduit is too short -- not enough slack. It was the most frightening attic-trip yet. I didn't have any close calls, but I was quite the contortionist and I really feared a crash into my shower. :roll:
Ends up it was a moot point because the heat generated by pushing the wires into the flex conduit caused the wires to stick to its walls, so there's no way I can pull the new wires into them. :evil:
So, now I have no choice but to run new conduit(s) for the wiring, and rather than mess with the downspout thingy, I'm going to resort to doing what I had been trying to avoid all along: penetrating my stucco wall on the gable end at the back of the house. :roll:
So I went back to Home Depot today to buy all the PVC conduit I'll need.
Upon retuning home, I reaized I forgot to buy the little brackets to attach the conduit to the wall! :evil: So I returned again to buy three 44 ¢ pieces.
Only to return to discover that I don't have a 1" knockout on my service disconnect box! :evil: So I return to exchange everything for ¾".
Then I discover they're out of stock of a couple of vital pieces in ¾"! :evil::evil::evil:
Four trips to Home Depot in two days and nothing to show for it. :x
I gave up. Maybe next weekend I can actually accomplish something. :roll:
--Keith :mrgreen:
Oh, I won't sing that simple tune again...
Don't feel bad man. My best record is 3 trips to HD in one day, receiving a traffic ticket on the last trip home and still not being able to turn the water main back on into the house at the end of that day.
And that's not the only time I've made 3 trips to HD in one day... I can't think of a house repair I've done that only required one trip to HD.
Hey I know it's frustrating and I think we all do it.
BUT good to see you're back at work. Just think if you hadn't made those mistakes (behind you now) you'd have a day of mistakes ahead of you.
Marc
Thanks for the condolences, Marc. :) You could call my previous post "venting" -- I knew I could count on some empathy from y'all. 8)
Well, I do have a progress report -- a pretty good one, actually. It would have been more, but I got a very late start today because... Well, hmmm... Should I? Yeah, why not... A couple of times a year I spot a suspected drunk driver. If I'm able (and last night my wife and I were), I'll notify California Highway Patrol and safely follow the driver as far and as long as practical, and keep the dispatcher(s) updated along the way.
Last night's event was one of the most egregious. The guy was OK much of the time but would drift suddenly into lanes and shoulders, nearly wiping out or taking other innocent motorists with him.
We crossed jurisdictions and led to a hand-off to another dispatch center. About :x:xthirty:x:x miles after the "slow speed chase" started (we're woefully underserved by CHP), I finally had two cruisers catch up to us. They pulled him over, checked him out, and...... Would you believe he wasn't drunk! :shock: Just tired! :x My wife and I were shocked! They cited him, let him go, and thanked me for my help. :roll:
Soooooo... Where was I? Oh, yes -- a progress report!
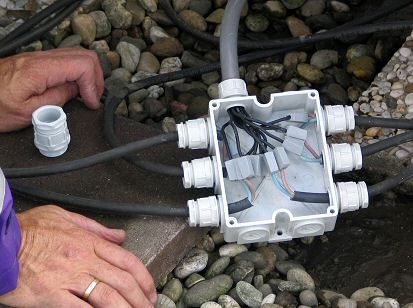
Recall that this was the version that Rod drew to my attention as not to code:
The wire in the conduit is now THWN (Thermoplastic Heat and Water Resistant Nylon Coated) 12 guage solid, including a green ground wire -- no longer the stripped NM-B (Romex) cable with a bare ground wire. (It's for a 20 amp 120 volt circuit.)
Obviously I have some work left to do in the junction box... ;-) ...But I did drill the holes into the attic already, so I just need to go up to the attic to feed NM-B cable into the holes and hook it up.
I'm not so thrilled to have another artery on the wall -- I miss having everything so neatly tucked into the downspout thing. :roll: But it's not too bad I guess. It will look better after I paint it to match the house, of course -- but I'm going to wait on that until it's inspected. I want the inspector to see that I used Schedule 80 electrical PVC. 8)
I wasn't able to remove the old water-tight conduit, so I just cut it off and left it inside the downspout thing. :roll:
It may not seem like much, but I'm glad to at least be unstuck and moving forward again.
Good for you Keith - both on your progress and for your caring of your fellow, non-drinking drivers. I saw the same thing one night and called it in, but never really thought to follow them until the cops catch up - that's a very good idea.
I can relate to the multiple HD trips also. I just hate the one's (like this past Sunday) where you get there only to find them closed - that's the worst! I at least feel grateful it's only a 10 minute drive for me - I know some people on here have to be way more organized than us if they have a 1 hour+ drive! :oops:
But, this is significant, I think, because it sort of a "golden spike" moment. Well, not really... But it represents the fact that I was able to get the cable from the attic into the junction box outside, which was no small accomplishment!
Unfortunately it took several attic trips to what is arguably the most challenging area to navigate... :roll: Unfortunately, my first effort to pull both cables failed -- only one came through while the other got hung up on the attic side. :evil:
There are times when I really wish I had hired a pro. :oops: Yesterday was one of them. :roll: I spent a lot of time in extremely cramped and uncomfortable quarters untangling the mess of lines inside the attic that is totally my fault for a combination of lack of preparedness, poor execution, and in a practical sense, having to work solo all the time. :( When I think of all the money I'm saving by doing the work by myself, I sometimes wonder if I'm working for minimum wage! :lol:
But, I continue in my quest... 8) Each day I put a few hours in, I get that much closer to the final result, and I keep my eye on the prize.
And speaking of the prize -- this past weekend I attended the first annual Bay Area Rock Fest, where I saw, heard, and/or personally interacted with ten awesome bands from all over the world. :twisted: This is my excuse for not doing anything on my build last weekend! :lol: I had a fantastic time and made a number of new friends.
I'm not nearly done with my attic trips though... :roll: I still need to do some more detangling, stapling/securing, and pulling. I doubt it will get done today though, 'cuz today's Mother's Day and there are some moms and grandmas to celebrate. :D
--Keith :mrgreen:
Hai Keith,
Looking "good"... but could be better.
Next time leave some extra wire within the box (just wire it one time around) to have some extra slack.
Why are you using those old fashioned fasteners? (dunno the English term for "lasdop").
This is an old fashioned one which can be used only ones (can't add extra wire in it later). Also installation is a drag... (twisting wires in place..)
As you can see from the next pic, those are much easier to use (just plug'm in) and additional wires can be added later. I'd recommend those, especially for laymen. (just hook'm up baby!)
You can clearly see the how easy it is to add wires :)
Another thing, pulling wires through the box by drilling a new hole in it is not, atleast here on this side of the ocean, permitted.
just looking over yer shoulders keith. keep it up!
Keith,
The extra slack is especially handy when using the kind of connectors you use. When you need to add another end, you have to cut the whole and strip wires again in order to re-twist and connect them again. Using that other connector I showed you (comes in various designs) you're able to just jenk of the damn connector without cutting wires. It surprised me to hear you could not find any of them "newer" types.
Cutting wholes yourself is not according to code. Buy some new pre-drilled boxes to add more cable-ends. NEVER use the bottom of the box, like you did. (well at least according European standards that is :) )
Look it this kinda box: (this guy's using very short cable, but it's connected using newer connectors so don't need too much slack.. altho shown is another application.. don't worry, it's all about the box)
Recovered from web.archive.org — originally hosted at http://www.polderpv.nl/Assets/images/DSC062.jpgro
Ro,
What the actual name of those connectors, and do you know where I might find them to buy them?? They look much easier then the standard romex caps. :wink:
Guess I better check with codes as well on these new ones for this area, because I can not find them anywhere either>? Maybe thats why>?>? :roll:
Let me know if you have any inmformation on them.
Thanks
AJ
I've been thinking about this practically non-stop since I responded this morning... :roll:
I think I might know how I should have made the transition from surface of wall to through wall... and I may yet redo it this way:
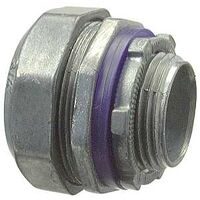
It's an LB connector, similar to the elbow thing beside the service disconnect -- rather than make a "left turn," it makes a "rear turn":
I'm thinking I should replace the junction box with one just like it that has a second entry on the opposite (left) end that will accommodate my attaching one of the above LB connectors, then have 8 to 10 feet of PVC conduit attached to that which will run into the attic and attach to a threaded coupling and into another junction box up there.
Just when I thought I was done with this part... :evil::evil::evil:
--Keith :mrgreen:
Ro,
What the actual name of those connectors, and do you know where I might find them to buy them?? They look much easier then the standard romex caps. :wink:
Sorry, dunno where to buy them in your part of the globe. I do live in Holland/Europe.
Romex, however, is a world-wide brand and do deliver the conduit boxes and additional stuff.
The box I showed has pre-cut holes which mostly are sealed in order to break the opening when needed. Then you'll add (screw) a Tight-connector to it, something like this:
Recovered from web.archive.org — originally hosted at http://images.orgill.com/200x200/6334569.jpg(this is a water tight one, somewhat expensive and used outdoor)
See this link for website
Here's a conduit box:
http://amos.shop.com/cc.amos?main=prod&act=33466587%2C43761857&ccsyn=261&ccsid=949542702-5055
I'm sure you can get something like that in your local hardware store.
But again, not sure how things are dun 'n the USA for example. But sure there's some code-book around :)
ps. Keith, you checked the new DT yet?
But of course! Click my "www" icon. :twisted:
Just bought 10th row tickets for their Northern California show on Sunday, and I'm considering traveling to the other two California shows as well. 8)
--Keith :mrgreen:
But of course! Click my "www" icon. :twisted:
Just bought 10th row tickets for their Northern California show on Sunday, and I'm considering traveling to the other two California shows as well. 8)
--Keith :mrgreen:
Man, I'm still waiting for them to announce a date that's closer than 3 states away. :roll:
Well, I'm slowly (emphasis on "slow") getting through my HVAC work, finishing up the redo on the electrical as per the very helpful corrections from Rod and company.
I replaced the "dead end" two gang box with a "straight through" box of the same size. I then put the leftover 2' extension of PVC on the end of it and attached that to the LB connector. I then managed to create a properly sized hole in the stucco to accommodate a 3/4" electrical PVC conduit, a little over 6 feet long, left over from another thing I did a couple of years ago (not studio related):
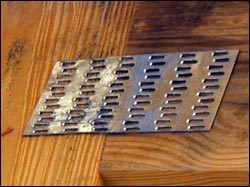
Let me tell you, that hole was not easy to make! :evil: Just my luck: I ran into some resistance, which I thought was foil-backed sheathing, but then came to realize was a truss connector plate! :xRecovered from web.archive.org — originally hosted at http://www.ewpa.com/images/def_metal_plate.jpgNot only did I have to drill through that darned thing, but I then had to go through the 2x4 to which it was attached, and then... Yep, another connector plate! :(
I finally made it all the way through (I'm sure I really mangled the plate on the inside face), fed the pipe through, and then glued it to the back of the LB, leaving me with this:
I'm going to wait on connecting everything in the junction box until I'm done in the attic. I believe I'll have some slack up there, and if so I want to push it through in order to have some usable lengths of wire left over. At that point I'll be sure to use a liberal amount of GE Silicone II caulk to seal the holes (old and new).
Now I have to muster up the energy and courage to go up into the attic again on this rather warm day to finish the job. :roll: I'm not so thrilled about having more exposed conduit and two junction boxes (one inside and one outside) to deal with, but I will say that having the conduit forced into the attic by six feet and moved over from the end by another two feet will make things much more comfortable up there (or, rather, much less uncomfortable).
Like, now... :x
--Keith :mrgreen:
Shortly after I posted yesterday afternoon, I loaded up all my tools and ventured into the attic. I knew I was in for a tough time when the attic ladder was hot. I barely popped my head into the attic before retreating. It was just too damned hot. It would be tolerable if my trip were to last five, even ten minutes, but I knew I'd have be up there much longer. Heck, it takes me that long just to make the trek to the area I need to work in! :roll:
I'll give it another try two weekends from now. (I'm out of town this coming weekend.)
Note to self: On sunny days, you can't afford to procrastinate -- get the attic work done before noon.
--Keith :mrgreen:
Hello again,
We had a nice weekend here with some cooler weather, so I got an earlier start and headed up to do the much needed "PVC-to-Romex junction box" installation.
And, yes, I put a cover on it when I was done. 8) Oh, and in case you're wondering, the red electrical tape on two of the wires is just a marking to distinguish them from the other wires that are the same colors.
I also managed to carry forward the refrigerant and electrical lines about 30 to 40 feet north towards the garage, securing it to the trusses along the way. It was, as usual, slow going, methodical, meticulous and careful work. Unfortunately I had no flat surfaces to kneel upon -- I would literally have to rest my knees on the bottom chord of the truss in front of me and rest my ankles on the bottom chord of the truss behind me, and then after finishing securing the lines in that section, I'd move forward two feet to repeat the operation! :evil:
After I came down from the attic on Saturday, Mrs. Sharward was shocked at how my clothing was completely drenched in perspiration after two hours! :x (I should have gotten a picture of that! :P) And let me tell you, after getting cleaned up, I was wiped out for the rest of the day. :(
But the good news is that, while I'm not completely done with all the attic work, the worst of it is (I think) over now, as the rest is over the garage where there is no blown-in cellulose insulation to get in the way, where the peak of the roof is higher (and, thus, not as hot), and much easier to navigate to and from.
After making the connections in the exterior junction box, I'll be ready to feed the lines into the studio and install the interior unit, plus carry the supply wiring all the way to the service panel. In a couple of weeks I expect to have a fully functioning air conditioner in the studio room!! :evil: That will be awfully nice to have while working on the rest of the build, especially with the hot weather fast approaching.
--Keith :mrgreen: