Actually, I just reviewed some things and Tyvek isn't spec'd for under floors, only for walls - for under your floor, i would use a 6 mil poly sheet (black, not clear) - stretch it across the joists and staple to the outside of the outer joists just under the first layer of OSB - it will keep ground moisture from penetrating into your lower floor layer.
Both the 6 mil black poly and Tyvek (for wall wrap) are carried by building supply places; more like "lumber yards" than the Home Depot type stores. Tyvek has a microporous structure that allows it to breathe releasing trapped moisture, but at the same time it's an air blocker so minimises any airborne moisture penetration through walls. On walls, the house wrap should go just under the outermost layer of paneling on the walls... Steve
from shed to studio?
Originally posted at johnlsayers.com, topic 1589.
Whew alot of work for nothing this weekend. I got the concrete piers dug in, leveled and bolted on to the 4x4s. Now according to the drawing, do you only want me to double up the 2x4 bands on each of the 12' length side? It seems like in the diagram the only 2x4s that are doubled up are the bands that are parallel to all the other joists and there is no 2x4 that is perpendicular to all the joist, is this right?
I just thought about it, the ceiling will only basicly be resting on the joists that are running the 10' lengths on both sides so those are the only ones that need to be doubled up right? The two other sides, just a single 2x4 perpendicular to the joists correct?
I think what you're saying is correct, if I understand you correctly - if you check the earlier drawing, I uploaded a modified version with some details I'd previously not included - hope that helps... Steve
Ok cool I know exactly how i'll do that. I'll get the floor done today. By the way, what would be the best way to fasten to perimeter 2x4s to the 4x4s?
And should I just build my walls according to my pdf plan but 2x4s spaced every 16" instead of 24"?
Since all the 2x4's will be supported by 4x4's, you can just use two 16d nails (galvanized, NOT bright) through each 2x4 into the 4x4 - they have more holding power if you angle them a bit differently from each other; you want to stay at least 1/2" away from the edge of the 2x4 (and slightly slanted toward the center of the 4x4) - so the upper nail in each case would aim slightly downward, and the lower one slightly upward - this puts the body of the nail further from the outside of the 4x4, giving it more holding power.
Then, you can toenail the perimeter 2x4 down and into the 4x4 with two nails per 16" section, kept 2-3" away from where the perimeter 2x4 is nailed into the 4x4 - so each 16" section would have two nails holding the perimeter board to the 4x4, and each joist would have two nails holding it to the perimeter board.
Here's a detail of how/where to nail -
For wall construction, you should NOT do what your PDF shows - if you want any isolation at all, you should use staggered stud construction with two layers of paneling each side. I'll post a wall detail after this; you can skip the Resilient Channel, it's kind of tricky to get right the first time and will only cost you maybe 2-3 dB of isolation... Steve
Here's the wall drawing - if you want, ignore the comments about the RC, and just fasten the sheet rock directly to studs. Alternate the layers so you have staggered seams, caulk each layer as you go, and if possible find some REAL acoustic rated caulk. Building shift/settling will cause minute air leaks pretty quickly, which will degrade performance of the walls.
You'll also need a good quality solid core exterior door, you might do a search on door seals here for more input... Steve
BTW, this design was used on a 20 x 24 free-standing building in Austin last year, the owner said he couldn't hear his drummer from 10 feet away outside the building... Steve
As you go along with your building, remember that to get any decent amount of isolation your ENTIRE construction should have an outer mass separated by air/insulation, and an inner mass that is as physically NOT connected to the OUTER mass as you can make it. This is true of floor, walls, ceiling, everything. In your case, the small size of the room won't allow you to have an airlock and double doors, so your door will be the weak point. With that in mind, you should plan to put the door on a wall where you LEAST care about sound bothering someone - when I get a bit more time I'll make some suggestions on door seals vs. cost and convenience... Steve
I'm still kind of confused. Can't I just build the frame of the wall as in the pdf then do my insulation as well as RC(i'd really like to)? Also instead of 24" spacing, i'll do 16". Sound Ok?
Oh and one more thing, I read in that other post about the guy putting a window AC unit in the wall, any possible way I can do this without having too much soundleak around it? Otherwise, i'll die in the room without it.
You can do whatever you like - but if you want much in the way of sound isolation, you need to realize that the PDF you posted is a lawn storage building, NOT a studio - basic construction like that has almost NO sound proofing whatever.
I'm not trying to be a hard-ass here, I'm just pointing out what will and what WON'T work for sound isolation - what will NOT work is flimsy construction with only one layer of paneling on either side of frames - neither will construction with holes, cracks, or sloppy joints - What DOES work is mass, placed in two separate locations and separated by as much air space/insulation as practical, and SEALED. Any place that seal is broken, it needs to be done in a really roundabout way so sound cannot travel through the opening.
As far as walls are concerned, you can build them using 2x4's with RC on the inside, placing the studs on 24" centers is fine. You should still use two layers of paneling on the outside; a layer of 3/4 OSB, then house wrap and whatever siding you're planning on using for the outside. The sound isolation of such a wall, with two layers of OSB on the outside (properly staggered and sealed) and two layers of 5/8" sheet rock inside on RC with standard house fiberglass insulation in the cavities, is as good as the staggered stud walls using 2x6 caps and plates - plus, the 2x4 walls will eat up 3" less total space inside the room than the 2x6 staggered ones will.
As to the air con, are you referring to the separate little room with the AC unit feeding the little room, then baffled ducts feeding in and out of that to the studio? Steve
I understand what you’re saying and where you’re coming from. I still plan on doing the multiple layers outside with house wrap and RC inside etc etc. I also just realized there is no picture diagram in the PDF for a wall. So I'll probably have to devise something my self. I was thinking just maybe standard frame with double 2x4s on the sides as well as top and bottom and 16" spacing. I speak from no experience so please correct me if I’m wrong. In all the books I have there is no indication of what dimensions should I use for the wall. Obviously, two of my walls will be 12' and two 10', but how tall? Is 8' ok? And the A/C unit I have is one you would place in the room either on the window or your make a hole for it. Thanks so much again.You can do whatever you like - but if you want much in the way of sound isolation, you need to realize that the PDF you posted is a lawn storage building, NOT a studio - basic construction like that has almost NO sound proofing whatever. I'm not trying to be a hard-ass here, I'm just pointing out what will and what WON'T work for sound isolation - what will NOT work is flimsy construction with only one layer of paneling on either side of frames - neither will construction with holes, cracks, or sloppy joints - What DOES work is mass, placed in two separate locations and separated by as much air space/insulation as practical, and SEALED. Any place that seal is broken, it needs to be done in a really roundabout way so sound cannot travel through the opening. As far as walls are concerned, you can build them using 2x4's with RC on the inside, placing the studs on 24" centers is fine. You should still use two layers of paneling on the outside, a layer of 3/4 OSB, then house wrap and whatever siding you're planning on using for the outside. The sound isolation of such a wall, with two layers of OSB on the outside (properly staggered and sealed) and two layers of 5/8" sheet rock inside on RC with standard house fiberglass insulation in the cavities, is as good as the staggered stud walls using 2x6 caps and plates - plus, the 2x4 walls will eat up 3" less total space inside the room than the 2x6 staggered ones will. As to the air con, are you referring to the separate little room with the AC unit feeding the little room, then baffled ducts feeding in and out of that to the studio? Steve
OK, the good news is, modally (under the following assumptions) your room shape is pretty decent for a room that small, and won't require quite as much acoustic treatment as some shapes would -
The assumptions are: your floor platform itself will be 10 x 12 edge to edge, you'll be using 2x4's for wall framing with RC inside and two layers of sheet rock - this will put your outside dimensions at 10 x 12 PLUS the thickness of two layers of OSB or paneling, and your inside dimensions at 11.2 x 9.2 - if you then make your REAL inside height exactly 8 feet, you end up with good modal distribution throughout the range of modes associated with that size room.
The BAD news is, the minute you cut a hole in any of your walls and install a window type AC unit, you may as well have just pitched a TENT to record in, as far as sound isolation is concerned. These units are acoustically just a big hole in the wall - they have to pass air through heat exchanger coils and bring in fresh outside air, so typically the only obstruction to air travel through them is a thin foam filter and some finned heat exchangers (like a car radiator) -
Here is a link to the discussion I referred to earlier, which (sadly) just about sums up my AC knowledge -
http://www.johnlsayers.com/phpBB2/viewt ... sc&start=0
Now, to do this you would need to add some kind of "side-car" onto your room, or give up a serious percentage of floor space (and screw up the acoustic dimensions) of what you have planned. Your wall between the AC room and the main room still needs to be sound proofed, and any penetrations for ducts sealed thoroughly and soft-coupled from one side of the wall to the other, to avoid flanking noise following the duct through the wall.
As to wall framing, there is no reason to use 16" centers other than to cut down on the amount of RC you need (may save a buck or two) - basically, if your studs are @ 16", your RC can be 24" apart - if your studs are @ 24", then the RC should be 16" apart. The "complete section" sticky has a lot more info on all this.
Just in case you've not noticed, this can turn into a hell of a project for a "first timer" - however, if you stay cool and don't jump too fast/far, it is do-able, and has been done by beginners successfully - the trick is to always ask lots of questions until you're completely clear on each stage of construction, and to stick to an old carpenter's adage - "measure twice, cut once" -
Check out the link above, and think about whether your room is already at minimum size (trust me, it IS), and we can go from there... Steve
Thanks for the reply. So there is no real benefit to having 16" spacing? I was thinking with all the extra weight on the walls and ceilings, 16" spacing rather than 24" spacing would yield a stronger structure. So is my plan for having double studs top/bottom/sides ok? I just have to decide weather or not I do 16" or 24".
About the A/C, Would having the unit covered and outside with a duct into my ceiling work? I'll have it covered to protect is from the elements but that would be I would have to run in and out of the room to turn it off. I can deal with that, i'd rather do that than to have sound leakage from a big hole in my walls. I'll do more thinking about that. So in the meantime, I guess I will debate on 24" or 16" spacing for my walls and get that done.
For the door you mentioned, I think I will place the door on the 12' length wall. What kind of door should I get with what kind of seals. I did a bit of reading, and all of the doors mentioned with the sealing systems and what not were pretty expensive. I can build the wall and the door frame normally regardless of what door I will be using correct?
One last question, when building the walls, do I have to place the wall on neoprene pads as well? I've seen this in diagrams but it's kind of confusing? Or do I just screw the bottom of the wall frame into my floor? My Assumption is that, I can just screw the wall into the floor because once I have my floating floor, the floor will not be touching the walls execpt for the acoustic caulk and the RC channels will enable the dray wall to not be in contact with the studs and the floor. Am I right or wrong? Thanks again!
PS. When you say inside height being 8', is that with the floating floor or not?
You're right, the 16" spacing would be stronger - for that reason, you could use 16" centers and 24" spacing for the RC -
"is my plan for having double studs top/bottom/sides ok?" - Not sure I'm following what you mean here -
"Would having the unit covered and outside with a duct into my ceiling work?" -
It could, as long as you don't use short duct runs, do separate supply and return, don't use too loud a fan, do put the fan outside the room as far away (duct length-wise) as possible, do use rubber isolator couplings in ducts where they pass through the isolation envelope so as NOT to tie outer and inner leaves together firmly), caulk everything liberally, etc -
"all of the doors mentioned with the sealing systems and what not were pretty expensive. I can build the wall and the door frame normally regardless of what door I will be using correct?" -
You can get away from the major part of the expense if you're willing to step over a higher threshold - that's the most expensive part of good door seals without tripping hazards. For a private facility, you can decide whether the cost is more important than the convenience. Those drop seals for doors start at around $250 and go upward.
A standard pre-hung exterior solid core door is a good start - however, don't install it exactly as specified for normal house construction, or you're back to no isolation again... Standard door installs typically use a larger rough opening in the frame - you then insert the pre-hung frame and door into this opening, and use shims between the rough opening and the door frame to align the door so it's level, square, plumb, etc, and will work - then, nails are driven through the frame into the wall frame, at or near where these shims are located, to lock everything in place. Finally, after the wallboard is on this shimmed gap is covered with moulding and you're done (except for painting) -
If you do this in a sound proof room, you screw up isolation by probably 20 dB or so.
The MINIMUM change needed for a sound isolation door is to stuff this crack everywhere possible (from both sides) with bits of fiberglass insulation, then caulk thoroughly at BOTH sides, making the door/wall joint as airtight as possible.
Once this is done, you need airtight seals all the way around the door itself, so when it closes it's hermetically sealed.
For the sides and top, this isn't that tricky - some cleats with weather stripping, placed firmly against the door when closed, and caulked to the door frame while screwing in place with the weather stripping slightly compressed against the door face, works pretty well.
The bottom is the bitch - you either spend $300 or you live with stepping over a 1x2 board when you go in and out. This board would be done the same as the side/top cleats, with weather stripping between the cleat and the door, and the cleat caulked underneath (between cleat and floor) and laid flat on the floor - keep in mind, each time you trip over that cleat you'll likely mess up your weather stripping. It's not a perfect solution, but it's the only one I've come up with so far other than $$$, especially for a single door.
If you decide to beef up your door with a layer of OSB on the outside, you can cut the extra layer slightly smaller than the door dimensions to leave room for a second strip of weatherstripping, to give two separate seals - you can do this without an extra layer, but it involves a precision router job to relieve the door edge for the weatherstrip.
"do I have to place the wall on neoprene pads as well?" - No, the frames can sit directly on the subfloor - all your hermetic seals will be the caulk beads around the drywall layers on inside, and ditto for the OSB layers on the outside. The frame's only job is to hold up the paneling and roof.
"When you say inside height being 8', is that with the floating floor or not?" - I checked it both ways, with full 8' finished dimension and with a 5-1/2" floated floor (1/2" pads, 3-1/2" joists, 2 layers 3/4" OSB), and either way it comes out no problems. (other than the usual needed acoustic treatments for any room)
I'm behind on some drawings for double walls/windows for another member, so I'll have to get back to you on illustrations for some of this... Steve
So it seems that I can build my wall with the framing for the door as normal but when I attach the door to it, I should not follow typical construction methods. I won't be at the stage for at least two weeks anyways(thinking very very optimistcaly).
For the A/C unit, i'll do some more thinking about how the ducts will work but how you put it might just work best.
And about the wall construction. What I meant was when I build the wal the bottom 2x4 that all the vertical 2x4s studs are going to be sitting on, should I double that up? As well as the 2x4 studs in the corners going vertical, shouldn't I double those up as well?
Bottom plates (under all the studs) are done single, top plates usually double - Standard pre-cut studs are normally 92-1/4" long - when you add this to the thickness of 3 horizontal 2x4's (4-1/2") you end up with 96-3/4", which leaves room for 1/2" sheet rock ceiling and 1/4" lee-way for 8' wall panels. That's for NORMAL construction...
For sound proof construction using RC, you would put up your wall panels on the RC (staggering joints as shown in the earlier diagrams I posted) and then put insulation and RC on ceiling joists, finally hanging the sheet rock ceiling layers on RC INSIDE the walls, leaving 1/4" gap all around and caulking each layer. This keeps the ceiling inner leaf floated away from any solid connection to walls or ceiling frame for best isolation.
In seismic areas, you may be required to put the ceiling up first and then the walls - as long as you leave a 1/4" gap between the tops of the wall panels and the resiliently hung ceiling layers, caulking layer by layer, it will still work - it may lose about 1 dB of isolation using that method, but that's not been proven anywhere I've seen, more just "gut feel" -
I'll do a corner detail for your type construction sometime in the next day or two and post it here - you're right, there is some doubling but it's more for creating nailing surfaces for wallboard than anything else... Steve
Here's the basics -
Am I not reading the diagram right or are the wall studs going the wrong way? Shouldn't they go up and down vertically?
The top and left parts of the diagram are looking down, showing where studs (light brown) should be placed - the square, center part of the drawing is a side view, showing how the topmost cap is interlocked by reversing which cap extends beyond the inside corner -
Once I build the walls, should I begin the bottom part of the ceiling with the 2x4s going the 10' length, because I want the roof to slant that direction. Nothing special about fastening the walls to the floor correct? And for staggered studs construction, I have to have a bottom and top plate. The diagram doesn't exactly show where these go. I see the picture at http://www.saecollege.de/reference_mate ... stics3.htm , this one,The top and left parts of the diagram are looking down, showing where studs (light brown) should be placed - the square, center part of the drawing is a side view, showing how the topmost cap is interlocked by reversing which cap extends beyond the inside corner -
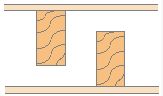
You're right about the walls being thicker when staggered studs are used - you must have absorbed this comment several posts ago - "plus, the 2x4 walls will eat up 3" less total space inside the room than the 2x6 staggered ones will. " - Here's an idea of the staggered stud wall - the dark brown is the bottom and top plate of 2x6, and the studs are 2x4's - the insulation gets woven through the studs as shown.
The non-staggered stud wall is shown in the earlier drawing; the difference in wall thickness for each wall would be 1-1/2", even though the top and bottom plates are 2" wider - the staggered stud frame doesn't need Resilient Channel, which takes up about 1/2". The straight 2x4 frame DOES need RC in order to isolate inner and outer leaves of the wall. Because your room is small enough already, the straight 2x4 frames with RC makes more sense.
For your ceiling, you can't use 2x4's because they aren't rated for that long a span - you'll need to use 2x6's instead, even if you place them on 16" centers. The simplest way to do the ceiling/roof without running into problems with moisture/rot is to first build your sound proofing leaves, and then put a simple roof over that.
I'll try to get an illustration for you in a few days... Steve
Ok cool. So heres my plan for the weekend, to build the longer walls first (12' walls) and if I have time, the 10' walls, I don't think it'll take very long to construct the walls, just hammering and nailing pieces of wood together. I'll put all four walls up if I can and then i'll start on the construction of the ceiling. How is the ceiling going to be done, just wondering? Double layer drywall, RC, 2x6 stud, insulation, plywood? Thanks again!You're right about the walls being thicker when staggered studs are used - you must have absorbed this comment several posts ago - "plus, the 2x4 walls will eat up 3" less total space inside the room than the 2x6 staggered ones will. " - Here's an idea of the staggered stud wall - the dark brown is the bottom and top plate of 2x6, and the studs are 2x4's - the insulation gets woven through the studs as shown. The non-staggered stud wall is shown in the earlier drawing; the difference in wall thickness for each wall would be 1-1/2", even though the top and bottom plates are 2" wider - the staggered stud frame doesn't need Resilient Channel, which takes up about 1/2". The straight 2x4 frame DOES need RC in order to isolate inner and outer leaves of the wall. Because your room is small enough already, the straight 2x4 frames with RC makes more sense. For your ceiling, you can't use 2x4's because they aren't rated for that long a span - you'll need to use 2x6's instead, even if you place them on 16" centers. The simplest way to do the ceiling/roof without running into problems with moisture/rot is to first build your sound proofing leaves, and then put a simple roof over that. I'll try to get an illustration for you in a few days... Steve
Yeah, that's pretty much it - although there are a few details to watch out for.
I hope when you say you'll build all the walls in a weekend, that you're just talking about outer leaf and framing - the RC and inner drywall layers shouldn't go on until the outer ceiling and roof are on.
The (perimeter) ceiling joists for this type construction will be your outer soundproofing leaf, so this will need to be done carefully.
When you mentioned roof slope, I got the impression you're planning a single-sloped shed-type roof - is this correct? If so, you'll need to use 2x6's for that also. If you do a peaked roof (like the PDF you originally posted) and use collar ties across each rafter pair, you could use 2x4's. Either way is fine, the roof itself will NOT be part of your sound proofing, only weather proofing... Steve
At first I wanted to do a peaked roof but that probably involves more work. I think I might just settle for a sloped roof.Yeah, that's pretty much it - although there are a few details to watch out for. I hope when you say you'll build all the walls in a weekend, that you're just talking about outer leaf and framing - the RC and inner drywall layers shouldn't go on until the outer ceiling and roof are on. The (perimeter) ceiling joists for this type construction will be your outer soundproofing leaf, so this will need to be done carefully. When you mentioned roof slope, I got the impression you're planning a single-sloped shed-type roof - is this correct? If so, you'll need to use 2x6's for that also. If you do a peaked roof (like the PDF you originally posted) and use collar ties across each rafter pair, you could use 2x4's. Either way is fine, the roof itself will NOT be part of your sound proofing, only weather proofing... Steve
When I build the walls witht he offset top 2x4 for corners, wouldn't I have to do it on both sides of the wall not just one?
If you mean both ENDS of the wall, yes - the drawing was just a small detail showing ONE of the ends of the wall with the overlap. in actuality, you would build all wall frames as shown EXCEPT for the topmost caps - then, to tie it all together, you would cut the upper caps so that (for example) if the short wall's horizontal plate/caps stopped at the inside edge of the long wall's frame, then the upper caps would extend to the OUTSIDE of the long wall's frame, so that the joints are lapped... Steve