Many thanks Stuart, Iv started to fix the frames to the walls for the treatment for the live room,
Bass traps in the corners and was planning on building a few broadband absorbers, cloud for the ceiling, and a drum riser, any other suggestions?
Before you put any treatment in there at all, run an analysis with REW! You need that as your "baseline" data, so you can see what each part of the treatment is doing, and whether you are going int he right direction. So before you do anything involving treatment, download REW, set up your speakers and measurement mic at the final mix position, and measure the location of that mic very accurately! You need to be able to get it back to the exact same position (accurate to within a few mm) every single time, or subsequent measurements.
Then after you install each part of the treatment, measure again with REW, and compare the graphs.
- Stuart -
I'm having to get every thing in the live room first so that I can then move the bands kit in there before treating the control room, so are you talking about the live room or control room, or both?
If you are talking about the live room then I'm up for that as I know my little studio is limited but I do want to make it as good as I possibly can.
Is REW available for Mac? I'm not the music man or computer buff just a dad building a studio for his 2 sons to use and maybe make a bit of beer money by recording and mixing some local bands, so i will need los of guidance for this bit I think.
I'm having to get every thing in the live room first so that I can then move the bands kit in there before treating the control room, so are you talking about the live room or control room, or both?
Both, but the control room is more important. The basic concept is that the control room should have a "neutral" sound, not coloring the sound emitted by the speakers in any way, so that what you hear in the room is exactly what the speakers are telling you. On the other hand, the live room can have "character", subtly altering the natural sound of the instruments, if that's what you want to do. So a room can be more "live" or more "dead", or it might be "warmer" or "mellow" or whatever else you want it to be. And if you are not aiming for any particular sound, then at least you want to make sure that there are no gross problems with the room that might need treating. IT doesn't have to be neutral, like the control room, but at the same time you don't want major imbalances in the sound.
That's my long, convoluted way of saying "test them both, but the CR is more important". :)
- Stuart -
Thanks again Stuart for the explanation,I think I can understand a little or enough for doing the control room, but what should I do for the live room we have mics, REW for mac which I can put on my sons macbook pro, a soundcard and the monitor speakers that will go in the control room, but I haven't managed to find any info for setting up to test a control room,
Is there any posts on this forum explaining this that I could have a read through?
Hi Roguejackal,
I'm not an expert, but browsing around the forum I collected the following info:
- Use the open back cloud for suspending insulation off an already angled ceiling, so the insulation works on lower frequencies than if just placed directly on the ceiling. It helps with modal issues, tempering the floor-ceiling response.
- Use the hard back cloud for breaking up the modes / flutter between floor and (a flat) ceiling - angling also provides a more broadband effect than simply making it flat..
Insulation in your clouds will not affect lower frequencies - an angled hard top cloud will.
Hope that helps (and if not true, I hope an expert will correct it !)
Your build is coming together very nicely !
Simo
Well I spent a good while reading REW and tried to get my son into it but with all the usual life stuff getting in the way didn't have a lot of joy,
Spoke to my stepson about it and a friend of his who knows a bit about treating rooms for acoustic purposes and decided to crash on with the tracking room, hope that is ok with you Stuart but i plan to get the basics up get the band in there and then if i need to fine tune it then i'l make a few more adjustments,
so here's a few pictures of some of the work so far,
Battens on wall to contain the insulation
IMG]http://i1196.photobucket.com/albums/aa410/roguejackal/Clinic%20Recording%20Studio/88C1F09A-A042-4B77-9214-48EFD0F0ED0D-4994-000009824571CCF1_zps9e054b0a.jpg[/IMG]
Thought I would make some wall panel absorbers similar to the ones in this sticky viewtopic.php?t=7814
Cut some old 100mmx25mm treated timber for backing frames for some absorbers to hang on the wall,
The larger ones are for 1200mm x 600mm x 125mm deep insulation and the smaller ones are for some 1000mm x 600mm x 50mm deep insulation again to be covered by material and hung on the walls.
I'd like to add that the sticky's on the forum are a great resource for beginners like me who have limited acoustic knowledge but it gave me lots of ideas for using existing materials that I have for the build I just need to purchase some "breathable" material for the covering :D
A few more pictures of progress :D
New colour for a couple of the walls in the room just to liven it up aesthetically a little,
2nd coat to go on yet so quite pleased how well this has covered the white paint,
the battens fixed to the wall are for hanging my treatment on the wall.
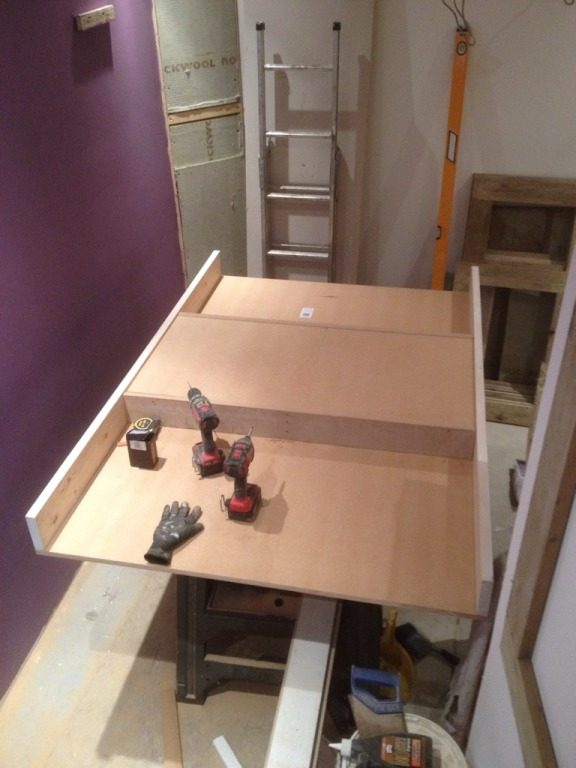
The centre piece with the MDF will be filled with insulation on the back and will have the light fixing on it,
the 2 open ends will have a 1200mmx600mmx125mm batt of insulation in each covered with material facing
downward and a hard back fixed if it will be better, some more input on this would be appreciated.
the 2 open ends will have a 1200mmx600mmx125mm batt of insulation in each covered with material facing
downward and a hard back fixed if it will be better, some more input on this would be appreciated.
There already seems to be a hard back on there, if I understand you correctly. You say that the insulation will be facing down, so what we are seeing there on the workbench will be flipped over, which means that the wood backing you have on there will be facing up, towards the ceiling. Is that correct, or did I misunderstand you?
Nice work, by the way! It's looking good.
- Stuart -
the 2 open ends will have a 1200mmx600mmx125mm batt of insulation in each covered with material facing
downward and a hard back fixed if it will be better, some more input on this would be appreciated.
There already seems to be a hard back on there, if I understand you correctly. You say that the insulation will be facing down, so what we are seeing there on the workbench will be flipped over, which means that the wood backing you have on there will be facing up, towards the ceiling. Is that correct, or did I misunderstand you?
Nice work, by the way! It's looking good.
- Stuart -
thanks for answering Stuart, but no the middle section flat side will be facing down , needs gloss paint on it once hung, this will have a light fitting fitted to it, the 2 open ends will have insulation in them with material covering them on the downside, il get some more pictures sorted showing this so its easier to understand.
Just a little more progress 2nd coat on the walls with my hangers on the wall before being covered,
and the floor latexed last night ready for laminate floor to be laid,
Well the cloud is hanging, still need to fix the hard backs to the blue insulation areas and gloss the primed woodwork,
then fit the light.
What distance from the ceiling would be best? floor to ceiling height is around 2.780m any comments would be helpful please.
Now I'm confused! :?::| When I asked if you were going to flip the cloud over with respect to the way it was shown sitting on the workbench, so the insulation would be facing down, you said "no", but now you did flip it over, and the insulation really is facing down!!! ? :shock: So it is, in fact, hard-backed, which was the original question. Or rather it would have been, if it would have stayed as shown in the original photo, but from the side view, it looks like you took that hard backing off???
I'm referring to this photo:
hard-backed-cloud-not.jpgDirectly above that photo, you have a caption saying "Some pictures of the cloud I am building for the room,", and right underneath it is the comment/question: "and a hard back fixed if it will be better, some more input on this would be appreciated." That's when I said that the hard backing was already there (implying it would be useful), then I asked/commented "so what we are seeing there on the workbench will be flipped over", to which you said "no". So I assumed it was going to be a soft-backed, hard-faced reflector, not a hard backed, soft faced absorber, but in reality it turned out as just a plain absorber, no backing or facing...
So that's why I'm confused: the cloud you hung does not look like the one in the picture that you asked about, since the one in the picture appears to have a hard back "below" the insulation (which would end up "above" the insulation when flipped over). But now that hard back is gone, and thus the effect it would have had is no longer there...
It's hard to comment on designs that change along the way, from the way they are pictured!
Just call me befuddled...
:?:
Anyway, to answer your question: If it is not hard backed or hard faced, then it is just an absorber on your first reflection point, and there's only a slight advantage to angling it. However, if it is hard-backed (with a substantial, thick, heavy, rigid surface, then there is an advantage to angling it, as it helps a bit to break up things happening in the vertical plane. And if it is hard-faced, then as a reflector it would need to be angled suitably to avoid sending reflections to the mix position, or any other place where people are doing critical listening.
- Stuart -
Sorry for the confusion Stuart, when it was upside down on the bench it kind of does look like it has a hard back in the insulation areas,
but the pictures of it hanging are how it is now,
if it is better to make it hard backed on the two end sections i will fit the MDF to those two sections on the back,
I was planning to put insulation on the topside middle section where the light will be fitted as well if it is beneficial?
Is there a correct height off the ceiling for this cloud in the tracking room?
Before deciding on whether or not a hard back would help, it would be good to run REW on your room to see what the actual acoustic situation is, and whether or not the hard back would do anything useful. If you can, run one set of tests without any treatment in the room (just the hard inner-leaf), or as close as you can get to that, reasonably, then install the treatment devices, one at a time followed by a new set of tests, so you can see exactly what each devices is doing, and what still needs to be done.
There isn't really any fixed height that one can say "It must be exactly 11 5/17" from the ceiling", as that depends to a certain extent on the room and what it needs. But probably hanging it around where it is right now is a good starting point. Once again, experimenting with different heights and angles using REW can reveal a lot about the room, and how the cloud is working in it.
- Stuart -
Ok thanks for that Stuart, really appreciate your input as I am a thoroughbred beginner at all this,
I'v resigned myself to doing the REW on the control room when
the band stuff is in the live room as then we will have the Adam monitors here,
I will build the drum riser and wall treatments and get my corner treatments finished and covered,
but leave the wall treatments off the walls until REW has been done in the live room,
Then I can add them to see what good/bad effect they are having.
Thanks again Stuart. :D
Drum riser finished :D With low voltage LED lights for a bit of bling :D
Only problem is I can barely move it on my own, which i suppose is good and bad :shock:http://i1196.photobucket.com/albums/aa410/roguejackal/Clinic%20Recording%20Studio/null_zps57109c5f.jpg
Sound treatment to be covered and skirting board to be done along with the air-con unit.
I'm also going with two solid doors for the tracking room, one of which is already hung the ex hospital doors I posted earlier,