Kathy's Barn Conversion!

Started by Kathy on 1 February 2006. 311 replies, 2006–2007. In the Library under Build diaries. Key posts in this thread.

Originally posted at johnlsayers.com, topic 5556.

Well, hello! I have been reading for a few months and have posted just a couple of times so far (inquiring about making your own cables and wires). I respect many of you gentlemen and am in awe of your knowledge and expertise. Knightfly and Sharward in particular but several others as well. I thought it was the right time to create my own thread for my project that is just now underway. I feel comfortable and at home here even though you don’t even know me yet. But I’ve come to know YOU over the course of reading post after post and I do hope that you will warmly embrace my project as well and share your much needed words of wisdom along the way. I have several pictures to share regarding my initial progress so far which will get you up to speed so I am going to break up my first posting into 3 different posts to make it more readable and organized. First , for those who don’t remember seeing my other few posts, my name is Kathy. Yes, I’m a woman on a mission to build my own multi-track haven. I consider this the start of a journey that I like to call my own personal Yellow Brick Road.
    *I have no construction experience. *I know nothing of a man’s carpentry world. *I did not have Legos as a young girl. *Joist sounds like a woman’s name to me. :-) *I have no plans to hire a contractor.
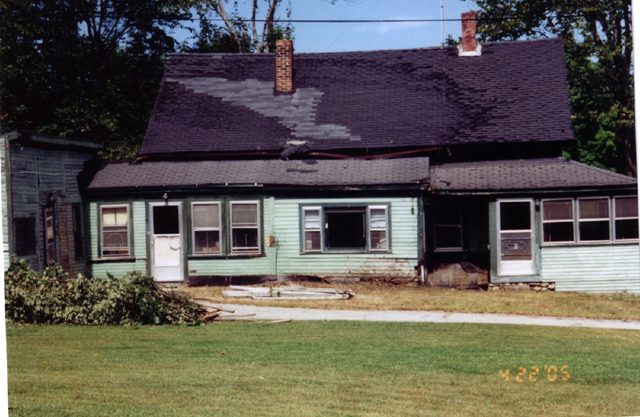
So what’s my approach? As luck would have it, I have a very generous male friend who has chosen (or rather WAS chosen!) to commit himself to completing this dream from start to finish. A blank canvas in the form of an unfinished building attached to my home (formerly a barn) is our starting point. Budget is between $5,000 and $6,000. All of that is on a credit line at Home Depot. Half has already been used for 2 different lumber and supply deliveries (including all the 2x4s, 2x6s, insulation and plywood flooring). Additional cash funding will be possible for future things as time goes on. Main sticky point? Heat, air, and ventilation. I have absolutely no thoughts on this and have no clue what I am going to do. Although you will all tell me I should plan for this now, I am saving it for last to deal with later. Other areas of concern? The roof/ceiling and the fact that it probably isn’t going to hold 2 layers of drywall so one is all I will be going with and there are still issues since the ceiling is sloped and the control room will be separate from the live room. The control room will have a low ceiling and the live room will retain the vaulted sloped look. Good luck to me! Impossible dreams? I am hoping to actually have a small loft (more like a 3ft crawl space) directly above the control room ceiling to lounge in a beanbag and watch tracking in the open live room below or even for storage. Structurally, you will see how this could be a pipe dream and an impossible challenge. But that’s all down the road......let me get you started. First let’s go to the VERY beginning. Below I have a photo of the house BEFORE I purchased it. It was a broken down mess that should have been condemned. It was built in 1900. This view is of the left side of the house if you were standing in front of it on the road. In the very left side of the picture you can see the attached building that looks like a workshop. It was actually a barn. A two story barn at one time but they removed part of it.
Recovered from web.archive.org — originally hosted at http://www.kathylabonte.com/barn/pictures/original_home2.jpg
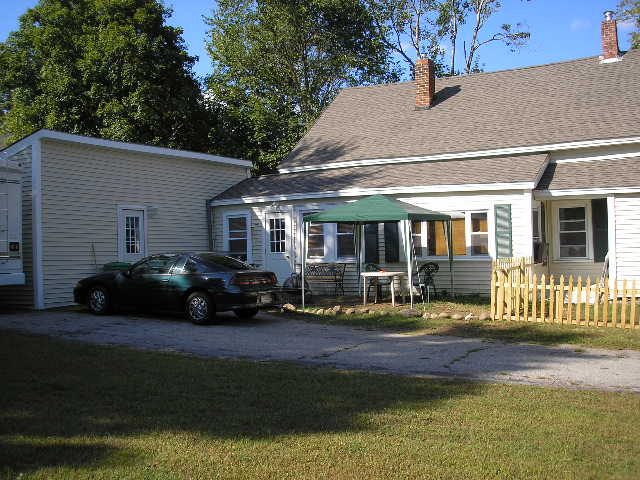
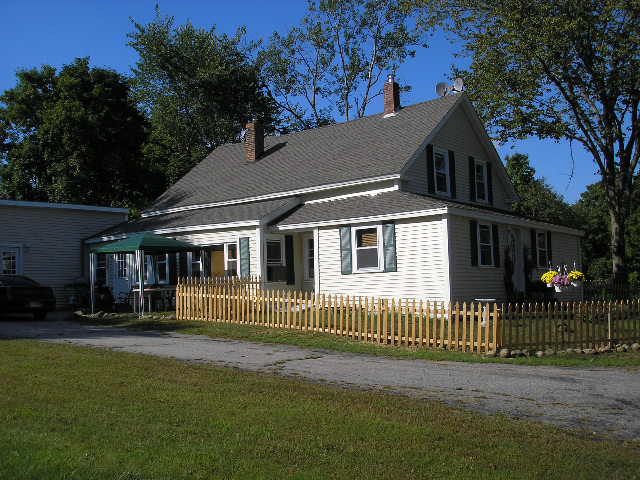
The next two photos show the house the way it is today just after I purchased it in September of 2005. It was completely gutted out and overhauled in a massive rebuild.
Recovered from web.archive.org — originally hosted at http://www.kathylabonte.com/barn/pictures/house_sep_2005.jpg
Recovered from web.archive.org — originally hosted at http://www.kathylabonte.com/barn/pictures/house_sep_2005_2.jpg
It sits on a quarter acre of land in a quiet residential circle in a small New Hampshire town. A songwriter’s dream, I say! I have neighbors to each side of the house but they are no problem. I do have a neighbor that I haven’t even met directly BEHIND the barn wall. You can spit in his yard because I only have about 10 feet of property behind the barn that is mine and then it is his. But I’m not concerned at all. We’ll get to that later. Although the outside looks beautiful now (as does the inside of my home), the inside of the barn looks about the same as the outside once did. Parts of it were torn out by the builders in what must have been obvious rot and they replaced random sections of the walls here and there with new studs and plywood where necessary. They chose not to rebuild this building like the house. They left it empty and unfinished and only put new wood in scattered areas where it must have obviously been full of holes and falling apart. In other words, they nailed up a few boards to patch up sections so that they could sell the house. Much of the barn is original including some awesome beams that I will be leaving. . Dimensions are: 25ft long by 15ft wide. The ceiling is a sloped one. It is 14 ft high at it’s highest point on the east side and just barely 7ft high at it’s lowest on the west. Below are some pictures of the barn the way it was when I moved in. It was empty and this is before we touched it. Please click on each one to enlarge for detail. http://www.kathylabonte.com/barn/thumbs/th_barn_bare_northwest.jpg http://www.kathylabonte.com/barn/thumbs/th_barn_bare_east_wall.jpg http://www.kathylabonte.com/barn/thumbs/th_barn_bare_southeast.jpg http://www.kathylabonte.com/barn/thumbs/th_barn_bare_southwest.jpg My next post will deal with Phase One: The Floor.
Okay, here we go. Phase 1: The Floor The original was a mess. It was warped, crooked, sagging, broken, and unstable. We decided to create a subfloor above it and support the new floor by digging down into the current floor 2 feet into the earth and pouring cement into tubes. We used string and levels to find the lowest and highest spots on the rolling and warped floor and poured the height of the tubes accordingly. We laid out about 5 tubes directly down the center of the room (25 ft long). Then we did the same on the west side of the room. We did not pour any cement posts on the right side. Why? Well the east side (which is actually the back wall of the barn) had a strong and decent wall to attach the floor to. But the west side (the front of the barn) was a nightmare. The walls are uneven and they looked more like stalls that hay was put into. They weren’t even real modern day studs and framing. They have a completely different look and it’s OLD and thin. The floor was the worst there too. We aren’t even going to be attempting to even out that old wood in the wall to drywall it. We are going to be framing a new wall there and that is why we poured cement posts on that side to support the new wall as well. But we will be using the existing good wall on the other side where we didn’t pour cement posts. We won’t be framing a new wall there. Just along the west side. After the cement dried, Scott (my brave friend!), explained and showed me how we would create the new floor to be level. We used the string method again to get our levels. We built a double joist (yes, now I know what that word means!) to travel down the length of the room smack dab in the middle by nailing together 2 of the 2x6s. Again, the total length of the room is 25 feet. We got it level by using a few shims on the posts and then attached each end to the north and south walls. We built a second double joist for the west wall. A single joist runs the length of the good east wall, attached to that east wall all the way down. We then cut the 2x6 joist slats for inbetween and secured them to joist hangers. Below are the pictures of our floor. By the way, I STILL don’t quite understand. Is this a floating floor or a room within a room or what? Please click on each one to enlarge for detail. http://www.kathylabonte.com/barn/thumbs/th_barn_west_floor1.jpg http://www.kathylabonte.com/barn/thumbs/th_barn_north_floor1.jpg http://www.kathylabonte.com/barn/thumbs/th_barn_east_floor1.jpg http://www.kathylabonte.com/barn/thumbs/th_barn_south_floor1.jpg My next post will deal with running the cabling under the floor. Then we should be caught up for now!
Phase 1a: Wiring Beneath the Floor. Laying Cable thru PVC Piping This has turned out to be more challenging and frustrating (and time consuming) than building the subfloor. There's going to be two rooms and the barn will be divided into a control room and a live tracking room. Wiring will run between and within both. This was a major chess thought process of planning way ahead and altering those plans frequently when problems arose. We opted to get some PVC piping in 4", 3", and 2" sizes. I mapped out a fairly complex system of cabling and proceeded to try and lay it out between the joists. What a nightmare. I am currently still working on this part and have changed my control room and live room layout twice due to cable length issues as well as interference issues between the tube paths. I have spent countless man hours (or shall I say “woman” hours) at the computer creating cabling charts, patchbay maps, wiring needs, and color coding all these lists and layouts for visible ease of use. More than once I have been perplexed and wanted to pull my hair out. As a matter of fact, it was this stage of things that brought me to the board to ask about building my own audio cables. If you remember seeing my posts, I wanted to know more about it because I simply could not find snakes and cables long enough for my needs. I scrapped the idea of wiring my own due to cost and fear though I will do any future cable needs in the future that way. I’m determined to learn. But for now, I needed fast results. Since I was stuck with cables of certain lengths I ended up changing my control room and live room layouts to accomodate my cables. Strange, but true. In the end, it has worked out even better as I am happier with this more logical layout. Keep in mind it wasn’t just audio cables that had me prisoner. Specialty stuff like firewire and DVI cables only run in 15 foot lengths as does the MOTU audiowires I am using in my interfaces. I really needed to have things placed right for those items as well. Below are pictures of the PVC piping process. I am unfinished but with a solid plan worked out on paper now it’s a green light to finish up. Please click on each one to enlarge for detail. http://www.kathylabonte.com/barn/thumbs/th_barn_tubing1.jpg http://www.kathylabonte.com/barn/thumbs/th_barn_tubing2.jpg http://www.kathylabonte.com/barn/thumbs/th_barn_tubing3.jpg http://www.kathylabonte.com/barn/thumbs/th_barn_tubing4.jpg http://www.kathylabonte.com/barn/thumbs/th_barn_tubing5.jpg http://www.kathylabonte.com/barn/thumbs/th_barn_tubing6.jpg Below the pictures are pdf files I’ve attached to show you some of my thought processes and layouts. First and foremost, I was extremely agitated and disappointed that I could not take the time to learn a blueprints software program such as Sketch Up. I have the software installed and hoped to draw up a perfect vision of my studio masterpiece but I couldn't get past drawing a box. So, that left me "visionless" in terms of sharing with you. However, I did open up Appleworks and draw up a VERY CRUDE and primitive layout of at least where things will be. I've included the PDF of that here. I wish I could show you all the details in my head but I just don’t know how to draw it out on paper. When it came to the massive underground tunneling system that was growing in complexity and the realization that many more snakes and wires needed to be acquired, that's where the real time consumption came in whilst making full blown cabling charts. I did use color coding to help with each equipment location and once the chart was complete (after several changes) it did help to visually sort out the great entanglement of audio wires that needed to co-exist with one another. I have included the PDF charts of those layouts and lists below as well.
External image, not preserved — original: http://www.kathylabonte.com/barn/pictures/pdf_icon.jpg
Barn Layout
External image, not preserved — original: http://www.kathylabonte.com/barn/pictures/pdf_icon.jpg
Cabling Layout
External image, not preserved — original: http://www.kathylabonte.com/barn/pictures/pdf_icon.jpg
Conduit PVC Tube Layout
External image, not preserved — original: http://www.kathylabonte.com/barn/pictures/pdf_icon.jpg
Patchbay System Layout So, that's where we stand right now. It is Feb 1st of 2006 and I expect that the tubing will take me until mid month to get completely wrapped up, floor insulated, and boards nailed down. Then Phase One will be over and it's on to framing individual walls for the control booth and live room separation, the vocal isolation booth, and the drumming station. Scott (my friend) had figured that the floor would be the most difficult of the process. Although a jack of many trades and considerable practical experience under his belt, he had never done a floor like this before and worried about the procedure and details. Now that we are almost done I think he is relieved to have that part over. The walls should pose little problem but we do have our challenges ahead of us.
Wow, Kathy! Not only is your project impressive, you've raised the bar for presentation. 8) Dan :)
Kathy, welcome to the insanity - I'm also amazed... One thing that's bothering me though; the floor where there's apparently wood UNDER and OVER the joists, in one of the first pics. Whether you intended to build a floating floor or not, what you did build is a RESONANT system, a mass-air-mass-air-mass (I think) consisting of Earth-air-wood-air(insulation)-wood. I'm concerned that this will bite you in the butt if care isn't taken to damp at least the top wood leaf (everything above the final joists) - otherwise, what you may have is a giant drum head that will color the room sound very noticeably :cry: The very least you will likely need to do here is to overfill your joist bays with UN-faced batts, THEN put the plywood down, and (preferably) then fasten the top floor to the subfloor with a layer of Green Glue for even MORE damping. (if you use insulation that's faced, the facing can create other resonances in the floor cavity as well; but probably not loud enough to be audible, this is mainly a problem when trying to ISOLATE one room from another - as in, 3-leaf wall effect; worse LF isolation, slightly better midrange isolation) Even if you're not concerned with isolation in any direction, this "drum head" will make it a living hell to get neutral sound in that room. The above procedure is about the only way I know of that will prevent this. I hope you're not so far along that this will be costly to remedy, but it DOES need to be looked into; hopefully I'm just seeing it wrong ??!? Steve
knightfly wrote:
Kathy, welcome to the insanity - I'm also amazed...
Steve and Dan, Thanks so much for your compliments! I didn't expect any actually. :-)
One thing that's bothering me though; the floor where there's apparently wood UNDER and OVER the joists, in one of the first pics. Whether you intended to build a floating floor or not, what you did build is a RESONANT system, a mass-air-mass-air-mass (I think) consisting of Earth-air-wood-air(insulation)-wood.
I don't understand what you mean. I don't see any wood over and under the joists. :?: There is an old barn floor made of wooden slats a long time ago. Directly underneath them is earth. It sits right on the ground with no foundation. So when we dug the holes to pour cement tubes we cut thru the slats, dug into the earth. So there is earth, wood slats, air, the subfloor joists, and then plywood to seal it. In the joist bays will be insulation. Is this what you are seeing and how is this wrong? Or are you seeing something else?
I'm concerned that this will bite you in the butt if care isn't taken to damp at least the top wood leaf (everything above the final joists) - otherwise, what you may have is a giant drum head that will color the room sound very noticeably :cry: The very least you will likely need to do here is to overfill your joist bays with UN-faced batts,
I have already purchased all of our insulation for the floor and it is the traditional pink stuff with paper backing. :cry:
THEN put the plywood down, and (preferably) then fasten the top floor to the subfloor with a layer of Green Glue for even MORE damping.
The plywood IS the top floor. I'm confused.
(if you use insulation that's faced, the facing can create other resonances in the floor cavity as well; but probably not loud enough to be audible, this is mainly a problem when trying to ISOLATE one room from another - as in, 3-leaf wall effect; worse LF isolation, slightly better midrange isolation) Even if you're not concerned with isolation in any direction, this "drum head" will make it a living hell to get neutral sound in that room. The above procedure is about the only way I know of that will prevent this. I hope you're not so far along that this will be costly to remedy, but it DOES need to be looked into; hopefully I'm just seeing it wrong ??!? Steve
Yes, please be seeing it wrong! Please! I haven't even started insulating the floor really. I'm still running wires thru the PVC and then I will fill the cavities and nail down the plywood. I just knew that we'd do something wrong. But hopefully you are seeing something that isn't there in the picture. If I HAVE screwed up with the faced insulation I'll live with it. But would adding an extra sheet of plywood to the floor, doubling it, help? I'm going to have to get my partner in here to follow along the thread. He's teaching me everything and he knows a lot but he is a virgin to the processes of construction that deals with the issues of sound. When I told him I wanted to build double walls for the front of the control room that separates the live room and will hold glass, he wasn't quite sure why. He's listening to my requests and giving me looks sometimes like I'm from another planet. :lol: I have to watch for things like air pockets, correct double wall framing, even double drywall was a very foreign idea to him. He's the teacher and the leader but he's not allowing for these things because he doesn't know about them so that's my job to alter each step of our work so that it conforms to the standards here for audio, if possible. So, I want him to come in here so he sees what the norm is for steps and procedures for ALL the studios in here. I don't think he's ever been on a message board in his life so I'll have to show him how to post. Anyways, I'm anxiously awaiting the outcome of this first potential problem. Look at the pictures again and tell me if what you saw is right. Thanks so much. I'm looking forward to the long haul in here. Kathy
If the wood I saw in the pic is against the ground, it won't cause any acoustic problems but it WILL (almost guaranteed) cause dry rot, mold, termite, and probably OTHER problems - if it's removable by any means short of removing your existing new framing, I'd strongly suggest getting rid of it before you go any further. If your already bought insulation is all kraft-faced, it's possible (not fun though) to remove the paper from all but the top layer; there are two main reasons for this. One, you do NOT want more than one vapor barrier in ANY exterior wall (a floor is, in many ways, just a horizontal "wall" - having more than one vapor barrier will trap moisture between them, and this is never good. Check the REFERENCE section for any and all "white papers" (linked) at Building Sciences Corp - an amazing resource for this aspect of building. The second reason for only one facing for ALL insulation in a cavity may not be as important to you, depending on your isolation needs - it actually, as thin as it is, STILL creates somewhat of a "third leaf" effect by dividing one large air gap into smaller, stiffer ones, thereby worsening low frequency TL a bit and, in the process, slightly improving the mid-range TL. The plywood IS the top floor. I'm confused. Sorry, I thought you would be adding a second layer for more mass... Adding a second, DAMPED layer over your floor would help the sound in the room quite a bit - thicker means lower frequency resonance, and damping (Green Glue is best but expensive) will also help. Packing your insulation in pretty tight will also damp the floor quite a bit. If your earth under the floor is pretty dry year 'round, and your rooms will be heated, then the only vapor barrier you want is one just under your top floor (over the joists) - this would be the paper facing on your top layer of insulation ONLY. A second barrier, in the form of poly against the ground, would only cause more problems by TRAPPING moisture between the two; this would cause premature rotting of your floor joists. 25 years ago I was about where it sounds like your friend is - knew quite a bit about building but NOTHING about sound construction. Point is, it's NOT intuitive, and I still have a crappy, NON-soundproof room to prove it :cry: - So I second the motion that your friend join the forum and follow that infamous "Read this before you even THINK..." - those first 2-3 threads in the REFERENCE section should help him get a handle on some of the why's and wherefore's; also, there's less lost in translation if he can ask his own questions in his own words. Last, no matter how much of a rush you are in please do NOT do things without FIRST asking if they will work; I really don't want to see you have to put up with, or have to correct, things that could have been prevented - I've been there, and it's NO FUN... Steve
knightfly wrote:
If the wood I saw in the pic is against the ground, it won't cause any acoustic problems but it WILL (almost guaranteed) cause dry rot, mold, termite, and probably OTHER problems - if it's removable by any means short of removing your existing new framing, I'd strongly suggest getting rid of it before you go any further.
The original barn floor is wooden slats sitting directly on the ground, yes. It's been there for over 100 years. When we cut any of the slats to dig the holes for cement pouring, the slats came up to reveal hardpacked dry dirt in most areas. However, now that I am thinking as I write this, many parts of the barn floor we cut into revealed yet another layer of wooden slats instead of dirt. I believe there is even an older floor under this one. Not in all places though, because we did hit dirt and cavities that had old milk bottles and antique blacksmith type tools, etc. Even if we did attempt to pull up each slat I think we will find yet another solid slat under many of them and time has taken those prisoner. They are a part of the earth as far as I'm concerned. So, if there is indeed two layers of old wood slats, two barn floors, is that good for me? After 100 years, a lot of these slats are still in good shape and not rotted at all. We chose to leave the original floor down for extra protection from the ground.
If your already bought insulation is all kraft-faced, it's possible (not fun though) to remove the paper from all but the top layer; there are two main reasons for this. One, you do NOT want more than one vapor barrier in ANY exterior wall (a floor is, in many ways, just a horizontal "wall" - having more than one vapor barrier will trap moisture between them, and this is never good. Check the REFERENCE section for any and all "white papers" (linked) at Building Sciences Corp - an amazing resource for this aspect of building.
I would have no problem removing the brown paper backing. But when you say "remove the paper from all but the top layer" I am confused. The paper is only ON the top layer. What am I missing? Also, is there any benefit of putting the insulation in upside down so that the brown paper backing is facing downward towards the original floor and the pink stuff is pointing up in the joist cavities? Or is that completely moronic?
The plywood IS the top floor. I'm confused. Sorry, I thought you would be adding a second layer for more mass...
Well, I was. But I am a little concerned with height on the east side of the barn where the roof is at its lowest. I'm also concerned in the control room where the ceiling will be low. But honestly, I am all for adding a second layer of plywood. I only need 12 sheets to cover the room.
Adding a second, DAMPED layer over your floor would help the sound in the room quite a bit - thicker means lower frequency resonance, and damping (Green Glue is best but expensive) will also help. Packing your insulation in pretty tight will also damp the floor quite a bit.
I will probably add another layer. As for Green Glue, I am considering it but the cost is my deciding factor. I was also considering it later for between each drywall layer. Question: I'm not using real plywood on the floor. It's that OSB stuff that is tongue and groove. It's $19 a sheet vs. $45 for real plywood. Is this ok? I assume it is. This is what I would use for the second layer as well.
If your earth under the floor is pretty dry year 'round, and your rooms will be heated, then the only vapor barrier you want is one just under your top floor (over the joists) - this would be the paper facing on your top layer of insulation ONLY. A second barrier, in the form of poly against the ground, would only cause more problems by TRAPPING moisture between the two; this would cause premature rotting of your floor joists.
What is poly? Yes, the earth is very dry under the wood slats. Like I said, some of the slats pulled up revealed a second set of floor slats and I'm sure the earth is as dry under there as well. So, we DO want the paper faced backing touching under the top floor. If I didn't buy the paperfaced backing then what would be serving as my vapor barrier then? I feel like I screwed up buying this type of insulation but you're saying that the paper facing against the underneath of the top floor is what you want for a vapor barrier. So what would the vapor barrier be if I didn't have paper facing on the insulation? Sorry if these seem like dumb questions but I really don't have the background to pick it up as quickly. Some things need a little more explanation and detail before it makes sense to me.
25 years ago I was about where it sounds like your friend is - knew quite a bit about building but NOTHING about sound construction. Point is, it's NOT intuitive, and I still have a crappy, NON-soundproof room to prove it :cry: - So I second the motion that your friend join the forum and follow that infamous "Read this before you even THINK..." - those first 2-3 threads in the REFERENCE section should help him get a handle on some of the why's and wherefore's; also, there's less lost in translation if he can ask his own questions in his own words.
Yes, I am going to get him in here. He's a busy guy. Married with 3 children (2 are twins), and the sergeant of the local police force here in town. Plus he owns a side business striping parking lots. He's popular and spread kind of thin so I'm lucky to have him when I do get his time. Our day is usually Wednesdays. He spends the whole day and we kick butt getting what we can done. Then he leaves me to continue based on what he has taught me. Sometimes he comes back for a couple of hours on the weekend but I usually continue on my own until the next Wednesday. But we live in a small town and if I have question or even need him to come help me do something he's 5 mintues away. When he's on patrol he often comes by in the cruiser to check how I'm doing in the barn as well. I just sent him an email telling him to come visit the forum. And next time he's here we'll look at it together.
Last, no matter how much of a rush you are in please do NOT do things without FIRST asking if they will work; I really don't want to see you have to put up with, or have to correct, things that could have been prevented - I've been there, and it's NO FUN... Steve
Yep. That's why I'm here. You guys are my virtual contractors. I'll run everything by you before we move to the next step. Thanks again. Kathy
(sorta) in order - If the barn wood floor is in that good a shape, I'd leave it too; some of these old constructs are amazing. I've read that Locust wood, for example, has been used for fence posts that were still solid after anything else would have been just a dim memory... Insulation - you're using 2x6 joists, right? If so, I'd assumed you had not very thick insulation (re: the pix) - so what I meant was, you would need more than one layer of insulation to over-fill your joist cavities, so that the insulation would push up against the bottom of the floor and damp any resonances. If you use a second layer of insulation, that would give you TWO places where the kraft paper would end up and that's NOT GOOD, either acoustically or "moisturally" :? as it would trap moisture, most likely just where it DOESN'T need to be. So, if I'm right and your insulation blankets are NOT thick enough to stick up ABOVE the floor joists before putting the plywood/OSB down, then you need MORE fill in the floor in order to make the insulation stay snugly in contact with the OSB, thereby damping the floor against resonating. With the "fluffy stuff" type of insulation, between 15-20% "crush" is what you want. No, you do NOT want the paper backing against the ground; it belongs against the underside of your first layer of OSB that's on top of the joists. It's not moronic, just incorrect. Speaking of OSB, most agencies at this time consider it a direct replacement for plywood; being a cantankerous old fart, I still have my doubts. However, for this application the main requirement is density and a fair amount of strength, and OSB meets those criteria just fine. You'll want to put the first layer down using construction adhesive between joists and OSB PLUS nails (better yet, screws properly sunk) - this will minimise any rattles/vibrations/squeaks. Same with the second layer, only just glue the T&G joints themselves, and stripes of adhesive over each joist location - this allows each layer to maintain its own coincidence frequency, which helps with damping a bit. The ONLY time you'd want to glue ALL the face surface of a second layer, is if you're using a Constrained Layer Damping material such as Green Glue. If the approximately $14 per sheet cost of Green Glue is daunting, you can get somewhat the same effect (not as much tho) by laying down two layers of 30# roofing felt (heavy tar paper) between the two OSB layers. You would NOT overlap the paper, just BUTT each row; then, do the second layer of paper at right angles to the first, butt each row (they're about 36" wide), and fasten with T50 staples (or if your bud has a coil roofing nailer that would work) "Poly" is polyethylene sheeting, sometimes called Visquene - and if you didn't have paper backed insulation, this could be stapled over your joists before the OSB goes on; but paper is better, because it allows a bit of breathing which the poly will NOT. No apologies necessary; the only time I get irritated with people is when they DON'T want to learn :? Otherwise, I'll explain in as many different ways as I know how til it's clear. If any of my answers seem curt, blunt, rude, etc, it is NEVER intended; I'm only trying to avoid mis-communication, which occasionally happens DESPITE my attempts. One example: When I say "solid core door" I mean a full thickness, SLAB of heavy wood that's the same thickness everywhere - but I failed to make that plain at one point, and at least one member bought "solid core" doors that were really "panel" doors. They were actually solid, but thinner where the panels were (less mass is NEVER good when you're trying for isolation) - so now I try to make things so painfully clear that this doesn't happen again. The good news: we were able to help the member fill those doors and it worked out... You guys are my virtual contractors. Cool; got lotsa tools, now we got virtue... :mrgreen: ... Steve Hey, this is your "butt-kickin" day - get off the 'puter and go kick some fer me... :wink:
okay...you're gonna love this post. Its contents might be considered for the "Stupidest Mistake" award. But I'm getting ahead of myself...
knightfly wrote:
(sorta) in order - If the barn wood floor is in that good a shape, I'd leave it too; some of these old constructs are amazing. I've read that Locust wood, for example, has been used for fence posts that were still solid after anything else would have been just a dim memory...
Yes, now you're understanding what I was trying to convey. I know nothing about this but it has been told to me by Scott (my friend) and others that those boards are great and that they would even be worth some money. The floor is solid enough to want to keep those slats underneath the new floor for sure. And the fact that there is even a second layer of wood under much of it makes it even more sturdy. We just couldn't use it as a "real" floor because it sags in places and is just dirt underneath some spots and is loose in areas. And warped and uneven as hell. But I like knowing that it's under there.
Insulation - you're using 2x6 joists, right? If so, I'd assumed you had not very thick insulation (re: the pix) - so what I meant was, you would need more than one layer of insulation to over-fill your joist cavities, so that the insulation would push up against the bottom of the floor and damp any resonances. If you use a second layer of insulation, that would give you TWO places where the kraft paper would end up and that's NOT GOOD, either acoustically or "moisturally" :? as it would trap moisture, most likely just where it DOESN'T need to be.
OHHH! I get it! See, I had no clue we were talking about 2 layers of insulation therefore using 2 paper backings. This is crucial that we talked about it. We had just laid down ONE strip of insulation in the joist cavity and that was it. There is a HUGE hole, and I mean huge, between the barn floor and the bottom of the insulation. Our new floor is almost a foot above the old one. Remember I said that the barn floor was uneven? Well, the distance between the barn floor and the top of the new floor joists is 12" in some spots and only 9" in others. But there's a lot of varying space under there. Scott said that one strip of insulation was fine. Personally, I thought that the insulation was supposed to touch both the barn floor and the OSB new floor. And if I understand you correctly, then this is true? The entire space from old floor to new floor should be filled/stuffed with insulation and there should be NO air space? That makes sense to me in terms of plain old insulation and keeping out the heat and cold, nevermind about sound. It seems as though only one strip of insulation couldn't do the job when it's so far above the old floor. So, if this is true this is GOOD news. It means I did NOT buy enough insulation to do the floor joists at all. I can sorta correct my mistake by purchasing the yellow fluffy stuff now? Can that be the bottom layer that lays on the barn floor and then the pink stuff with paper backing lay on top of that? That would be ideal if I could still use my pink stuff and only add an order of non-backed yellow stuff to add to it to fill the cavity completely.
So, if I'm right and your insulation blankets are NOT thick enough to stick up ABOVE the floor joists before putting the plywood/OSB down, then you need MORE fill in the floor in order to make the insulation stay snugly in contact with the OSB, thereby damping the floor against resonating. With the "fluffy stuff" type of insulation, between 15-20% "crush" is what you want.
See above....can I do what I asked?
No, you do NOT want the paper backing against the ground; it belongs against the underside of your first layer of OSB that's on top of the joists. It's not moronic, just incorrect.
Okay. Just checking. Thanks for not making me feel stupid. :wink:
Speaking of OSB, most agencies at this time consider it a direct replacement for plywood; being a cantankerous old fart, I still have my doubts. However, for this application the main requirement is density and a fair amount of strength, and OSB meets those criteria just fine.
Cool. I'm glad to know that. It definitely saved some money. Especially when you talk about doubling it.
You'll want to put the first layer down using construction adhesive between joists and OSB PLUS nails (better yet, screws properly sunk) - this will minimise any rattles/vibrations/squeaks. Same with the second layer, only just glue the T&G joints themselves, and stripes of adhesive over each joist location - this allows each layer to maintain its own coincidence frequency, which helps with damping a bit.
Geez, we didn't do any of that properly! I guess I should tell you we got a little excited and actually nailed down one of the boards already BEFORE we even started laying out the tubing! It was 2 weeks ago. We were so excited to be done with the floor joist framing and I had a delivery of lumbar out in the driveway. In New England this time of year that's not good. So, we brought in a few pieces of the OSB to throw down loose so we would have an area to walk on and put the saw and tools as we worked. Well, there is one spot in the back of the control room where we didn't THINK there would be any tubing or cabling or anything. It's basically an area that the couch is going to go (see my layout chart if necessary Barn Layout ). So that's the area we are designating as our work area. We grabbed a roll of insulation and threw a few rows down, stapling the paper to the tops of the joists (and this is where I now cringe knowing that there is not enough insulation under there!). We threw down a board, cut it to rest on the joist properly and around a piece of bumped out wall in the back. It was the end of our Wednesday and Scott had just opened a few Coronas and was feeling good! As we were admiring our work he said, "Screw it! I'm nailing it down!" I said, "Are you sure"? and he replied, "Yeah, there's nothing going here". And so he did. Well, all was good until a couple of days later when I'm starting the maddening process of laying out tubes and realize that I forgot to tell him that indeed there WAS tubes needing to go there. Part of my Lshaped/circular desk will run down that wall and that is where I have a desktop rack that holds all of my midi instruments and guitar processors. Those have to be wired to various other parts of the studio. I needed three tubes there. So, when he came back the following Wednesday we cut out 3 holes and managed to get the tubes slid underneath (because there IS no insulation on the barn floor and we could slide the tube right under the insulation hanging from the joist cavity). Nailing down that one board has caused problems. I then discovered that the 2" tubing I used there could not handle 2 snakes being run thru with TRS connectors on the ends. They got caught in the 90 degree elbow. It was a mess and the start of my nightmare. To make matters worse, the few tubes he started to lay with me were ones he GLUED together once we had them down and the string run thru them. He glued the elbows and then the extension piece that comes up thru the floor. There was no way to change things. So, I had to saw the extension off and slide the tube back out from under the floor. Then I manually put the snakes in thru the straight part of the tube and maneuvered them thru the elbow. This time I just taped it secure and then ran the tube fully filled with snakes back under that OSB board and used a new extension piece to come up thru the floor. What did this all teach me?
    •We secured the floor prematurely •We shouldn't glue or nail anything permanent until the last second •We need to run as many actual snakes and cables now BEFORE buttoning up the floor because the less wires I have to use the string for the better.
Back to the methods you have told me about how to lay down the floor. He used #8 nails. Is this not sufficient? Do we have to use screws? I prefer screws but is it a matter of taste or is there a reason why we should use one over the other? Of course, if we had used screws, pulling it up would not be such a problem! Well, actually, not if an adhesive was used. I didn't know about this. What kind of construction adhesive to use (brand, style) and is it only one strip where the board is going to lay over the joist? Second layer, the adhesive on the T&G and over each joist? Do I use the adhesive on the T&G of the first layer too? Any nails or screws on the second layer? I love your commitment to communication and attention to detail. I am the same way. Could you just lay it out in steps for me again as if I were a monkey that needed to know EVERY small thing on how to lay and secure the floor? Specifically, the differences between layer one and layer two. That would help me tremendously to not be confused.
The ONLY time you'd want to glue ALL the face surface of a second layer, is if you're using a Constrained Layer Damping material such as Green Glue.
Yes, that's one area I have read about here and am not confused about. I know how Green Glue is applied and the cost. I did my homework there.
If the approximately $14 per sheet cost of Green Glue is daunting, you can get somewhat the same effect (not as much tho) by laying down two layers of 30# roofing felt (heavy tar paper) between the two OSB layers. You would NOT overlap the paper, just BUTT each row; then, do the second layer of paper at right angles to the first, butt each row (they're about 36" wide), and fasten with T50 staples (or if your bud has a coil roofing nailer that would work)
That's a great suggestion, thank you! I'll have to look into the pricing of that. I know it won't be as goodas Green Glue but I'm actually not a stickler in this area so the little extra protection that it provides will be enough for me. Would this also work later on the walls between two layers of drywall?
"Poly" is polyethylene sheeting, sometimes called Visquene - and if you didn't have paper backed insulation, this could be stapled over your joists before the OSB goes on; but paper is better, because it allows a bit of breathing which the poly will NOT.
Cool. If my idea of mixing two insulations is approved then I'm glad I have the paper backing that I do.
No apologies necessary; the only time I get irritated with people is when they DON'T want to learn :? Otherwise, I'll explain in as many different ways as I know how til it's clear. If any of my answers seem curt, blunt, rude, etc, it is NEVER intended; I'm only trying to avoid mis-communication, which occasionally happens DESPITE my attempts. One example: When I say "solid core door" I mean a full thickness, SLAB of heavy wood that's the same thickness everywhere - but I failed to make that plain at one point, and at least one member bought "solid core" doors that were really "panel" doors. They were actually solid, but thinner where the panels were (less mass is NEVER good when you're trying for isolation) - so now I try to make things so painfully clear that this doesn't happen again. The good news: we were able to help the member fill those doors and it worked out...
Thank you again for having that patience to continue explaining until things are crystal clear. I love that and I am the same way. I appreciate your efforts.
You guys are my virtual contractors. Cool; got lotsa tools, now we got virtue... :mrgreen: ... Steve Hey, this is your "butt-kickin" day - get off the 'puter and go kick some fer me... :wink:
Well, this is the second Wednesday in a row I have told him not to come because I am not ready for him. I have to finish the tubing and cabling before we move on to the next stage that I don't know how to do alone which is laying the floor. He has shown me what I need to know in terms of the tubing and insulation (and now I have straightened that out even more by coming here before it's too late). The idea is that he gets me started and I finish up until we are ready for the next step that I can't do without him. Just like he couldn't do the cabling without me. It's not his studio and he doesn't know what I need nor does he understand how that all works. It would be a waste of his valuable time to be here while I ponder what needs to go where and change things in my mind over and over. I told him to stay home until I had this mess sorted out which I now do. So, I have to get that tubing laid down now, cables run, and then resume filling the cavities with insulation. Then I will be ready for him to come back and we can lay the floor. He doesn't know yet that it's going to be doubled. I'll have to order 12 more pieces. Another question about cutting the floor OSB: Is it common to have to cut these 4x8 sheets so that they fall correctly on the joists at 16" center? And also, the tubing is coming up thru the floor. We will have to cut out circular holes in the OSB to slide over the tube ends. Any thoughts or suggestions there? Making those precise cuts have us both worried.
Re: Prior Post Regarding Barn Floor Condition Below are pictures of the barn floor closeup. You can see the old wood slats better here and even see where there is wood below them in one picture. You can also see how high up the new floor sits. We have two doors to the room. When you open them you’ll step up. Please click on each one to enlarge for detail. http://www.kathylabonte.com/barn/misc/th_floorgap.jpg http://www.kathylabonte.com/barn/misc/th_old_slats_close1.jpg http://www.kathylabonte.com/barn/misc/th_old_slats_close2.jpg http://www.kathylabonte.com/barn/misc/th_old_slats_close3.jpg http://www.kathylabonte.com/barn/misc/th_old_slats_close4.jpg Re: Prior Post Regarding Securing Floorboard Prematurely! Below are pictures of that one OSB board section that we nailed down prematurely. You’ll see where we cut holes to bring the PVC tubing up thru. Please click on each one to enlarge for detail. http://www.kathylabonte.com/barn/misc/th_osb_nailed.jpg http://www.kathylabonte.com/barn/misc/th_osb_nailed2.jpg
Wow! Very professional! Best of luck to you with your project, it looks to be going great! Mike
Hi guys, I know my last 2 posts were a mouthful and we've got stuff to go over. But I thought while I was waiting for answers on the insulation I would look to the future a bit and the framing of the walls that we'll be doing next. In this barn, 2 of the 4 walls are stuffed with insulation and ready for drywall. That's just the way it was when I bought the house for the most part. One in particular that is ready to go is the east wall and it is where the vaulted ceiling is sloped down to its lowest point. A simple wall to deal with relatively speaking. But one of the 2 walls that are currently far from ready for anything is the west wall and this is the one that is highest with the vaulted ceiling at it's peak. This is also a true blue "barn" style wall. Almost like a barn door in some places. There is NO traditional 2x4 framing as I don't think they even used that size wood back in 1900. There's no frame at all. It's hard to explain so I have prepared some pictures. First, let me say that my main question is going to be how to insulate that wall. With no true cavities to stuff it's strange. But there ARE large gaps and holes between wooden slats and the wall which could be stuffed. My thinking though is that maybe putting up insulation on the outer facing of the wall would be best. Remember, we are building our own new wall on the floated floor and not using this existing one. Because of its uneveness, there is a part of the wall that protrudes and will butt up against the new wall on the floor joist but 95% of the wall will be about a foot back from the new wall. There is a large gap between the existing wall and where we will frame our new wall. So, because of that huge air gap I'm thinking it is okay to just secure insulation on the outside of the existing wall rather than try to stuff the awkward cavities here and there. None of this makes sense until you see it. I have spent 4 hours preparing pictures in Photoshop that are full of text descriptions and arrows pointing to important elements in the photo. There are 7 photos total and they DO make sense to be viewed in the order I have them. Please take the time, if you have it, to look at them and read the comments. Then perhaps you'll "see" what I see and be better equipped to tell me what to do. As always, thanks for your time and interest in advance. Please click on each one to enlarge for detail. Photos are in a logical order sequence. http://www.kathylabonte.com/barn/misc/th_old_westwall1.jpg http://www.kathylabonte.com/barn/misc/th_old_westwall2.jpg http://www.kathylabonte.com/barn/misc/th_old_westwall3.jpg http://www.kathylabonte.com/barn/misc/th_old_westwall4.jpg http://www.kathylabonte.com/barn/misc/th_old_westwall5.jpg http://www.kathylabonte.com/barn/misc/th_old_westwall6.jpg http://www.kathylabonte.com/barn/misc/th_old_westwall7.jpg
I just wanted to mention that I spent a few minutes at your site, Kathy, and I must say... Your writing style and the photos you're sharing with the world are really cool. I almost feel like I know you! 8)
sharward wrote:
I just wanted to mention that I spent a few minutes at your site, Kathy, and I must say... Your writing style and the photos you're sharing with the world are really cool. I almost feel like I know you! 8)
Thank you so much. What a nice thing to say. Honestly, that made me feel great. Thanks. And as far as knowing me, if you've read my site then you probably do. I'm an open book, always have been. I wear my heart on my sleeve. A huge downfall and a huge advantage all at the same time. You either love me or hate me. But I'm just me. I say it like it is and sometimes I got lots to say... Thanks for visiting my site. And as I said in my opening post, I feel like I know some of you as well just from following the threads. Sharward, you've put your heart and soul into this place, for sure. I'm still trying to get caught up on your entire project and I will.
Have you tried pulling wires through that PVC yet? I'm an electrician, and looking at it, some of those corners are pretty tight. Are you sure you're going to be ok? Conduit elbows are made for pulling, why not use electrical conduit? Great pictures! It looks like you're having fun. One of these days I plan on posting a bunch of pictures of my studio construction. I've got just under 6 years of photos... :)
SonicClang wrote:
Have you tried pulling wires through that PVC yet?
Yep. See below....
I'm an electrician, and looking at it, some of those corners are pretty tight. Are you sure you're going to be ok?
Nope! :oops: That's why everything came to a screeching halt two weeks ago and I have not had my buddy here on Wednesdays (our workday) to work on the studio for 2 weeks. I discovered that on the 2" tubing, my snakes were not going thru with 8 TRS ends on them! DUH! Not thru the elbows. I don't know WHAT made me try one. Just instinct. The one section of the floor that we nailed a board down prematurely is what led me to this. I had one tube we managed to get in AFTER the fact and I was looking at it .....just wondering.... So, I attempted to run the TWO snakes that it was designated to hold. No dice. The snake was fine, even the pipe was not the problem. It was the elbows. I was using strong string and pulling and pulling........and pulling and pulling............and pulling..........and....... I looked around to see if I was on Candid Camera. :shock: :evil: I realized that I was going to be very defeated at the end of my journey if I could not wire any of my new studio. We had only put down about 1/4 of the piping at this point but this particular one was glued up and secured within that one damn floor board. So, I took a saw to it and slid it back down and out from under the floorboard. I found out that the snakes would fit fine if I manually worked them in with the elbows off and then slide the elbow over everything. That worked great. But I wasn't going to be able to do that once the floor was down! So, I made the decision right then and there to disassemble my current temporary studio and steal all of my cabling from it now to lay into place permanently. I did not want to take the chance of trying to snake things thru later with problems. I can rig something up for the time being in my temp studio with a few spare leftover snakes and wires hanging around. The priority is to get all the permanent cables and snakes assigned to my gear unhooked and into their respective tubes to lay dormant underground for a while until we finish the whole project. So, that's what I've been doing. That one discovery has led me to wire up the rest of the tubes and NOT to use ANY glue until I know I am done and there are no conflicts or situations with placement. Then I'll glue the elbows and extensions together. This was especially true for the 30 foot mic snake that had 8 XLR ends on it AND it ends in a wye to wind up in two places (I modified the last 10 feet of the snake by removing the casing to allow 4 mics in two different areas). To be honest though, this problem with the elbows only occured on teh 2" piping. The 3" and 4" are huge and quite roomy. The snakes fit thru fine with all of their ends in tact and without effort in pulling. I intend to wire as much as possible but there will be a couple of tubes left for future needs that will just hold string in anticipation of new calbes I might need. I'm making sure those will be ok and large enough. I'm tellin' ya - this stage of the floor has been the hardest. It has required me to make all sorts of charts and think moves ahead and change my plans over and over. All for the better I might add. My new layout will be much more practical so I'm glad I was forced into doing this wiring now.
Conduit elbows are made for pulling, why not use electrical conduit?
It was twice as expensive and I thought I'd be okay with this.
Great pictures! It looks like you're having fun. One of these days I plan on posting a bunch of pictures of my studio construction. I've got just under 6 years of photos... :)
Wow, I'd love to see them! I'm sure everyone here would. I hope you do get around to it. Thanks for the compliments. And thank you for noticing the tubing and speaking up. You would have saved me if I hadn't already discovered it. I appreciate that. So, you're an electrician 'eh? I'm sure I'll have a question or two for ya soon enough! May I pick your brain sometime? :?:
When I saw the pictures of the PVC pipe I knew you were going to run into issues at the corners. Yeah, it's too bad I wasn't browsing these forums a little sooner. Like you found out, it's not the pipe size that gets you, it's the elbows. That's why 90 degree bends in electrical conduit terms is a lot of times referred to as a "sweep". You may benefit from using some pulling gel. You can find some right here http://www.blackbox.com/Catalog/Detail. ... 2&mid=4378 I can't tell you how many times I've been SAVED by this stuff. And screw that string stuff, what you need is a good fish tape. http://www.smarthome.com/9066.html You can find those at any Home Depot, Menards, or Lowes, whatever is around your town. Push that through the conduit, loop a couple wires on the end, and tape it all together with some quality vinyl electrical tape. Get a second person to help you as you pull the wires through. One person needs to feed the wires in as the other pulls. Get some rags ready for the person pulling because when he/she gets to the end with the pulling gel he/she isn't going to be able to pull any more without wiping the stuff off first. :) I hope this helps. Oh yeah, and ask away about any questions. My brain is free for your picking.
Kathy, Nice work so far! Before it's too late, are you SURE you don't want to pull up the old flooring boards and sell them? From what I've heard, you could finance the whole studio (and probably MINE too!). One other comment - on your patchbay layout PDF, you show a Behringer Ultrapatch. I believe they make three models (1000, 2000, 3000). Which are you using? I mistakenly bought a 2000 which is UNbalanced only. You can use an unbalanced cable/connection with with a balanced jack but not vise-versa. len
SonicClang wrote:
You may benefit from using some pulling gel. You can find some right here http://www.blackbox.com/Catalog/Detail. ... 2&mid=4378 I can't tell you how many times I've been SAVED by this stuff.
Never heard of it. Thanks. I will check into it. I think I'm ok now though because most of the wiring I am doing now is with elbows off and into big pipes. Now that I've chosen to do it before it's all secured into place it's much easier to manipulate.
And screw that string stuff, what you need is a good fish tape. http://www.smarthome.com/9066.html You can find those at any Home Depot, Menards, or Lowes, whatever is around your town. Push that through the conduit, loop a couple wires on the end, and tape it all together with some quality vinyl electrical tape. Get a second person to help you as you pull the wires through. One person needs to feed the wires in as the other pulls. Get some rags ready for the person pulling because when he/she gets to the end with the pulling gel he/she isn't going to be able to pull any more without wiping the stuff off first. :) I hope this helps.
Yes, it did! One question though: Is the fish tape something that can be used on the tubes AFTER the floor is down and I have to pull cable thru down underneath the floor? It seems to only be for the kind of work I'm doing now where I have free access to hold the tubes and stuff. Since the picture only showed it all rolled up, how does it have the weight to fall downwards into the tube, around the bend, and all the way thru to the other side? I'm trying to picture doing this with the tubes already in the floor and the extension pieces sticking up - is it for that type of situation?
Oh yeah, and ask away about any questions. My brain is free for your picking.
Thank you! I shall. :D
len-morgan wrote:
Kathy, Nice work so far!
Thank you very much. I appreciate that.
Before it's too late, are you SURE you don't want to pull up the old flooring boards and sell them? From what I've heard, you could finance the whole studio (and probably MINE too!).
I'm sure I DO! I always would have but I have not known where to go with this. Scott mentioned they might be worth something and so did someone else. It was left at that and we moved on. I have no clue as to how to approach this. Makes me sick that we actually cut into some of them for the cement posts. But there are still plenty left. Any ideas from anyone about who I can contact to buy these? I would use the cash to finance a heating/air/ventilation solution as I do not even have plans for that yet and do not know what I'm doing there.
One other comment - on your patchbay layout PDF, you show a Behringer Ultrapatch. I believe they make three models (1000, 2000, 3000). Which are you using? I mistakenly bought a 2000 which is UNbalanced only. You can use an unbalanced cable/connection with with a balanced jack but not vise-versa. len
Yeah, good observation. You mean someone actually looked at those layouts I made?? :shock: I bought the PX 3000 models for the balancing aspect. They'll handle the unbalanced fine as well.
The fish tape is very rigid. You push it through the conduit after it's all together and it'll go through it all because it's tough stuff. I've used a 500 foot fish tape before and pushed it through a LOT of conduit, and then pulled very large amounts of wires into the conduit. Normally in electrical work, you run the conduit so you've got one contiuous peice from one end to the other. Normally it's from one box to another. Then you push the tape through all that. So yeah, this could be used after your floor is down and you can no longer access the middle of the pipes. In my studio as of right now, all you can see of the conduits I've run are the ends. They all come into the control room, and the other ends are in the live room and vocal room. Without taking the ceiling down I wouldn't be able to touch the middle of the conduits, but I don't need to as long as I've got the ends accessible.
wow! nice work on the documentation. i'd like to add a vote for the existing flooring... even if you don't sell it you could pull it up and use it on top of the osb for your finished floor (assuming its in good shape and it looks like it is...) because once you layed it on top and did some light sanding and maybe stain/polyurethane, it would look incredible and you could never buy that floor... ok, back to lurking...
SonicClang wrote:
The fish tape is very rigid. You push it through the conduit after it's all together and it'll go through it all because it's tough stuff. I've used a 500 foot fish tape before and pushed it through a LOT of conduit, and then pulled very large amounts of wires into the conduit. Normally in electrical work, you run the conduit so you've got one contiuous peice from one end to the other. Normally it's from one box to another. Then you push the tape through all that. So yeah, this could be used after your floor is down and you can no longer access the middle of the pipes. In my studio as of right now, all you can see of the conduits I've run are the ends. They all come into the control room, and the other ends are in the live room and vocal room. Without taking the ceiling down I wouldn't be able to touch the middle of the conduits, but I don't need to as long as I've got the ends accessible.
Cool. That sounds like exactly what I'll need when I'm all done and there's an extra cable or two I'll want to add to the system after I'm up and running. I'm leaving room in the tubes as well as a couple of extra spares for future expansion. I'll run some string anyways to have it there but it sounds like the fish tape will do what I need to if the time comes. Thanks for explaining it to me.
gullfo wrote:
wow! nice work on the documentation.
Thank you very much. I appreciate you taking the time out to read thru it all and look at the files and pictures.
i'd like to add a vote for the existing flooring... even if you don't sell it you could pull it up and use it on top of the osb for your finished floor (assuming its in good shape and it looks like it is...) because once you layed it on top and did some light sanding and maybe stain/polyurethane, it would look incredible and you could never buy that floor... ok, back to lurking...
Well, you just cracked open a whole new can of worms now! What a great idea. I was going to have to lay out money for whatever floor type I was going with. I'm using part carpet in the back of the control room where the sofa will be but a wooden floor of some type at the front of the control room and under my chair and desk/work area. Hard wood flooring is expensive so I probably would have gone with one of the cheap end laminates. By pulling up those old slats I would have an awesome sense of the past and the personality of the barn in the control room with me. I like that kind of thing. As it is, we have discovered very old style metal types of tools and machinery buried in the ground behind the barn and I was keeping a few of those to clean up and hang on the exposed beams when it is done. We found things like an old flywheel and clutch to a car from like the 20s and some horseshoes from the blacksmith and all sorts of things I have no idea of. Anyways, I'm getting off track. Pulling up the floor is a superb idea but a HELL of a lot of work. For starters, I wouldn't know how to finish those boards once I have them. Sand them? Put a protective coating? I think Scott's gonna have a coronary when I tell him I want to do this. :shock: :shock: I think I'd be pushing the boundaries of his generosity a bit. So, if I attempt it I think I'll give it a go on my own and see how far I can get without him. I haven't the first clue as to how to get those up without splitting or damaging them. Any suggestions? A nail claw with the help of a traditional hammer claw and some careful elbow grease? I suppose once I get one started the rest will fall in place like dominoes. I'll confess I went out there tonight and just tugged on one with the back of the hammer. Not only did it start to come up but I confirmed the second floor underneath it that is much older and VERY stubbornly stuck to the ground (although that may come up as well once the top layer is off). Truth is, I'd like to sell it to get the money for the heat and air equipment.....and perhaps keep a dozen boards to artistically scatter thru the new floor - or place in a square pattern somewhere prominent. But I'm getting ahead of myself. I've got to get them up first. Any of you gentlemen in the New England area happen to have no life at all and a burning desire to partake in pulling up an old barn floor? Yeah, right! Well, I'll take all the virtual instruction you've got to offer over the ethernet line in lieu of physical muscle..... Tomorrow is Super Bowl Sunday so I won't be able to do much (though if I know myself I'll sneak out there for an hour to see what I can get done and get my feet wet). I'm having a party, as I do every year, even though my beloved Patriots blew it this season. I've got a 65" DLP screen with high definition and enough home cooked food to feed the town. The party's here tomorrow guys!