FINISHED IN 2020! Sharward's Partial Garage Conversion

Started by sharward on 3 January 2005. 1,541 replies, 2005–2020. In the Library under Build diaries. Key posts in this thread.

Originally posted at johnlsayers.com, topic 2921.

Let me catch you (and others) up on that. My original plan was to rip all the drywall off the ceiling, install new 2x6 joists parallel to the trusses, and then attach multiple layers of drywall to the new joists. I had actually planned on notching the new joists so that they sit a little below the trusses -- that would have taken all the weight off the bottom chord of the trusses and would have eliminated contact with them altogether so that I wouldn't have to worry about the possibility of vibration transferring to the trusses. After learning more about Green Glue, I decided (with help) that I would instead leave the existing 5/8" drywall in place, then add a second layer of 5/8" drywall with Green Glue sandwiched in between.
External image, not preserved — original: http://forum.studiotips.com/files/ceilingrevised_124.gif
Here is the thread on Studiotips where I posed that change and it was well received. Obviously, the holes I created would be patched with the same thickness of drywall that I removed before adding the extra layer. However, I have since become a little nervous about hanging a second layer of drywall on that channel. :? I do have a small piece of it, so I should be able to get it measured to see what its guage is... :roll: ...Maybe it's fine, but there's something that makes me nervous about it. According to my math, each drywall screw driven into the channel holds about 1 1/2 pounds of dead weight. However, each screw driven through the channel into the truss holds about 5 pounds of dead weight. Adding another layer of drywall adds another 5 pounds, so that's 10 pounds per screw into the trusses. These screws only have 1" of penetration too. :x Maybe it's fine, maybe it's not. :roll: Whereas initially I was worried about the channel, I'm now worried about the screws holding the channel up. One of the things I plan to do regardless is also drive screws through each layer of drywall directly into the trusses. This would take some weight off the steel channel. I'll cross that bridge when I get to it... Which will be pretty soon! :shock: I plan on doing some detailed "original plan vs. proposed plan" (even more detailed than the image above) to present to the city, as I can't deviate from the plan they approved without their, uh, approval. --Keith :mrgreen:
I'll cross that bridge when I get to it... Which will be pretty soon!
Yeah, when Slacker-boy up the hill gets done with that drywall lifter... :wink:
Hey man -- I've seen what "Slacker Boy" has accomplished in a mere two months. I want some of those Slacker Pills you're takin'! 8) --Keith :mrgreen:
sharward wrote:
However, I have since become a little nervous about hanging a second layer of drywall on that channel. :? I do have a small piece of it, so I should be able to get it measured to see what its guage is... :roll: ...Maybe it's fine, but there's something that makes me nervous about it. According to my math, each drywall screw driven into the channel holds about 1 1/2 pounds of dead weight. However, each screw driven through the channel into the truss holds about 5 pounds of dead weight. Adding another layer of drywall adds another 5 pounds, so that's 10 pounds per screw into the trusses. These screws only have 1" of penetration too. :x Maybe it's fine, maybe it's not. :roll: Whereas initially I was worried about the channel, I'm now worried about the screws holding the channel up.
Keith, If you screw through the channel into the bottom chord of the truss - the channel won't have any load at all - and the effect is not cumulative - in other words - when you are done screwing a sheet up - the next layer of drywall is the only weight it's screws have to carry....... but you want more than 1" of penetration - I would consider 1 3/8" absolute minimum - and 1 1/2 to 1 5/8" preferable. Rod
Thanks for watching over my shoulder, Rod -- it's great to know you're following. 8) I'm feeling a lot better about this now. I think. ;-) So, let me see if I got this straight (and I'm sure you'll correct me if I'm wrong ;-))... You're saying that if I add a bunch of screws to the existing drywall layer, bypassing the channel altogether and going straight into the bottom chords of the trusses, that would dramatically reduce or completely eliminate the load on the channel -- so that I no longer need to be worried about the screws holding the channel up. Those screws would need to be 2 1/2" long to penetrate the 5/8" drywall, the 1/2" inch or so of gap height of the channel), and 1 3/8" of penetration into the truss. (Or should I use 3" screws to penetrate 1 7/8"?) Then the second layer (with Green Glue in between) would be attached in much the same fashion, using even longer screws -- probably 3 1/2" screws to penetrate 1 3/4". Rod, I'm assuming deeper penetration is better than not enough (easy, fellas... ;-)) -- I just need to make sure that I'm not doing "too much of a good thing" (i.e., aspirin is good but too much can kill you)... :roll: Bear in mind too that the trusses are 6 years old... Not exactly "old growth," but it's definitely a lot harder than the new stuff I bought... so perhaps that may be a factor in a tie-breaking match. Thanks again, Rod! 8) --Keith :mrgreen:
BTW, you're gonna need some muscle and GOOD SCREW GUN to get that much penetration into the joists. Probably one with a cord will do, but if you want a really good cordless: http://www.amazon.com/gp/product/B00009 ... e&n=228013 I think this is then new version of the one that Jeff has, and it's amazing. It'll easily go a whole day screwing 3 inch screws up into the ceiling without running out the battery, and it has great power... didn't flinch at driving them up through 3 layers of 5/8" and into 30 year old joists. Of course, my arm was flinching after a few hours of it. :wink:
I just discovered this exemption to my local noise ordinance:
    8.68.080(E) Noise sources due to the erection (including excavation), demolition, alteration or repair of any building or structure between the hours of seven a.m. and six p.m., on Monday, Tuesday, Wednesday, Thursday, Friday and Saturday, and between nine a.m. and six p.m. on Sunday . . . (Source)
This means that, aside from trying to be courteous, I have to be really careful about the construction noise I generate before 6 p.m. I was banging nails until close to 8 p.m. on Sunday... :oops: This doesn't mean that I have to stop all construction activities at 6 p.m., but it does mean that I can't exceed the objective or subjective noise standards during those hours. In other words, using a screw gun after 6 p.m. is probably OK, but using the miter saw or banging on nails after 6 p.m. is probably illegal, not to mention a bit obnoxious to the neighbors who I'm ironically trying to help with the construction of this thing in the long run. :roll: So much for my hope to make some framing progress after work tonight... :x I picked up some lumber yesterday evening and I'm chompin' at the bit to finish the outer leaf! :twisted: I haven't had any complaints, or even requests, to be quieter with the construction, and I'd like to keep it that way. --Keith :mrgreen:
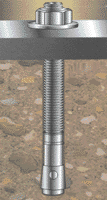
Last night I penciled onto the floor the doorway openings. I'm leaving 39" for my 36" door, including the door frame. That doesn't include the king studs and trimmer studs that will be on either side of the 39" doorway. I was hoping that the doors would be precisely "even" -- i.e., the openings are exactly "one right in front of the other." Ends up that I can't avoid them being about 1/2" off. :roll: With shimming I might be able to mitigate that though. On my lunch hour today I bought a 1/2" x 5 1/2" galvanized concrete wedge bolt...
Recovered from web.archive.org — originally hosted at http://www.smithfast.com/images/trubolt.gif
...and a 1/2" masonry drill bit. I'll be (hopefully) drilling the hole for that tonight. This is to secure the soleplate next to the outer leaf door. Drilling in concrete... Should be fun... :evil: --Keith :mrgreen:
We used a roto-hammer to drill those holes in my 30 year old concrete... like butta.
I was banging nails until close to 8 p.m. on Sunday... This doesn't mean that I have to stop all construction activities at 6 p.m., but it does mean that I can't exceed the objective or subjective noise standards during those hours. In other words, using a screw gun after 6 p.m. is probably OK, but using the miter saw or banging on nails after 6 p.m. is probably illegal, not to mention a bit obnoxious to the neighbors who I'm ironically trying to help with the construction of this thing in the long run.
Hey Sharward, maybe that's why my table saw disappeared... :lol: I've been using my tools up until just before 10pm. Most cities have a noise ordinance until 10pm. Hmmm... :wink:
Actually, most cities have a noise ordinance at all hours of every day and the noise ordinance becomes more restrictive and more heavily enforced after 10 p.m. Check out my city's "objective" noise ordinance. (This is not unusual.) --Keith :mrgreen:
Stick wrote:
We used a roto-hammer to drill those holes in my 30 year old concrete... like butta.
I may rent one if I can't do it with my new cordless "non-roto-hammer" drill. I'm told it may take 15 minutes or maybe longer to do my one hole. (If I had a lot to do, I'd certainly rent the right tool for the job.) --Keith :mrgreen:
Ugh... yeah, literally the roto hammer would take 15 seconds... especially in your "new" concrete.
Yeah, but think of all the time I'll save by not driving to and from the equipment rental yard! ;-) Didn't get to drilling the concrete tonight. Perhaps tomorrow. A good buddy of mine dropped by with an issue of Modern Drummer in hand -- a gift for me, "just 'cuz." 8) Of course I had to show off the handiwork. ;-) He's on deck to help me with adding that second layer of drywall to the outer leaf and framing up the inner leaf later this month. :twisted: Good friends are tough to find and even tougher to keep sometimes. My circle is small, but good. :D --Keith :mrgreen:
sharward wrote:
I have decided that I kind of doing the framing work. It's kind of slow because of the predrilling and my general weakness and inexperience with the framing hammer -- but I'm getting better at it. 8)
Sounds like you need a new form of exercise to help get you ready for your hammering.... :twisted:
Take a sledgehammer and wrap an old sweater around it. This is your "shovelglove." Every week day morning, set a timer for 14 minutes. Use the shovelglove to perform shoveling, butter churning, and wood chopping motions until the timer goes off. Stop. Rest on weekends and holidays.
I can testify to the effectiveness of this exercise, it seriously improves upper-body strength. Of course, it'll seriously kick your a$$ for a week or two until you get used to it. Designed by a geek, for geeks. :wink: Your build is looking great! Congrats....
Thanks for dropping by the ol' ranch, jwl! Heh, that sledge hammer exercise idea is pretty, uh, unusual! Boy, after I did all that excavation for my slab, you'd think I wouldn't need such a thing! :lol: In other news... I'll be darned -- I actually drilled a 1/2" wide by 2 1/4" hole in my concrete this evening after work -- deep enough to do this! 8) It wasn't too bad... It took about a half an hour I think -- I wasn't watching the clock. I was just taking is slow and easy. But for sure, if you have to do a lot of them, rent yourself a hammer drill like Stick used for his. I'm not too worried about this particular one not being as strong as the J-bolts that are set in the concrete over 7" deep. Those are definitely superior to this one. My main objective for it is to keep the wall steady as the door opens and closes. There will need to be a self-closing mechanism of some kind on it as per code. (Doors leading from garage to living space must close automatically to protect the living space against fires... And you thought it was for convenience! ;-)) I really can't wait to finish up the "outer leaf door wall" now. I've got double top plates in place, I've now got soleplates down -- I'm ready to cut some studs and headers! :twisted: --Keith :mrgreen:
Framing work continues! The climate has been wonderful for the last couple of days and today promises to be terrific too... So I'm trying to do as much as I can before the next crippling heat wave hits us. Much of my day yesterday was consumed by non-studio-building activities, but I did manage to do some framing work. I'm pretty much done with everything except the actual door opening now. The king studs are already installed; now I just have to put in trimmer studs, header, and cripple studs. I'll post pictures later. --Keith :mrgreen:
Whew! :shock: I think I'm done with the outer leaf framing now. :twisted: I redid the soleplate at the corner next to the doorway, opting to double up on the bottom layers. Behold! Here are some close-up shots of the header and cripple studs. Here's an upward close-up shot of the header that I created: three 2x6s and 2 strips of 15/32" OSB, all sandwiched together with 16d common nails. You can also see how I affixed the metal furring strips. Shortly after taking these pictures, I gave Mrs. Sharward a tour of the work. She stood inside the room and said, "Wow -- it feels like a room now." 8) Yes, it does! :twisted: I need to consult with the city building department for a couple of things. First, I'm changing my outer leaf ceiling plan, so I need to determine how formal I have to be about that -- submitting a change in writing may be necessary. Also, I need to determine whether an inspection of the framing work I did is required before I hang that extra layer of drywall on the ceiling and patch the gaping holes I created. Ever notice now my floor is typically free of sawdust when I take these pictures? That's because I typically use an electric leaf blower to clean out the garage after every weekend. 8) --Keith :mrgreen:
I need to determine whether an inspection of the framing work I did is required before I hang that extra layer of drywall on the ceiling and patch the gaping holes I created
1st required inspection of my room here in Florida will be of Framing, before anything else is added. BTW nice work Keith, just reviewed your thread over the past month and it looks like your past the "half way hump", headed for the home stretch!!! Marc
Yeah, I'm assuming I need an inspection. I'm actually hoping I can get one, because I'd feel a lot better moving forward knowing that I don't have anything I'd ned to fix later. Besides, it will restart the six month clock again, just in case I encounter any unforeseen delays. --Keith :mrgreen:
Keith It's all looking so good.... and I'm envious of that high ceiling it seems you will have :( K
Keith, You may have brought this up much earlier and I've just forgotten but isn't building the outer framing first going to complicate building the inner walls? If you're building a house, I can understand you have to put up the outside walls before the inner ones but in this case, you're going to have to move all of your material between the studs and/or through the doorway. Will you be able to build your framing on the floor and stand them up or will you have to build them standing up? I only ask because of my experience in "order of execution" problems when I drywalled myself into my vocal booth (TWICE!). len
Hey Luftweg, Yeah, having 10 foot ceilings to begin with is indeed a blessing. Think of how much easier Paul Woodlock's project would have been if that had been the case for him! :-) My finished headroom will be about 8' 9" with my "silencer soffits" in back and front being about 7' 6". Len, I did cover that some time ago, but it must have been quite a ways back because I can't find it now. The way I'm executing this is to frame the outer leaf first "in place," which will then allow me to add the 2nd layer of drywall to the existing ceiling. Once that's done, I (with a little help from my friends ;-)) will be framing the inner leaf walls flat in the main part of the garage, tipping them up. walking/rolling them through the outer leaf wall between the studs, then lifting them over the J-bolts and cranking them down. Remember, the inner leaf walls will be about a foot shorter than the outer leaf walls, so they'll glide through the outer leaf studs with relative ease. I did consider doing the inner leaf framing first, then boxing it in with the outer leaf framing -- but that would have complicated the outer leaf framing work. I'm heading to the city building department in a few minutes for a quick consult. I might have an inspection as early as Wednesday! --Keith :mrgreen:
Great news! I visited a building inspector at the building department office today. (In bringing him up to speed on my project, he said, "Boy, I sure wish I had neighbors like you!" 8)) My change to the ceiling plan was signed off rather quickly. Piece of cake! 8) The inspector raised the same concern that I had about hanging the second layer of drywall on the metal channel, and he was satisfied with my plan to shoring up the existing layer and installing the second layer with screws directly into the trusses. He recommended that I use 2 1/2" screws, rather than 3" screws, so that the amount of "wobble" during the driving of the screws is kept to a minimum. He understood my desire to have deeper penetration into the trusses, but he said that the 1 1/4" or so that I'll get should be fine, and he'd rather I minimize the trauma to the drywall. He said (and I agree) that the screw heads are what hold the drywall up, and that the drywall surface around the heads is more likely to fail than the screws would pull out... So, err on the side of a little less penetration and a little more integrity of the drywall panels. That suits me fine, because I still have quite a few 2 1/2" inch coarse threaded drywall screws left over from my beef-up efforts! :twisted: I also asked about whether or not I should get the "mini inspection" before proceeding. He thought that was a good idea. "Better to have too many inspections rather than too few" was his logic. I agree! Folks, I must say, I have had nothing but excellent service from these guys at the building department. Really! 8) The inspection is scheduled for Wednesday, probably morning. :twisted: --Keith :mrgreen:
sharward wrote:
....Here are some close-up shots of the header and cripple studs...
Keith: What is the difference between a 'cripple' and a 'jack' stud?? Is it just the name, like 'sole' versus 'base' plate, or 'sill' versus 'mudsill'? Whatever it is, it's the pieces of wood that go over the header (or is that 'lintel')... Gotta luv it. Hey, I just found out recently that 'gutters' are 'eavestroughs' in Cananda.... K