It's amazing what happens when you re-read something you 'think' you've already read :shock:
So the graphs in the last post are of the monitors running in stereo. So not very useful!! Here's the link to the drop box that has an REW reading from both monitors in mono and one for stereo.
https://dl.dropboxusercontent.com/u/416 ... 0both.mdat
I was also running the wrong .frd file for the SPL meter.
Soooooo, having said that, the same information applies from my previous post:
[quote="stevev"]I've had some time to put in the treatment for the control room lately. I've used the Australian OC 703 equivelant which is a product from Fletcher Insulation called FI 32. They produce it under licence from Owens Corning.
Treatment so far:
Entire ceiling is covered in a 100mm layer of Fi 32 with no air gap behind it.
First reflection points on the walls are covered in 100mm FI 32 with a 90mm air gap behind.
The rest of the walls to the back of the room are covered in 100mm FI 32 with no air gap behind.
The entire back wall is covered with 200mm FI 32 with a 90mm air gap behind.
There's no super chunks in the back corners at the moment and I'm wondering if that would help with the bottem end resonance?
I'm not experienced at all with REW, so any insight as to how these figures are looking would be greatly appreciated. Let me know if there's any other details from REW that would be helpful if there isn't enough info in the following pics.
I should also add that there isn't any treatment on the front wall between the soffits as I'm waiting for the A/C installation which will be in that position.
phew...just read through this whole thread! (work has been light today...) and I'm impressed. I'm getting ready to build a studio within the next couple months and there's a lot of great stuff in this thread to learn from!
Keep it up!
Can't wait to see how it turns out.
Cheers Mike :D Glad there's some stuff in here that's useful to you. My bit of 'sage-like' advice would be to start your own build thread before you pick up a hammer. (something I didn't do :roll: )
The info you'll get from various people on this forum will save you a lot of grief by the end of your build. It's not always what you'll want to hear, but it'll be what needs to be done.
As i'm getting towards the final stages of my build I can honestly say that it sounds better in terms of isolation and acoustics than I thought it would, and that's mainly to do with input from this forum.
Just taking a look at your REW data, and it actually doesn't look too bad at all. Maybe a bit on the dead side in the mid range? But definitely decent.
There's some modal stuff going on, so more bass trapping might help with that, and there's a "hole" around 125 Hz that might need some attention, plus there are some reasonably strong early reflections that you might have to deal with, but overall I'd say it looks OK.
Are you planning on putting any more treatment in there (apart from the front wall)?
- Stuart -
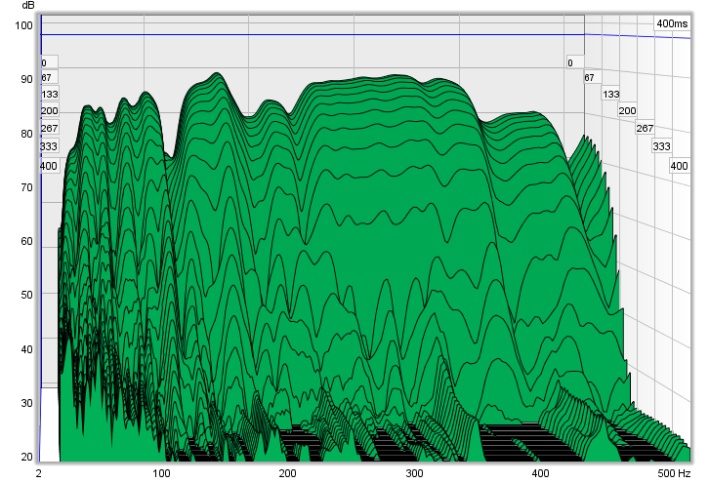
This first waterfall graph is of the control room with 200mm of FI 32 on the back wall and no super chunks. Also no front wall treatment between the soffits.
stereo.jpg
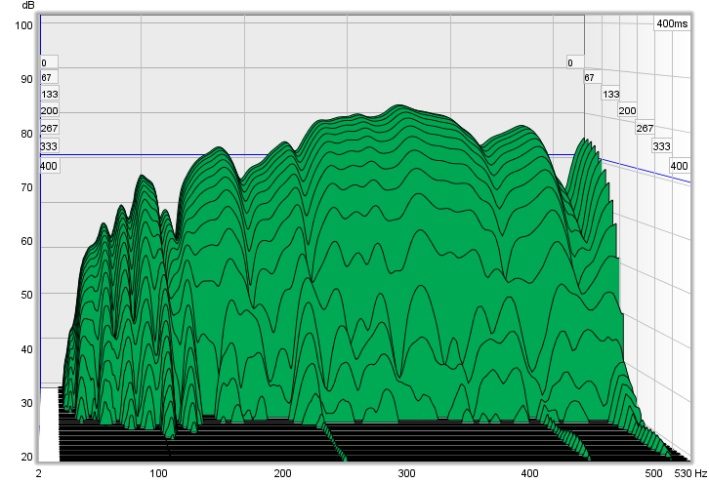
Adding a third layer of FI32 to the back wall, total 300mm and superchunking the rear corners, as well as putting a 200mm layer of FI 32 between the soffits has changed the room to this.
stereo superchunks.jpgBoth measurements are with the monitors in stereo and so aren't intended for analysis as such. More so you can see the difference in the room response with the added treatment.
Sounds great in there. I've wound up the monitors and listened to few well known discs and it's really tight in the bottem end. Kick and bass are well defined and the stereo image is really nice. I'm glad I didn't go with the wider spacing I was toying around with early in the build. Soffit mounting and room treatment has made the image wide enough.
Thanks for taking a look at that data Stuart. I didn't see your most recent post before I put up those last couple of graphs, but in answer to your question:
Soundman2020 wrote:
Are you planning on putting any more treatment in there (apart from the front wall)?
I've put in an extra layer of FI32 on the back wall , totalling 300mm, and also superchunked the rear corners. The front wall between the soffits now also has 200mm of FI32 in.
I've uploaded my most recent REW data to dropbox if you've got time to take a look.
https://dl.dropboxusercontent.com/u/416 ... tereo.mdat
Soundman2020 wrote:
there's a "hole" around 125 Hz that might need some attention
This seems to have remained a constant throughout all the testing and treatment I've done. I understand the concept of taking low frequencys out of the room, but how does one add them back in?
Thanks again for your time and input. much appreciated :D
This seems to have remained a constant throughout all the testing and treatment I've done. I understand the concept of taking low frequencys out of the room, but how does one add them back in?
You already did it! :) Believe it or not, you put the energy back in to the room by taking energy out of the room.. :shock:8) Sounds weird, I know, but that's what you are doing in effect.
The basic issue is this: you were looking at a null in a standing wave, but you were only seeing it because your mic was at that specific location in the room. At any other location, it would not have been in that null, but rather a "neutral" zone, or even the peak... for that specific frequency. A standing wave is called that because it ... well, it "stands": even though the wave is still there, and still moving through the room, the pattern of pressure peaks and pressure nulls that it creates is stationary with respect to the room boundary, so the wave appears to be standing still. Hence the name: "standing wave". In reality, it isn't actually stationary: it's only the patterns of pressure peaks and nulls that remains fixed, but the energy of that wave is still traveling around the room. So what you hear depends where you are in the room. Move the mic a bit and you'll be out of that null (and probably into a null for a different frequency). That's why it is so important to get the mic back to the exact same location each time you do a measurement in REW.
So, the energy of the wave is still moving around the room. For every null there is a corresponding peak, and since this is a room mode, the peak is located... in the corner of the room! All modes terminate in corners. So by treating the corner with thick absorption, you have damped the resonance of that mode: You brought down the peak, which also automatically brings up the null. Magic! The mode is still there, and still "standing", but now it is standing much more weakly, since it is damped. (And you also drove the frequency up a tad: it is now at about 131 Hz.) So you actually did, indeed, "fill in" the null by taking away some energy from that wave. But you took it away at the location where it is peaking, by damping its resonance.
It sounds totally illogical that you can treat an empty hole by apparently taking something out of it, but it make more sense when you realize that the "hole" is only part of the entire wave, and there's a corresponding peak somewhere else in the room, sort of the "other end" of the wave. So you are not actually "taking stuff out" of the hole, but rather "taking it out" of the peak, and that has an effect on the hole too.
Ain't acoustics wonderful? So intuitive, so logical, so clear... :shock::?:roll:
Not sure if I managed to explain that clearly at all: Reading it back, I think I just confused myself, actually! :)
- Stuart -
thanks Stuart. I read that once through but have to head out at the moment. I'll read it again maybe three, or four hundred times and i'm sure it'll make sense :lol:
The room is really sounding sweet though anyhow 8)
I'll read it again maybe three, or four hundred times and i'm sure it'll make sense :)
For sure! I just read it over, and edited it a bit to see if I could make it a bit more clear.... but I don't think it helped much... :( I'm still confusing me with my own explanation!
- Stuart -
You already did it! :) Believe it or not, you put the energy back in to the room by talking out of the room.. :shock:8) Sounds weird, I know, but that's what you are doing in effect.
and believe it or not, I think I actually understand the concept 8)
The way I understand it in my head is that it's a smoothing effect. If you reduce the 'bell-shaped' peak curve of a frequency (via room treatment, corners especially), then the corresponding null (elsewhere in the room) recieves the same treatment, but in reverse. Thus making the null less 'nully' and the peak less 'peaky'. (I don't believe thats proper acoustic terminology :wink: ), and makes for a more even room response.
Great thread stevev. It goes to show that proper room geometry, soffit mounting and generous absorption can make a smallish room sound like a big room.
I've made this thread a sticky :thu:
Cheers
john
Great thread stevev. It goes to show that proper room geometry, soffit mounting and generous absorption can make a smallish room sound like a big room.
Thanks John, that's certainly put a grin on my face :mrgreen:
That's a great way to describe it too. It does sound like a bigger room than it is, that's for sure. I thought putting that much rear wall absorbtion in was overkill, but it really has been the make or break point for the control room.
And it bears saying again, that my build would have been nowhere near the quality it is without the information and input from this forum.
thanks to all :D
Steve, just wondering if you have any final measurements on the amount of isolation that you ended up with? Did you hit your target of 65?.
It would also be great if you could add a few more photos of the rooms, so we can see how you did all of that.
But I'm really disappointed with this fast progress.... because it looks like I wont be getting that free trip to Aussie that you promised if the place isn't finished by the end of the year!!
:(8):roll::shot:
Seriously, great job you have done here! Just like John said: You have proven, conclusively, that all his techniques and methods really do work as advertised. Not that there was any doubt, but it's great to see it all confirmed once again, with actual objective acoustic measurements.
Impressed, I am.
- Stuart -
Thanks Stuart :D You're advice, encouragment and knowledge have been a huge part of pulling this all together and it's really appreciated. (it's probably appreciated by my neighbours as well, even though they don't know it, as they won't be hearing anything.)
Soundman2020 wrote:
Steve, just wondering if you have any final measurements on the amount of isolation that you ended up with? Did you hit your target of 65?.
I haven't got the internal access door built yet which makes a proper measurement difficult. Having said that, if I crank up a drum track and close the external access door and walk around the back of the studio I get a reading of around 60-65db TL. The other thing that's making it tricky to accurately measure is the outdoor ambient noise, ie birds, cars etc etc. I suppose that's a good thing if the ambient level and my output level are competing for the loudest volume at 1 meter away from the external shell. Perhaps I need to do a measurement at 3am to get a clearer level.
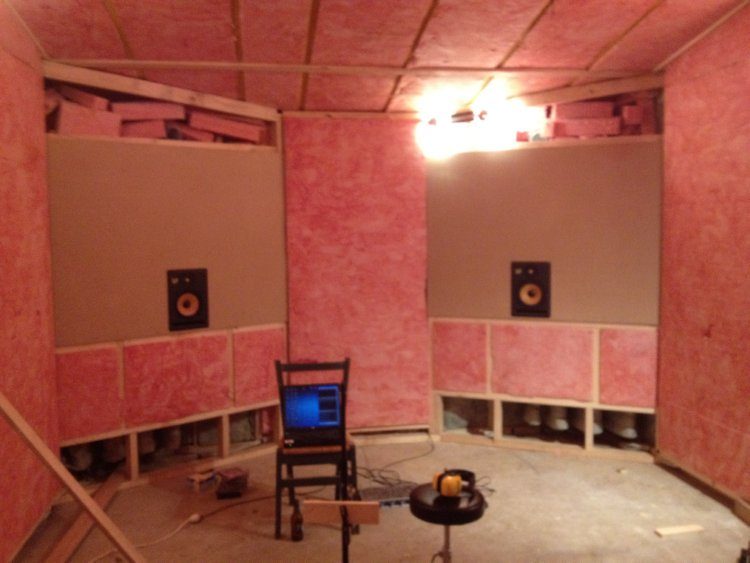
So this is the front of the control room. The FI32 is 100mm thick on all surfaces except between the soffits, where it's 200mm thick. Putting that in between the soffits made a huge difference to the sound of the room. I started off at 100mm thick which made a considerable difference, but adding the second layer really nailed it.
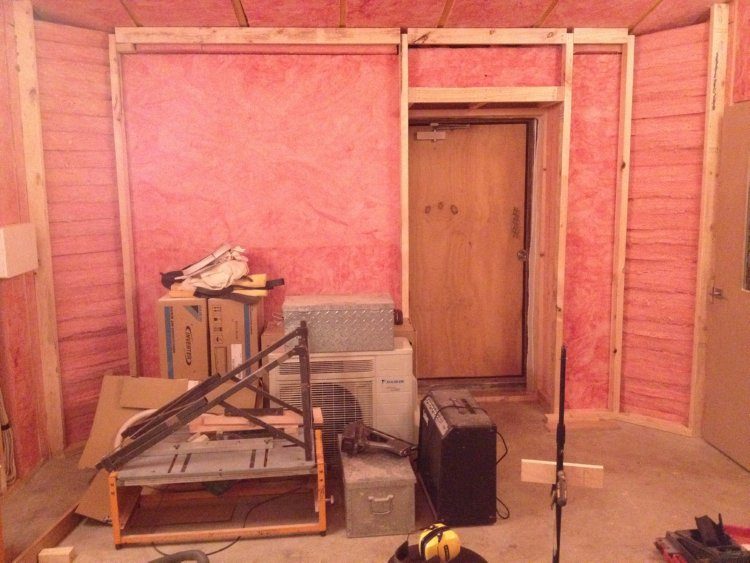
control room front.jpgHere's the back of the control room. 300mm thick with a 90mm air gap at the back wall, then superchunks extending out from that. The difference between having 200mm FI32 with no superchunks, and having 300mm with super chunks is amazing!!!
I'm also planning on making a 300mm FI32 removable insert for the doorway for mixing sessions.
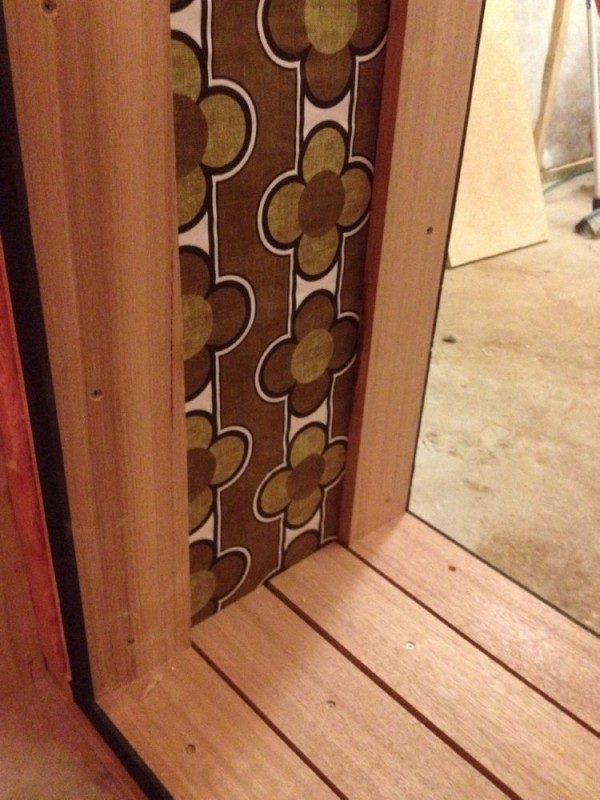
control room rear.jpgAnd here's a couple of pics of some of the finishing fabric and timber that is going in at the moment.
door trim.jpg
Image not preserved: super chunk fabric.jpg
A bit of advice for anyone who is doing any kind of fabric finish for walls ceilings etc....get an air stapler!!! This tip was passed on to me by my wife who used to work in scenic art. Standing on a ladder whilst trying to nicely tension fabric with one hand, and air staple with the other is hard enough. I can't imagine how tricky it would be with a manual stapler!!
Very nice workmanship. The end is in sight! Not too far to go now.
One question: Where are the vents from your speaker soffits? I guess you are venting up through the top?
- Stuart -
cheers Stuart.
The vents are a little hard to see in the above pic as the light glare makes the right hand vent almost invisible. You can just make out the left hand one as a circle at the top of the soffit. It's a tube of 100mm storm water pipe that will vent to the top.
Ahhh! OK, got it. Have you tested those, with the speakers running at high volume for a long period, to make sure they give you enough ventilation, and keep your speakers cool? Maybe I'm just paranoid about speaker cooling, but it seems that more cooling would be better.
- Stuart -
I've certainly had them running just about all day (8+ hours) playing CD's while i've been working and have checked the air temp coming out of the vents. I'd say the air coming out of the vents is slightly warmer than than ambient room temp. I could probably lower down a thermometer on a string to get an idea of temp at the rear of the monitor just to be sure, but it seems like the air flow is sufficient.
As long as you air getting airflow through those pipes, and the speakers themselves are not getting hot, that's what really matters. Do the front faces of the cabinets feel warm? Is there any way you can actually get your hand in there somehow, to touch the back of the cabinet, and feel if it is unusually warm?
- Stuart -
Hey Stuart, I've been able to get my hand in the front port of the monitors and everthing seems to be quite cool after hours of sustained operation. The front of the cabinets and speakers don't appear to be getting warm at all.
I've been on holiday fo a couple of weeks but back on the tools for the finishing stages now. I'll do some serious hours of monitor running in the next few days and get behind the monitors to check the temp before I put the final finishes on.
The furniture and finish is a little bit slack, but here we are doing our first session 8)
There's been a load of work stacking up for the studio, so after a bit of a holiday it's time to get the ball rolling before even though we're not fully finished.
It's a double bass session my wife is doing for an ongoing project. I've miked her bass many times before but this is the clearest and easiest it's ever been. There's still a bit of treatment for the live room to do, but it's sounding great. It's fantastic to be able to get a bit of distance between the mics and instrument without getting a 'room sound'.
I've also revisited a few mixes that are in progress for different projects. The difference between the room I was working in and this room is genuinely 'night and day'. It's like i was listening to mixes with ear-muffs on and now they're removed :shock:
The other great thing is that I was able to work on tweaking mix sounds in the control room while my wife was practicing a completely different double-bass piece in the live room. We couldn't hear each other at all, that's how good the inter-room isolation is :lol:
With any luck I'll get the final finishes done in the next few weeks, but at least we're operational.
That's great, Steve! That's what it's all about: great isolation, clear, tight sound, and clarity. It looks like you are hitting all your design goals, for sure!
I just wanted to comment on the decor: Do you have a name for that new style of studio finish? :P:shot: I love the desk, too: you might want to call Arogsy, and see if they want to buy the design from you!!! :o:roll: Should be a great hit as a new "Total Minimalist, Fully Ecological, 100% recyclable, DAW Desk" line. And the video monitor stands are also really avant garde!
8)
Seriously, leg-pulling aside, it looks great, and once you get the final finishes on, it's going to be fantastic. Can't wait to see how it ends up!
- Stuart -
Do you have a name for that new style of studio finish?
I'm thinking of going into production under the brand name "Offcutz" but I don't know if i'll be able to keep up with demand :shot:
And as another note, my wife was in there late last night rehearsing for another session today, whilst it was raining quite heavily outside. She said that she couldn't hear any rain noise in there at all. That's been a concern from the start as you know I've got a tin roof on the building. So it looks like the construction techniques (most of which have come from this forum) and attention to detail (nit-picking) have really paid off. 8)
Really looking forward to posting up pics of the finished product as it comes together.
I just took a look over the entire thread again, and I'm even more impressed at what you have accomplished, given what you started out with. I had forgotten some of the the details, but if there's one comment I can add here, its that your great success in nailing all your goals is due to mainly to the fact that you did everything right! (I guess the only goal you didn't nail was the budget :shock::!: but that goes without saying in any studio build... :) )
John already mentioned it on the last page, but this thread is a prime example of "How To Do It Right", and shows what can be accomplished by following John's basic design concepts, and giving careful attention to detail.
Executive summary: The John Sayers method works!
I really hope you get those "final finished" photos up soon, as I'm just dying to add this thread to the top of the list of "Finished Studios"!
- Stuart -
(I guess the only goal you didn't nail was the budget :shock::!: but that goes without saying in any studio build... :) )
You're dead right there Stuart :shock: I think we ended up closer to 50K AUD by the end of the build. I'll try to do a bit of a costing summary once we're totally done so people can get a better idea of what the 'real world' cost of each stage of the project is.
Having said that, my wife asked me last night when we were tracking and listening etc "was it worth the 50 grand?" My reply was an instant YES! :D