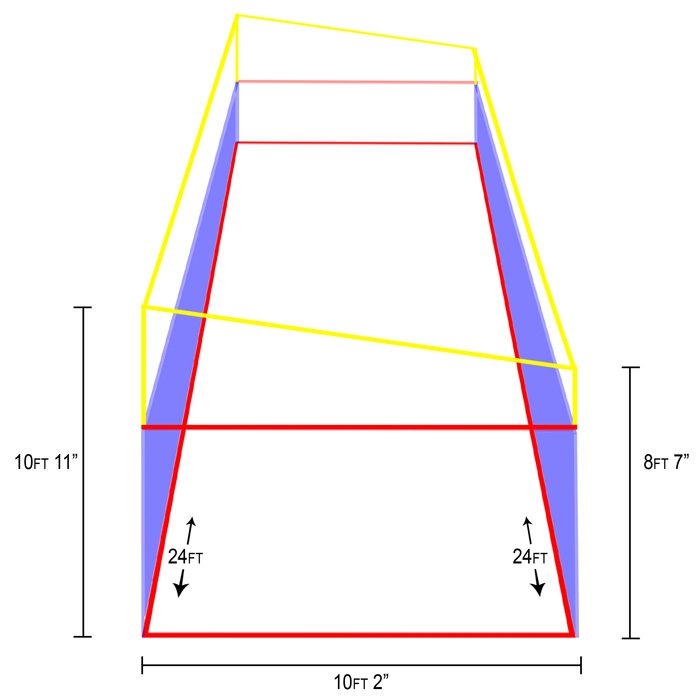
Ive attached a simple drawing I threw together in photoshop. This illustrates the structure which currently exists. I plan to use the double frame (Mass Air Mass) design. So, essentially, I'll have a room within a room, inside this structure. Does that makes sense? My problem, however, is that I already have outer walls (sheething) on the structure which cannot be removed. So, once my outer wall is framed, how would I go about adding the 3 layers of drywall between the shed sheething & my fresh new outside wall?
Would you suggest against this? Should I consider using the shed walls as my exterior wall? I'd really love some opinions on this.
My goal is to build a soundproof jam room. I play bass guitar and my brother & Dad both play drums. Bro is funding the project; I'll be providing the sweat. I'm sure we'll bring in guitars & vocals from time to time as well.
I can't wait to get started, having already begun to gather some materials. Dad even bought himself a new kit. ha.
Jam Room
Originally posted at johnlsayers.com, topic 13825.
Hopefully i can get home, from work, in time to snap some photos of the structure.
I've decided against a sub-floor. We recently poured a 6" pad inside the area, ontop of ground. I don't know the exact mix specs for the concrete. I remember, however, this was a higher than normal PSI with pea-gravel and fibers contained.
Looking at the "blue-print" i made (i know, dont laugh :p) the door will be on the East side wall, very close to the South wall. This is the best location, due to an overhang outisde the location that is to be used for a porch/smoking area. The photos will show this better than my explanation, im sure.
There's a couple neighbors, each of them are about 50 yards or so away. We all work night shifts so being able to play at odd hours is a must.
We somehow inherited a brand new industrial window AC Unit. I've read that this is a problem so I'm still considering how I'll go about that part. Perhaps create the ability to close it off, when Soundproof is needed most.
I realize that, at some point in framing, I'll need to know what I'm doing with the window unit. Getting started with the framing, however, is my concern for now.
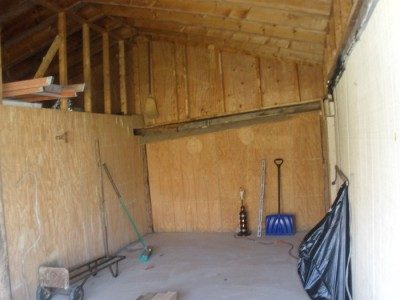
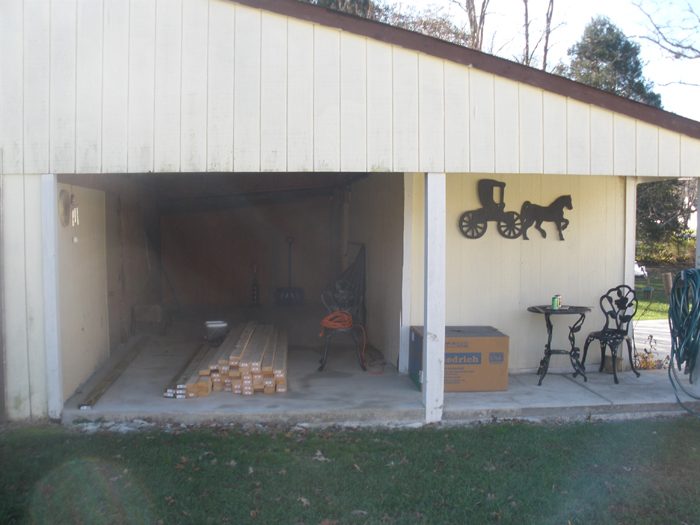
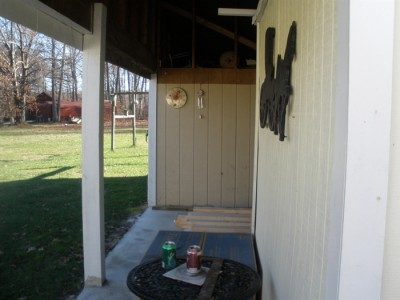
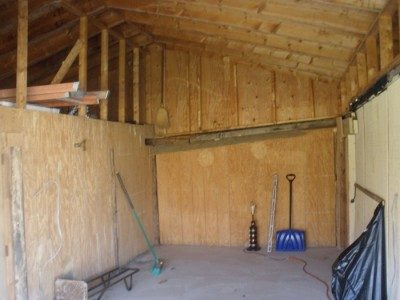
Heres some photos i snapped this morning.
Hi guy...I suggest reading the information highlighted/linked below:
You are in need of some orientation...and this just might help.
Hey! Thanks for the sugestion. I'm not sure exactly which parts you're suggesting that I read. I feel I've gone over the contruction portion numerous times already. I've been reading thread after thread, here, as well. I must admit, I'm astonished with some of the remarkable studios that have been built here.
A couple concerns I may have had, initially, I've since figured out (or so I think :p)
I guess I'm just looking for some reinforcement, from you experts, and assurance that my plan will achieve my goals. I'd hate to finish the build only to find the results arent what I had in mind.
Double framed walls, with 2-3 varying layers per leaf, ontop of 6" slab. No RC or GG. The following link shows this assembly to have a 58-63 STC Rating: http://www.stcratings.com/assemblies.html
Done correctly, is this sufficient enough to keep my grooves out of the neighbors dreams?
Although I'm sure I have much more to learn, I definitely think I have enough of an understanding to get started with my project. Its great knowing that you guys are just a click away, should I find myself in a jam.
Thanks for saying hello! I thought I was going to endup flying solo, for awhile there.
:)
-Pick
I notice the link, you supplied, doesnt show the EXACT double wall frame assembly I have in mind. However, I've seen it elsewhere.
edit: I used Knightfly's diagram with the updated corner setups, located here: viewtopic.php?p=28924
I plan to use 2-2x4's (ptbase), for the base and plate, separated by an inch. I read this is best, as it supplies 8" Spring. I do plan to stagger Int. wall & Ext. wall studs. I'm hoping to use this same idea for the ceiling. The interior walls will be shorter in height, to provide the same spring space between int & ext. ceiling. Each "room" will float freely, connecting only to itself.
Ive made note to pickup some non-setting REAL acoustical caulk. I'll be sure to use this any & everywhere..
It seems that I'll have to glue my exterior leaf to the wall, before setting and nailing the wall into place (Ramset into slab).
Main electric line was run thru the wet cement. No conduits. Just heavy duty outdoor line sticking up out of the slab near wall area.
Am I ok so far?
Thanks, again!
Steve Knightfly was one of several reasons that had me researching using this forum, so you can dig what he says is valid ;) If you are looking to generate wall data , check these files out: Gypsum board walls: Transmission loss data http://www.nrc-cnrc.gc.ca/obj/irc/doc/p ... /ir761.pdf Laboratory measurements of the sound insulation of building facade elements http://www.nrc-cnrc.gc.ca/obj/irc/doc/p ... /ir818.pdfI notice the link, you supplied, doesnt show the EXACT double wall frame assembly I have in mind. However, I've seen it elsewhere.
Thanks for the information, XSpace!
Does my plan have whats considered a "thrid leaf"?
Int. & Ext. frame (room within a room) but its all inside the current shed structure. Is that current shed structure a third leaf?
Thanks again!
I guess I should clarify my last post.
Will the exterior walls on the current shed structure degrade the isolation obtained by the "room within a room" contained within?
I'm currently reading Rod's book, recommended by many here. I haven't found a clear answer to this yet.
Stay with me XSpace! :) It seems that you're the only person interested in helping me complete my isolated drum room. I must say that I'm very very thankful for this. Would you happen to be into Metal/Hard Rock music? Perhaps I could send some Arsenic cd's your way. Its the least I could do to show how thankful I am to have your help and insight.
ok.. off to work!
What you have, I can not speak about right now.
I see something on the right hand side but it looks more like an area that had, at one time, been a door/opening but even this is not clear in the picture.
yes. good eye!
That, indeed, used to be an entrance. I'll snap some more photos when i get a chance.
The only bad thing about that door is that I'll lose a couple inches from my interior structure, due to the way its been rigged. I plan to clean it up as much as possible, in hopes of saving space. Unfortunately, the old door's header and jam is working as a support for that wall.
I have 2 options, I'm assuming.
a) Build a temp support, gut door & restud & sheath wall
b) leave as is & lose a couple inches
Being as I'll have a room within a room, inside the structure you're currently viewing, should this even be a concern?
Okie Doke..
We've had a trecherous winter, here in Eastern US, since my last post. I used the time to research, research, research.. Unfortunately, the more I research the more concerned I become about my plan. heh. Also, since my last post, Dad has purchased a drumset which is currently chilling in the living room. Needless to say, Mom wants her Living Room back and Dad is turning up the pressure for me to get outside and get this room started. I don't think he realizes just how unconventional this build will be.
Back to the drawing board:
I'm hoping to install my outer wallboard mass without an outer frame. This would consist of screwing 5/8" drywall to the existing structures interior. I located Tremco acoustical caulking, locally, for $107 /case. So I'll caulk the perimeter & "mud" the walls voids. I'll then install a second layer of 5/8 drywall, being sure the seams don't coincide, using 1/4" spacers between layers and Type G Laminate screws, so that the 2nd layers screws doesnt touch existing structure.
Does this plan sound adequate for my outer mass? I intend to leave 1ft. of air between inner and outer mass, since low frequencies are my main concern (drums n bass).
I know that ducting a window unit is frowned upon. However, is it a hopeful solution? I have a new, very large WU that was free and I'm pretty much being forced to make this thing work.
Please help ease my concerns that I'm not completely wasting time/money. Regardless, however, I have to get started very, very soon.
Thanks again :) \m/
-Josh
Hey Josh, a couple of comments, FWIW:
What do you mean by !-4" spacers between layers? That sounds suspiciously like a third leaf to me! Can you show what you mean by that with a quick model in Sketchup? You do NOT want three leaves if you are planning to isolate a drum kit! Avoid at all costs. When beefing up your outer leaf, all of the layers need to be in direct contact with each other, with no air gaps or voids between. Any time there is an air gap, that means you have created another leaf. You can have only ONE air gap in your entire wall, and that is the gap between the entire outer leaf, which is one solid mass with no gaps, and the inner leaf, which is another solid mass. Also, the usual way here for beefing up walls is just to lay the drywall in place between the existing studs (carefully cut to shape, obviously), hold it in place with cleats around the edges, and seal the edges with caulk. Then repeat for the next layer. But no air gaps with "spacers".... using 1/4" spacers between layers and Type G Laminate screws, so that the 2nd layers screws doesnt touch existing structure.
Yep, 1 foot is good. And you need to fill the entire foot with insulation, either mineral wool or fiberglass. If you can't afford to fill the entire foot, then fill as much as you possibly can, but you need at least half of it full.Does this plan sound adequate for my outer mass? I intend to leave 1ft. of air between inner and outer mass, since low frequencies are my main concern (drums n bass).
Not if you want isolation sufficient for a drum kit! Unless you do what Rod suggests in his book, with an exchange chamber. That would work. Don't forget that the drum kit is the loudest of all acoustic instruments, and puts out a very large amount of energy in the low end of the spectrum, which is the hardest of all to isolate.I know that ducting a window unit is frowned upon. However, is it a hopeful solution? I have a new, very large WU that was free and I'm pretty much being forced to make this thing work.
Not if you do it right! It will be money well spent if you do it right. I'd suggest that, if you don't already have it, you should buy Rod's book and read through it carefully, to see how to do it right. That purchase will be the single most important investment in your entire room. - Stuart -Please help ease my concerns that I'm not completely wasting time/money.
STUART! Thanks man. You're my savior! :lol: (XSpace also) :p
Honestly, I was a bit puzzled about using the spacers as well. I read the idea in a thread, on here. Coming from KnightFly, I was afraid to second guess it. Dude seems to be a genius. I believe his reasoning was something along the lines of allowing each piece of drywall to work independently. The spacers were to be temporary. Perhaps the post was outdated. I'll definitely scratch that. Thanks for pointing that out! Unfortunately, I dont have a copy of sketchup. I could likely get a copy, however, if you think it's a necessity. I'm sure you got a kick out of my CS2-made "blueprint", above. ;PWhat do you mean by 1/4" spacers between layers? That sounds suspiciously like a third leaf to me!
Actually, I was shocked to find Rod's book in my brothers DIY "library". I have read thru the seemingly appropriate chapters; I'll be sure to go over it all again. If i get some extra cash, I may go ahead and purchase my own copy, out of respect for his hard work.I'd suggest that, if you don't already have it, you should buy Rod's book and read through it carefully, to see how to do it right.
Interesting.. I'll definitely pickup a set of those Hands Free Drywall Cleats from Amazon. They look to be a real life saver. I notice they have screws in them.. I'm assuming the cleats screw into the stud, supporting the sheet until fastened and then the cleats are removed? Just trying to get a better mental image of how that works. Thanks for the tip! :)Also, the usual way here for beefing up walls is just to lay the drywall in place between the existing studs (carefully cut to shape, obviously), hold it in place with cleats around the edges, and seal the edges with caulk
I've read this before. however, while I have your helpful insight: I'm curious how space and additional walls/whatnot on the other side of the wall might affect isolation. For instance, viewing the first photo I attached above, you'll notice that the space I'm isolating is only a section of the entire barn/shed structure. Opposite the left side of the opening, I'm isolating, is a storage area. You can see how I have the ladder above this storage area. The ladder is laying ontop the storage areas ceiling. The right side also has a similar storage area. You can see this in the 3rd image, attached above. Does any of this create a third leaf?You can have only ONE air gap in your entire wall, and that is the gap between the entire outer leaf, which is one solid mass with no gaps, and the inner leaf, which is another solid mass.
OK.. Gotcha. This dampens the inner wall, right? So If I were filling half, I would want the insulation against the inner wallboard?Yep, 1 foot is good. And you need to fill the entire foot with insulation, either mineral wool or fiberglass. If you can't afford to fill the entire foot, then fill as much as you possibly can, but you need at least half of it full.
haha.. i had no idea that drumkits are amongst the hardest instruments to isolate. Exchange chamber, huh? I'll be sure to read this when I get home from work. I've considered creating the ability to "close a door" on the unit. However, the downsides to that are apparent.. My Dad is a retired HVAC guy; He laughed at my idea to duct the unit. I would have a very hard time convincing him of the plan. His idea of creating a "partition" of some sorts, however, seems more laughable to me. I realize a Split unit is ideal. My budget just won't allow for it, however. The Window Unit seems to be very large; Industrial sized. In the 3rd attached photo, above, you can see the box sitting beside a table. This thing is HUGE! Its also brand new and was given to me for Free. I definitely HAVE to find a way to make this window unit work.. I'll read more into the exchange chamber idea.. Thanks again, Stuart, for taking the time to look after my project. I am forever in debt to your knowledge. Theres so much great info, contained in these vaults, so I'll try my best to refrain from asking questions that i can answer with a little research. Like the spacer thing, though, I worry that some info may contradict. Its definitely a relief, though, knowing that I have someone watching over me. Please note that I still think KnightFly is a goddamn genius :D I must've misinterpreted something pertaining to a different application.Not if you want isolation sufficient for a drum kit! Unless you do what Rod suggests in his book, with an exchange chamber. That would work.
Naah, you can't afford it, I'm sure. Really expensive!!!! (Actually, it is free. You just download it direct from Google. :) ) It's a great tool for planning your room. It takes a bit of getting used to, but once you "get it", its a very powerful tool. I'd recommend it. It will save you many problems and lots of money. Building a model in 3D on a computer is MUCH easier than building the real thing, and you get to examine it from all angles, even ones that would be impossible in reality. Moving a 3D wall around because you got it wrong, takes a few seconds a costs nothing. Moving a real wall around because you got it wrong, takes days and costs plenty!Unfortunately, I dont have a copy of sketchup. I could likely get a copy, however, if you think it's a necessity.
The kind of cleats we are talking about here are just strips of wood that you nail diagonally into the studs, to hold the drywall in place. This thread might interest you: viewtopic.php?f=2&t=9127&p=63697&hilit=cleats#p63697 This one too (the discussion on cleats starts about one third the way down the page): viewtopic.php?f=2&t=9091&p=63644&hilit=cleats#p63644 Search the forum for "cleats", and you'll find more than you ever wanted to know about them!I'll definitely pickup a set of those Hands Free Drywall Cleats from Amazon. They look to be a real life saver. I notice they have screws in them.. I'm assuming the cleats screw into the stud, supporting the sheet until fastened and then the cleats are removed?
Yes, and no! Probably not the answer you wanted, but it's the truth. I asked the exact same question here a couple of years back, and it took me a long time to understand the answers. so I'll see if I can explain it in simpler terms, noe that I finally get it: You need to realize that a 2-leaf wall (MSM) is a tuned system. It resonates at a specific frequency that is governed by the total mass of the leaves and the depth of the air cavity in between them (among other things). If you increase the mass, or increase the air gap, then the resonant frequency will be lower. The idea of building a 2-leaf wall in the first place is to design it such that the resonant frequency of the wall is way below the range of human hearing, or at least is below the lowest frequency that needs to be isolated. Now comes the fun: If you add another leaf to the system, contrary to intuition, that INCREASES the resonant frequency, driving it back up into the region that you were hoping to isolate. However, the effect of that third leaf once again depends on mass and air gap. If the mass is high enough or the air gap large enough, then the final resonant frequency of the entire MSMSM wall is still below the region of concern. So, if the third leaf is just a sheet of drywall two inches away from the existing 2-leaf wall, then there is a very large increase in the frequency, and your low frequency isolation is shot to hell. But if you put a 12 inch thick granite wall 20 feet away, clearly there is no discernible effect at all! So, the question is, at what point does that "third leaf" not matter any more? the answer is obvious, when you think about it: at the point where the resultant resonant frequency is still less than half of the lowest frequency that you have to isolate. As soon as the gap is small enough / mass low enough that the final resonant frequency gets to be more than half of your lowest isolation frequency, then you have a problem. So, for example, say that you design your wall to isolate from 30 Hz up. To do that, it needs to have a resonant frequency no higher than 15 Hz. You did a good job, and the wall actually resonates at 14 Hz. Great! Excellent isolation! Then you accidentally put a third leaf next to it that increased the resonant frequency to 25 Hz. So now your wall will not isolate at all at 30 Hz, and will in fact INCREASE the transmission at that frequency. Not only does it no longer block sound at 30 Hz, it actually HELPS sound get through, and does not isolate at all well until 50 Hz. So let's say that instead of increasing the frequency from 14 to 25, your third leaf was a long way away and very massive, so it only increased from 14 to 15 Hz. Double 15 is 30, which is what you originally wanted, so that new massive distant 3rd leaf did not really affect your isolation at all. It's not that simple, of course, but that's the general idea. Unfortunately, the math for figuring out the resonant frequency of a 3-leaf wall isn't simple at all. However, I'd say that as long as you have a large amount of mass in your two-leaf wall (as compared to the third leaf) and several feet of air gap between the two-leaf wall and the third leaf, then you should be OK. So that's a very long and winding road that leads me to say: Yeah, your other walls are third leaves, and no, they probably don't matter. :) However!!!! Now consider this: a kick drum can easily produce a fundamental tone at 80 Hz, or even lower. A bass guitar goes down even lower, to ... what frequency? Look it up, and shock yourself. You have to build a wall that will stop those frequencies. It ain't easy...For instance, viewing the first photo I attached above, you'll notice that the space I'm isolating is only a section of the entire barn/shed structure. Opposite the left side of the opening, I'm isolating, is a storage area. You can see how I have the ladder above this storage area. The ladder is laying ontop the storage areas ceiling. The right side also has a similar storage area. You can see this in the 3rd image, attached above. Does any of this create a third leaf?
It damps the cavity, not the wall surface. You can put it on one side, the other side, or both sides. It doesn't make much difference. It damps resonance in the cavity primarily, not so much resonance in the leaves.OK.. Gotcha. This dampens the inner wall, right? So If I were filling half, I would want the insulation against the inner wallboard?
Yep! You sure know how to chose your instrument, don't you? :) A drum kit can easily put out 115 decibels (C curve, slow response), even when played normally. You can get it close to 120 dB if you really smash it hard and fast. At 115 dB continuous exposure, the Occupational Safety Hazard Organization council says that you have about 7 minutes before you suffer permanent irreversible hearing damage. At 120 dB it's is more like 3 minutes.... Which, of course, explains why many drummers are partially deaf (those who don't wear ear plugs while playing). And no, that isn't a joke. It is dead serious. So yep, a drum kit is LOUD. Really loud. It also puts out a large chunk of that energy in the low frequency end of the spectrum, below 300 Hz, which is also the hardest part of the spectrum to isolate. Stopping a sound wave with a frequency of 20 kHz (top end of the spectrum) is a piece of cake. Even thick paper will do that reasonably well. After all, the entire wave is only 1.7 cm long. But stopping a wave at 20 Hz is a big deal: At 17 meters long, that wave is one thousand times bigger, and it will go through several inches of plywood without even noticing it too much.... To stop a low frequency wave takes quite some effort! It ain't easy. You have to do it exactly right, or it won't work. Think of it this way: A bullet proof vest will easily stop an air gun pellet, but it will not be very successful against a cruise missile! It takes just a bit more armoring to stop a cruise missile (equivalent to heavy kick drum "thump"), than it does to stop a bullet (equivalent to faint triangle "ting"). You have to build your wall good enough to stop that cruise missile.haha.. i had no idea that drumkits are amongst the hardest instruments to isolate
If it wasn't designed to be ducted, then I can understand that! But I'm sure he'll get the idea of the exchange chamber. It's basically just a small room that the unit blows into, where it can make as much noise as it wants, and properly lined ducts lead to and from that room into the studio itself. The exchange chamber acts as sort of a giant plenum, and also a silencer at the same time. I'm sure your dad will get it. Having said that, your Dad will also understand that the unit you have is probably NOT what you need, unfortunately, since it MUST be size exactly correct to deal with the exact flow rate, flow volume, and temperatures that will exist in your studio, under normal operation. If it is too big, it will move too much air too fast, and will cycle much to frequently to dehumidify correctly. If it is too small, it will not move enough air fast enough, will cycle way too slowly, and will wear out prematurely. It has to be sized right. You can't just put an engine from a 747 in your car and hope it will work, just because you got it for free. You also can't put your car engine in a 747 and expect it to fly.... things have to sized correctly to do the job. Maybe a much better idea would to sell that huge HVAC thing and use the money to buy the CORRECT split system for your room, AFTER you and your Dad do the math to figure out what size it needs to be, based on room volume, occupancy, equipment heat output, humidity, etc. If your Dad is an HVAC contractor, he already knows how to do that. Or you can read Rod's book to figure it out. But is has to be dimensioned correctly.My Dad is a retired HVAC guy; He laughed at my idea to duct the unit.
Well, the idea of a partition is the basis for how an HVAC silencer works: A series of many partitions, one after another, all covered with acoustic isolation and contained inside a large sealed box. The partitions force the air to gow around many corners like that, backwards and forwards, which helps to isolate and silence the duct. It's the right idea. Search the forum for HVAC and silencer to get an idea. - Stuart -His idea of creating a "partition" of some sorts, however, seems more laughable to me.
"Coming from KnightFly, I was afraid to second guess it. Dude seems to be a genius. I believe his reasoning was something along the lines of allowing each piece of drywall to work independently. The spacers were to be temporary. Perhaps the post was outdated. I'll definitely scratch that. Thanks for pointing that out!"
I would be interested in seeing the thread that you are referring to.
My guess is that you misunderstood what was being stated.
Yeah, thats my assumption as well. I'll see if I can track down the thread. I'm at work; away from my bookmarks. it shouldn't be too hard to find, though.
ok.. wasn't too hard to track down.
Here ya go: viewtopic.php?t=598
In red text, you'll see:
In all cases, ¼" spacers should be used under panels until fastened, then pull the spacers and caulk before repeating for the next layer.
The spacers Steve refers to are placed underneath the panel, on the floor, to keep it[sheetrock] elevated and make certain that no direct connection between panel and floor exists.
ok, gotcha.. Thanks for the clarification! :)
For the record, i never doubted KnightFly :D
Neither did I.
ok.. getting back on track..
I unloaded 70 sheets of 5/8" drywall, today, so that I can get started on beefing up the outer wall.
I've been contemplating the hvac situation. Here's more about the unit.
Friedrich YS12J33
TwinTemp 26" Heat Pump Room Air Conditioner w/ 12400/12200 Cooling BTU, 230/208 Volts & 1177/1122 Heating Watts. 10.5 EER Rating.
External image, not preserved — original: http://di1.shopping.com/images1/pi/e3/2d/af/20271461-260x260-0-0_Friedrich+TwinTemp+YS12J33.jpg
More Info: http://www.ajmadison.com/cgi-bin/ajmadison/YS12J33.html
Considering an exchange chamber, what sq ft would be sufficient for said "holding" room?This is the sytem we used in Jamie's basement studio
http://www.johnlsayers.com/Pages/cerniglia.htm
70 sheets? Is that 4'X8' or 4'X12'? It takes a lot longer then you may realize to do what you are doing. Hope you have a nice, dry place to keep this covered up. I guess you are going around this room, ceiling included about four times including the interior walls?ok.. getting back on track.. I unloaded 70 sheets of 5/8" drywall, today, so that I can get started on beefing up the outer wall.
4'x8' stored in a dry area. My over-abundance of drywall is actually the outcome of miscommunication. When relaying the amount to pickup for the exterior wall, I failed to mention (or explain well enough, apparently) that drywall is sold in pairs. So I ended up with 2x the intended amount. This is ok, however. I'll now plan to use 70 sheets, total, for both interior and exterior applications. I remember reading that 2 layers of 5/8" drywall on both int. & ext. walls would approximately result in, if all else is executed correctly, faintly hearing a drumset 15' from the building. Hopefully this extra amount will either a) result in complete isolation or b) make up for any unintentional shortcomings in the design. Initial drywall figures: • North & South wall = 11x9 = 99/32 = 3.09 sheets (3.1) x 2 = 6.2 sheets • East & West Wall = 11x24 = 264/32 = 8.25 Sheets x 2 = 16.5 sheets • Ceiling = 10x24 = 240/32 = 7.5 Sheets x 2 = 15 Sheets Exterior Double Coverage = 37.7 (38) Sheets The N & S Wall are over-estimated, since i figured them as squares.70 sheets? Is that 4'X8' or 4'X12'? It takes a lot longer then you may realize to do what you are doing. Hope you have a nice, dry place to keep this covered up. I guess you are going around this room, ceiling included about four times including the interior walls?
Awesome! Thanks, John! I'll put some time into studying the PDF & Link you've provided and will let you know if I have any questions/concerns. Caulk: While visiting my brother to borrow some lights (i hate this early darkness thing) he mentioned that he had some supplies that might interest me, one of which was some caulking he was given. It would be so awesome if this caulk is appropriate for isolation. He had about 15 cases of this stuff, sending me home with 2 cases (60 - 300ml tubes total) and insisting that I come back for more if needed. The caulking, in question, is as follows: S-M (Schnee-Morehead Inc) Acryl-R SM5430 Non-Skinning Non-Sag SSR Sealant "This non-skinning, non-drying sealant is based on a unique elastomer that provides a non-stringy consistency and excellent durability. It is used to seal hidden joint details found in contemporary construction and metal assemblies, such as: • Standing seam roof (SSR) panels • Joints of foamed-in-place insulated panels • Concealed-exposed end lap joints • Lap seams • Hidden mechanically fixed joints • Window mounting fins and flashing This sealant is USDA acceptible." Technical Data Sheet: http://www.trustsm.com/pdf-sm/SM5430TDS.pdf MSDS: http://www.trustsm.com/pdf-sm/SM5430MSDS.pdf If not ideal, will using this caulking hurt me that bad? He had alot of "panels" that, I'm guessing, this caulk was designed to work with, leftover from some sort of loud "Mechanical Room". These tongue-and-groove panels had some sort of metal exterior covering a thick "foam" (4-5"?) and were very very heavy. I dont think he knew a whole lot about them; my description is just an assumption made after viewing them quickly. I'm welcome to use these panels as well, if needed. Perhaps they could be useful on/as my doors (getting a bit ahead of myself). ok.. ok.. Time to get out there and build my 4th wall and prepare for drywall installation. Yesterday's drywall-unloading helped me discover muscles I never knew I had. ha. It's been awhile :p I'll use the next week to heal & hopefully find a friend with a drywall lift. Correct me if Im wrong: The first layer of drywall can be fastened, "normally", with screws. The second layer will be fastened with type G laminate screws? I still have to pick those up somewhere. Thanks! :)This is the sytem we used in Jamie's basement studio