UPDATE
After more planning and another chat with the local building office, I have a shiny new permit! 8)
I also finally got some DB readings with the Radio Shack meter mentioned throughout the forum, set to get the max during a short time span.
Standing 12 feet away from drums inside closed garage: 113
Standing 12 feet down driveway from closed garage door: 90
Standing 2 feet from exterior side of garage: 90 (neighbor 10 feet away!)
Living room (entry from garage thru laundry room to living room): 79
Master Bedroom (above laundry/living room and slight overhang from garage): 80
I took a few guesses before we started taking readings and was just under by a little bit :?
The plans are mostly the same as originally posted with a few modifications. I have gone with shimming the walls along the long edge to cope with the slanted flooring like this...
Recovered from web.archive.org — originally hosted at http://4.bp.blogspot.com/_bqd6FCtHBy4/SpzJ-dLkiCI/AAAAAAAAAGg/2i3rgdqzM6Y/s320/Shimmed+wall+2.jpgAll other concerns (dealing with the water pipe/ground wire, ceiling joist load, etc.) have been alleviated. :)
Now on to new concerns. :(
So far, I have only started removing drywall to expose what new obstacles and headaches are lurking within the walls. I have been carefully removing it by pulling the nails/screws out and trying to salvage most of it to cut up and replace between stud cavities or use as scrap on silencer boxes etc.
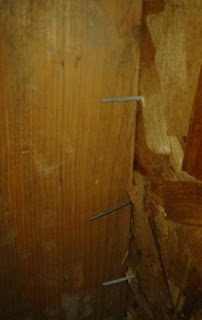
Sure enough, nails. Lots of em. Along the vertical length of almost half of the studs, there is a series of nails coming through the OSB about a full inch. Very close to the studs where this occurs, mostly within 1 inch of the stud. It looks like there were meant to go into the stud, and just missed all the way up. Much fewer in number, and very close to or coming part way through the studs are longer heavier gauge nails, I assume for the OSB under the siding.
Here is a side view of a row of nails showing both sizes. This row is very close up against the stud, other places they are farther out.
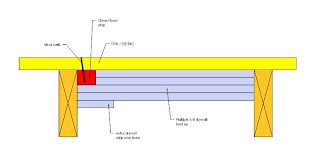
Recovered from web.archive.org — originally hosted at http://4.bp.blogspot.com/_bqd6FCtHBy4/SpzUDmE7X_I/AAAAAAAAAGw/uCt8EENjYcM/s320/Siding+nails.jpgAfter doing a search around the forum, it appears the consensus solution is not to grind them off flush, but to push closed cell foam over them to depth as the first layer of added beef-up between the studs. Then start adding layers of drywall on top of the foam for the rest of the mass. Most of the scenarios to which this solution was applied had very random placed nails all over the cavity space between the studs. Since my nails are all in a fairly neat row up close to a stud, I wonder if this solution would work without eating up more of my air gap than necessary.....
Recovered from web.archive.org — originally hosted at http://1.bp.blogspot.com/_bqd6FCtHBy4/SpzKHLHmoUI/AAAAAAAAAGo/yY8DhkUvExk/s320/stray+siding+nail+solution+1.jpgInstead of adding a full layer of foam, adding just a strip of it the depth of two layers of drywall about 2 inch's across all the way up the side of the stud to cover the nails. Then adding drywall to continue the layer across the stud bay. Then adding drywall over the foam and drywall layers. Or am I better off doing a full layer of foam all the way across the stud cavity? Anyone have any thoughts?
Another problem I encountered while removing drywall along the shared wall with the laundry room was OSB right under the drywall. I expected to just find fluffy insulation leading to the inner drywall. So I've got another careful removal process to deal with before I can get to and remove the insulation and beef up that wall.
Any questions, suggestions, comments, criticisms, or feedback would be appreciated.
Thnx
Hmmm, well X, I asked for questions and you delivered.
I freely admit that my thread has a bit of confusion in it, most notably my brief moment of staggered stud insanity, and maybe some of my posts are not really well written..........so I went back through my thread to check, and sure enough.....it so happens I'm building in my garage. On concrete. I hope that clears things up. :wink:
Every one involved in building should own a pair of these:
http://chicktool.com/tools/nippers/nippers.gif (the tool on the right hand side)
Nip off the nails that are up against the stud if they are creating a problem for you.
Rather then use shims under a wall plate, which could turn into a tedious task with not so delicious an out put try this. Once you establish what the slope difference is, transfer that to the flat 4 inch side of a 2 X 4.
Any lumber that comes into contact with the concrete is better suited if it is pressure treated, if it needed to be said.
Thanks for the thoughts X
A couple questions, I had originally thought about clipping or grinding the nails off flush with the OSB, but thought I should check around and came across this thread. Most of these nails in my wall appear to be holding the siding up on the outside. If I shorten them, won't I be messing with the shearing forces for the siding?
Also, if it was one or two nails, I might be more inclined to just clip/grind with little worries, but since I have long rows of nails together, wouldn't I be (in theory) weakening an entire segment of my siding attachment?
Shimming..... thankfully I have a built in angle template. The footing under the garage walls (not sure what else to call them) is level. The garage floor slopes away from the house along the length of my room. This method (or the drawing of) received the thumbs up from the gentleman I talked to at my local building office.
1- Put down my floor plate for the new walls (yes, pressure treated) at its proper depth to the existing back wall, but pushed close to the footing along the side wall.
2- Mark where I want to place the shims on the new foot plate.
3- Place the board to be used for the shims (2x4 or similar) in position vertically on the new foot plate.
4- Then using something flat and rigid placed on the foot plate of the existing wall (which is level), extending outward against the side of the vertical shim piece, mark the angle.
5- Then cut off the angle with a miter saw and label the newly cut shim's position.
6- Repeat as necessary.
7- Then attach all the shim pieces and add a top plate, so I would essentially have a short "shim wall" for the length needed, where the foot plate follows the slope of the garage and the top plate remains level.
8- Then I would be able to build the rest of the framing normally on the ground so its nice and plumb and attach my "shim wall" to it, then raise the whole thing into place. Foot plate should match the slope, and the vertical studs and stop plate should be plumb.
*key word in all of that being SHOULD :|
That is the plan anyway. Its going to be a bit tedious, but if I make a mistake I'm only out a few inches of lumber rather than several feet. When it comes to the door framing, I'm planning to rip a piece lengthwise as you suggest so I have solid wood under the door instead of spaces.
Thanks for the thoughts X
If I shorten them, won't I be messing with the shearing forces for the siding?
Hardly :) Unless you refer to shearing as the siding eventually falling off the wall, then yes, that will most likely happen.
The few nails you showed, that just missed the stud, those I would cut IF they are giving you concern. The rest of the nails have a job to do and should remain where they are, as long as they are, and undisturbed as they are.
Yes, I am referring to the siding eventually getting loose and falling off :(
The few in the photo are just that, a few shown as an example. Along that stud and a couple others, the missed nails go all the way up the wall.
I don't have a problem leaving them as long as I'm dealing with it properly. IE: Pushing closed cell foam onto the nails as the first layer of beef-up between the studs.
My initial question was if it was necessary to fill foam all the way across, or just use a long strip over the nail pattern since these nails are in a nice "neat" line along the side of the stud, and then fill the rest of the way across with drywall. Then continuing to add drywall to my desired level of beef up. Eventually adding a few layers past the depth of the foam with everything caulked up nicely.
Still looking for suggestions/answers/guidance in dealing with the nails sticking out in my stud bays.....
I have 5 stud bays that I need to deal with. (One other bay, the nails are nearly flush against the side of the stud so I think I can pound them against the side of the stud and fill over them with the backer rod and caulk.)
In the problem studs the nails wonder all the way up from flush against the stud up to almost an inch away from the stud. There are a few random nails out in the middle of the bay that I'm not as worried about just cutting off, but I'm am very hesitant to cut off entire rows of nails. So back to my question.....
In applying rigid foam pushed over the nails (as suggested in other threads), would it be necessary to fill across the entire stud bay, or, since they are lined up...can I use a long strip of foam (maybe about an inch and a half to two inches wide) just over the row of nails, then fill in the rest of the way with my layers of drywall? Eventually covering over the foam strip with the last few layers of drywall?
Which is going to be more "proper" way to do it? :?: