Home Studio in Saudi Arabia , Vocal Booth and CR Design

Started by M300SEL on 30 August 2007. 28 replies, 2007–2008. In the Library under Walls, floors and ceilings.

Originally posted at johnlsayers.com, topic 9336.

Hello All I am a long time reader in this great forum , about a year now ( well maybe a picture viewer more than a reader ) do for my weak English " almost" , I've done lots of studying for a lot of construction threads here and the ones on the REFERENCE Area , and I also got Rod's Book from Amazon ( O yeah Rod ! your Book went all the way to the Middle East :o ) I've read most of the book it was an exiting time, A LOT of good info with Great order , except that I was hoping it had some more Details for those who don't have any building experience (like me :oops: ) I am sure the English was a big reason too for my less understanding , any ways I will appreciate any help from you guys , and off to my thread : I have a small project here which I will be starting soon to improve my home studio (Isolating and Treating) I will go ahead with the details : Existing room :
Recovered from web.archive.org — originally hosted at http://www.nabd.net/members/M300SEL/image/construction/room1.jpg
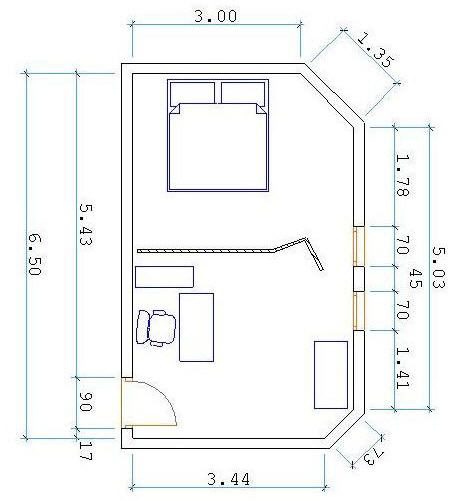
This is a Guest Room , which I made it my temporary studio for about a year now, as you see it has a bed on one side , there is some cabinets and other stuff too there ,so I built a wooden partition to block the vision of that side ,to record and mix on the other side , now I will get red of that bed and every thing and use the whole room for my home studio . Floor, Walls and Ceiling of the existing room : The floor is concrete slab , and the finishing is marble rocks ,and over that a 1/2'' carpet ,The walls and ceiling are of concrete slab too. The Room is 6.5m long and 3.95m wide and the height is 2.91m The Project : My number one concern is to build a vocal booth , to get an isolated quite and treated room for recording Vocals ,Then Treat my Control room, i am not planning to build walls or other stuff for the control room , the only construction will be done is for the vocal booth and studio treatment. How loud ? The noise I want to isolate is things like : AC noise , computer fans, chair and door cracklings , a noisy vibration coming from a water pump located behind my back wall, and the garage door opening/closing littlie noise leaking from the windows , I tried to measure the sound of most of those noises with my ( Check Mate SPL Meter , CM-130) so I turned the AC on and the PC , opened the garage door and waited for that noisy pump to pump ! then got the measurement from where the vocalist will approximately stand , it was around 50dB , the other thing is that I want to monitor with the speakers while recording, that may add some more dB's. Vocal Booth Dimensions: I tried to get the biggest area for the booth without harming the control room space ,and I used one of the Room Ratios in Rod's book ,this one particularly 1:1.14:1.39 the dimensions are : 2.3m H , 2.61m W ,3.19m L , Desighn_A
External image, not preserved — original: http://www.nabd.net/members/M300SEL/image/construction/A.jpg
for those dimensions and for that slope on the back right corner and for my mini split AC I had to move the booth around 0.9m from the back wall so the booth would be symmetric and for the booth ceiling not hitting the AC , then I had to put the door on the front wall next to the window , that made things kind of crowded over there with the right monitor being in front of the door. In Design_B ,I dropped the symmetry thing and moved the booth around 0.3m to the left , that made the space in the right side around 0.7m enough space to put the door on the right wall , and make the window larger . Design_B :
External image, not preserved — original: http://www.nabd.net/members/M300SEL/image/construction/B.jpg
For the space behind the booth I am planning to build a Zigzag silencer for the air interring the booth and hang it on the room's back wall , I will get back to it on coming posts. I know there are much better designs and ideas than the ones i made, so if someone had any more , that would be appreciated :) . Booth's Floor : It will be of 2×6 joists 16" oc , and floated using Auralex U-Boats , I have 50 of them then a layer of 3/4" Plywood, second layer is 3/4" MDF with Green Glue between them ,then a peace of carpet for the finishing Questions : 1- is the plywood and MDF a good combination for the floor and GG ? how about the thickness is 3/4" ok for the two layers ? 2- should the outer walls be at the end of the floor or should they cover it ? see the sketch : Booth's Walls : That would be staggered stud walls with 2x6 plates and 2x4 studs , with 16" oc framing . I was kind of messed up with the corners until I saw this sketch by Steve which matched my framing so I designed it that way.
External image, not preserved — original: http://www.nabd.net/members/M300SEL/image/construction/corner.gif
The inner wall would be two layers of MDF sandwiched with Green Glue , first layer is 3/4" thick , the other is 5/8". The outer wall would be a single 3/4" MDF . Questions : 1- About Green Glue , I have a 12 pack box, would that do the job for the 4 inner walls , ceiling and floor ? 2- Should I use another thickness for the walls or is it good that way ? 3- Is One layer for the outer wall Ok for the isolation I need ? , or should I add another ? 4- All walls and floor framing is there on the sketch, is it done the right way ? especially the corners,window and door ? this is the Sketchup file http://www.nabd.net/members/M300SEL/ima ... raming.skp Booth's Ceiling : I have no idea for a good way to do it , any recommendations ? :shock: Insulation : I've been searching for local suppliers for fiberglass and rockwool , i found that there is a fiberglass factory here which uses Owens Corning technology , this is the website http://www.afico.com.sa/ I did not fined the 700 series nor the pink fluffy fiberglass , but I did fined rigid fiberglass boards in different densities , Faced and Unfaced , here is the technical information for them http://www.afico.com.sa/board%20insulation.zip The one similar to the 703 is with 48Kg/m3 density is that right ? Its dimensions are 1.2m W , 1m L , I called and asked about the price for the 2" thick board with 48Kg/m3 density , they said its about $5 for a single board , how does that compare to the prices in the US :roll: ? For the walls insulation and treatment I will be using those boards , but for the floor and ceiling I think I need a thicker non rigged fiberglass insulation, but i did not know what to use from those products in their website ? Is this what I am looking for http://www.afico.com.sa/blanket%20insulation.zip ? Well that’s it for my first post , hope I made things clear enough :roll: Here are the Sketchup files for design_A and B http://www.nabd.net/members/M300SEL/ima ... tion/A.rar http://www.nabd.net/members/M300SEL/ima ... tion/B.rar Regards Wael
congratulations on your tread.... Excelent!! full of details.... Quickly.....i think a square boot isent the best option...try not paralel walls..... if im not mistaken... thanks djo
Hello Djo i went for the square booth to get that room ratio right , and square is easer on building :lol: you are right about the parellal walls but for sure there will be allot of absorption in there , i am planning to do super chunk traps in the corners , with broad band absorbers on the walls along with a cloud, or something close to that Thanks for the quick reply
this might be workable. angled inside treatment walls. outside shell has drywall layer inside and multiple layers outside as needed. bases are separate and walls are separate as well instead of stagger studs. ceiling uses 2x12 with wide slats. cloth, and insulation to diffract and absorb. angled walls are slat resonators, straight inside walls are slats over absorbers. add some hanging fabric covered 703 absorbers on the walls to treat if too live. note: insulation not shown but assume to line the backs of the slat walls and between drywall in outside shell.
Image not preserved: M300SEL booth.jpg
File not preserved: M300SEL booth.skp
Hello gullfo wow ! now that's a big change in plan :shock: thanks allot for this great idea , its much better no doubt but double walls instead of staggered , that means more $ doesn't it :? is staggered walls really that bad :roll: ? if i filled the corners with super chunk bass traps , and hanged panel absorbers on the walls and ceiling , would not that fix the parallel walls problem ? and for the walls , MDF is easier to fiend over here than Drywall , the ceiling helped alot , thanks again Wael
the only additional cost might be the extra set of 2x6 & 2x4 around the top and bottom plates. much more isolation though... ultimately you're building it so if you find the extra 2x6 and 2x4 are out of budget then go with the staggered studs. its all about tradeoffs... if MDF is less costly and therefore meets your budget needs, then you should be able to use it realizing its a different density than drywall.
gullfo thanks allot , i am working on the supplies now any one got answers for my other questions ? Regards Wael
the superchunks and hanging absorbers will work - make sure the room isn't square and that no 2 wall dimensions are the same or even multiple of each other. also, the ceiling-floor needs treating. lastly use as little absorption as you need to balance the room to avoid making it too dead.
cool gullfo ,will hang clouds on the ceiling, Thanks i will order insulation tomorrow , can someone help on this :
but for the floor and ceiling I think I need a thicker non rigged fiberglass insulation, but i did not know what to use from those products in their website ? Is this what I am looking for http://www.afico.com.sa/blanket%20insulation.zip ?
and this
Questions : 1- About Green Glue , I have a 12 pack box, would that do the job for the 4 inner walls , ceiling and floor ? 2- Should I use another thickness for the walls or is it good that way ?
i was searching for local rockwool and i found this : http://www.saudirockwool.com/products.asp so , which is beter the fiberglass on the recent links or that rockwool , for insulation in walls ,floor and ceiling ?
Back after a big break , and thank god construction has started ! first there have bean changes in plan , they are in general : 1- Double wall instead of staggered . 2- the inner walls facing each other are not parallel any more. 3- the booth is moved to the right side of the existing room , leaving about 70cm on the left side for interring the booth , therefore the door is on the left side wall , and the window size is much better now and centered to the existing room. 4- Mini-split moved a couple of meter forwared to the left wall to give space for the booth ceiling , its not the right place for it back there any more , and its beter now for the CR Cooling. the last desigh looks like this :
Image not preserved: last_180.jpg
Construction started on Wednesday 26/12/2007 and stopped on 10/1/2008 for the next step. i used 2×4 studs for wall framing , and 2×6 for floor and ceiling framing walls are of MDF boards 1.8cm and 1.5cm thick.
External image, not preserved — original: http://www.jawaly.org/M300SEL/image/construction/diary1/01.jpg
External image, not preserved — original: http://www.jawaly.org/M300SEL/image/construction/diary1/02.jpg
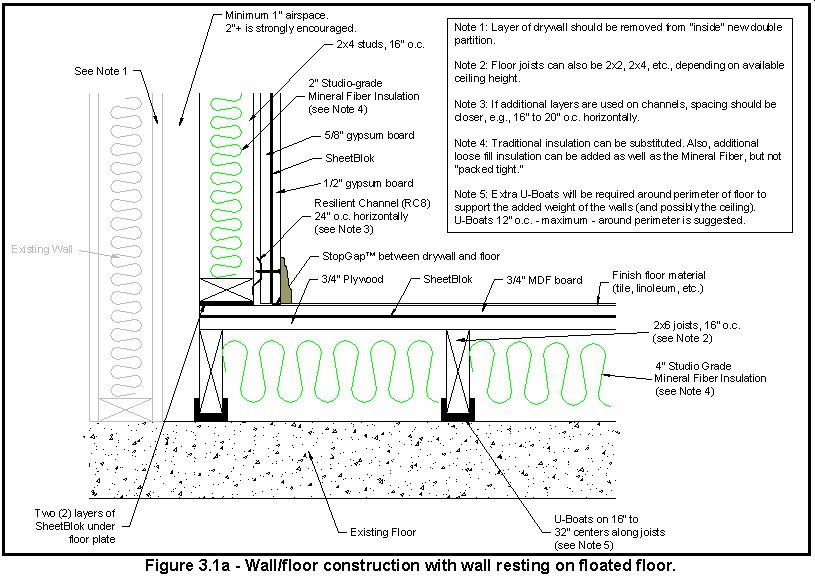
here is how the floor framing went , i folowed Auralex desighn and tips for the wooden deck ,
Recovered from web.archive.org — originally hosted at http://www.acoustics101.com/common/figure3_1a.jpg
External image, not preserved — original: http://www.jawaly.org/M300SEL/image/construction/diary1/03.jpg
External image, not preserved — original: http://www.jawaly.org/M300SEL/image/construction/diary1/06.jpg
then installed the Auralex Uboat
External image, not preserved — original: http://www.jawaly.org/M300SEL/image/construction/diary1/07.jpg
External image, not preserved — original: http://www.jawaly.org/M300SEL/image/construction/diary1/08.jpg
External image, not preserved — original: http://www.jawaly.org/M300SEL/image/construction/diary1/09.jpg
for insulation , it was not easy finding a good choice , i ended up choosing fluffy Fiberglass insulation with aluminum facing , could not fiend un-faced, the thickness is 10cm , and bought some rigid rockwool 40Kg/m3 5cm thick to cover that 15cm deck.
External image, not preserved — original: http://www.jawaly.org/M300SEL/image/construction/diary1/10.jpg
External image, not preserved — original: http://www.jawaly.org/M300SEL/image/construction/diary1/11.jpg
External image, not preserved — original: http://www.jawaly.org/M300SEL/image/construction/diary1/14.jpg
External image, not preserved — original: http://www.jawaly.org/M300SEL/image/construction/diary1/16.jpg
External image, not preserved — original: http://www.jawaly.org/M300SEL/image/construction/diary1/18.jpg
External image, not preserved — original: http://www.jawaly.org/M300SEL/image/construction/diary1/25.jpg
after that we drilled the holes for the wiring ( electrical on the back and mic/headphones snake on the front.)
External image, not preserved — original: http://www.jawaly.org/M300SEL/image/construction/diary1/20.jpg
External image, not preserved — original: http://www.jawaly.org/M300SEL/image/construction/diary1/21.jpg
External image, not preserved — original: http://www.jawaly.org/M300SEL/image/construction/diary1/28.jpg
then start covering the floor with the first layer ( 1.8cm MDF board ).
External image, not preserved — original: http://www.jawaly.org/M300SEL/image/construction/diary1/29.jpg
External image, not preserved — original: http://www.jawaly.org/M300SEL/image/construction/diary1/30.jpg
i did not fiend any acoustic caulk over here , so i ended up using a multi purpose silliconized caulk from White Lightning
External image, not preserved — original: http://www.jawaly.org/M300SEL/image/construction/diary1/32.jpg
External image, not preserved — original: http://www.jawaly.org/M300SEL/image/construction/diary1/36.jpg
External image, not preserved — original: http://www.jawaly.org/M300SEL/image/construction/diary1/37.jpg
External image, not preserved — original: http://www.jawaly.org/M300SEL/image/construction/diary1/67.jpg
External image, not preserved — original: http://www.jawaly.org/M300SEL/image/construction/diary1/68.jpg
finished up the first layer , next is 1.8cm Plywood ,but after applying the ONE and ONLY GREEN GLUE :shock:
External image, not preserved — original: http://www.jawaly.org/M300SEL/image/construction/diary1/54.jpg
External image, not preserved — original: http://www.jawaly.org/M300SEL/image/construction/diary1/51.jpg
i only have 12 tubes ( shipping it all the way here was Costly , but you got to hav it :lol: ), adn i had to go easy on them ,
External image, not preserved — original: http://www.jawaly.org/M300SEL/image/construction/diary1/41.jpg
External image, not preserved — original: http://www.jawaly.org/M300SEL/image/construction/diary1/46.jpg
External image, not preserved — original: http://www.jawaly.org/M300SEL/image/construction/diary1/48.jpg
External image, not preserved — original: http://www.jawaly.org/M300SEL/image/construction/diary1/56.jpg
External image, not preserved — original: http://www.jawaly.org/M300SEL/image/construction/diary1/59.jpg
External image, not preserved — original: http://www.jawaly.org/M300SEL/image/construction/diary1/60.jpg
External image, not preserved — original: http://www.jawaly.org/M300SEL/image/construction/diary1/63.jpg
The floor was done easy with no problems , but when it came to the walls , things got a little bit complicated , becous of that sloped wall , for the walls to meat and to be sealed the boards should be treated in corners , here is a sketch which shows what i mean : and i was toled that the best way is to treat the corner edges this way : the other problem was the rightside wall and the sloped one should be done on the floor then raise them up after hanging the boards , well that wall was not light :lol: Pictures of the wall construction :
External image, not preserved — original: http://www.jawaly.org/M300SEL/image/construction/diary1/81.jpg
External image, not preserved — original: http://www.jawaly.org/M300SEL/image/construction/diary1/82.jpg
External image, not preserved — original: http://www.jawaly.org/M300SEL/image/construction/diary1/83.jpg
External image, not preserved — original: http://www.jawaly.org/M300SEL/image/construction/diary1/84.jpg
External image, not preserved — original: http://www.jawaly.org/M300SEL/image/construction/diary1/85.jpg
External image, not preserved — original: http://www.jawaly.org/M300SEL/image/construction/diary1/86.jpg
External image, not preserved — original: http://www.jawaly.org/M300SEL/image/construction/diary1/87.jpg
External image, not preserved — original: http://www.jawaly.org/M300SEL/image/construction/diary1/88.jpg
now came the real test ! ( Corner treating to seal ) well my carpentner had some problems dealing with those corners :? he did not do it in a cleat cut , it was uggly , here is the pic
External image, not preserved — original: http://www.jawaly.org/M300SEL/image/construction/diary1/91.jpg
he could not do better so i broght another carpentners , they were from Pakistan , and they were mutch better with ( Wood ) see the difference
External image, not preserved — original: http://www.jawaly.org/M300SEL/image/construction/diary1/98.jpg
Now thats more like it :lol: this is how they cutted the boards so the edges would shape as it shold for thoes corners :
External image, not preserved — original: http://www.jawaly.org/M300SEL/image/construction/diary1/97.jpg
and had to do the framing again
External image, not preserved — original: http://www.jawaly.org/M300SEL/image/construction/diary1/94.jpg
External image, not preserved — original: http://www.jawaly.org/M300SEL/image/construction/diary1/95.jpg
External image, not preserved — original: http://www.jawaly.org/M300SEL/image/construction/diary1/99.jpg
now its mutch better :
External image, not preserved — original: http://www.jawaly.org/M300SEL/image/construction/diary1/100.jpg
External image, not preserved — original: http://www.jawaly.org/M300SEL/image/construction/diary1/103.jpg
External image, not preserved — original: http://www.jawaly.org/M300SEL/image/construction/diary1/102.jpg
External image, not preserved — original: http://www.jawaly.org/M300SEL/image/construction/diary1/104.jpg
External image, not preserved — original: http://www.jawaly.org/M300SEL/image/construction/diary1/105.jpg
and the Wall is Up
External image, not preserved — original: http://www.jawaly.org/M300SEL/image/construction/diary1/108.jpg
now the Back wall
External image, not preserved — original: http://www.jawaly.org/M300SEL/image/construction/diary1/110.jpg
External image, not preserved — original: http://www.jawaly.org/M300SEL/image/construction/diary1/111.jpg
External image, not preserved — original: http://www.jawaly.org/M300SEL/image/construction/diary1/112.jpg
External image, not preserved — original: http://www.jawaly.org/M300SEL/image/construction/diary1/113.jpg
External image, not preserved — original: http://www.jawaly.org/M300SEL/image/construction/diary1/114.jpg
second 1.5cm MDF layer
External image, not preserved — original: http://www.jawaly.org/M300SEL/image/construction/diary1/116.jpg
Now joining the sloped and the back wall ( ohh i hait theas Corners :evil: )
External image, not preserved — original: http://www.jawaly.org/M300SEL/image/construction/diary1/117.jpg
External image, not preserved — original: http://www.jawaly.org/M300SEL/image/construction/diary1/118.jpg
Now left Wall framing ( Door framing )
External image, not preserved — original: http://www.jawaly.org/M300SEL/image/construction/diary1/120.jpg
External image, not preserved — original: http://www.jawaly.org/M300SEL/image/construction/diary1/121.jpg
External image, not preserved — original: http://www.jawaly.org/M300SEL/image/construction/diary1/124.jpg
External image, not preserved — original: http://www.jawaly.org/M300SEL/image/construction/diary1/126.jpg
External image, not preserved — original: http://www.jawaly.org/M300SEL/image/construction/diary1/129.jpg
ALL THree Walls are UP
External image, not preserved — original: http://www.jawaly.org/M300SEL/image/construction/diary1/127.jpg
wow, nice work. Those Pakistans really do a good job. btw, are the MDF pannels glued on eachother?
Ro if you mean Green Glue , no the outer walls are not sandwetched with GG i only have a 12 pack , and i used them for the inner walls and ceiling , that is 2 tubes for the floor , 8 for the four inner walls , and 2 for the inner ceiling.
No, I mean (real) glue.
Ro No i did not , should i :roll: ? there is only caulk on the edges between the MDF Boards
no, you shouldn't. :) I mistook the kit for glue.
Cutting and measuring for the inner wall framing :
External image, not preserved — original: http://www.jawaly.org/M300SEL/image/construction/diary1/128.jpg
External image, not preserved — original: http://www.jawaly.org/M300SEL/image/construction/diary1/129.jpg
External image, not preserved — original: http://www.jawaly.org/M300SEL/image/construction/diary1/130.jpg
External image, not preserved — original: http://www.jawaly.org/M300SEL/image/construction/diary1/131.jpg
External image, not preserved — original: http://www.jawaly.org/M300SEL/image/construction/diary1/132.jpg
External image, not preserved — original: http://www.jawaly.org/M300SEL/image/construction/diary1/133.jpg
now filling the outer wall with insulation , because it is FRK i have read that the facing should be on the wall not between the two walls so it would not act as a third leaf ,
External image, not preserved — original: http://www.jawaly.org/M300SEL/image/construction/diary1/135.jpg
External image, not preserved — original: http://www.jawaly.org/M300SEL/image/construction/diary1/134.jpg
the insulation is 10cm thick but these fluffy fiberglass can get thicker without compressing :lol:
External image, not preserved — original: http://www.jawaly.org/M300SEL/image/construction/diary1/136.jpg
External image, not preserved — original: http://www.jawaly.org/M300SEL/image/construction/diary1/141.jpg
External image, not preserved — original: http://www.jawaly.org/M300SEL/image/construction/diary1/137.jpg
External image, not preserved — original: http://www.jawaly.org/M300SEL/image/construction/diary1/142.jpg
now the inner wall framing take its place after caulking
External image, not preserved — original: http://www.jawaly.org/M300SEL/image/construction/diary1/143.jpg
External image, not preserved — original: http://www.jawaly.org/M300SEL/image/construction/diary1/144.jpg
External image, not preserved — original: http://www.jawaly.org/M300SEL/image/construction/diary1/143.jpg
External image, not preserved — original: http://www.jawaly.org/M300SEL/image/construction/diary1/145.jpg
its time for pulling the electric wiring , and put the outlets in its place there well be one electric outlet in the booth ( 110V) and one for the lighting key\Dimmer .
External image, not preserved — original: http://www.jawaly.org/M300SEL/image/construction/diary1/146.jpg
External image, not preserved — original: http://www.jawaly.org/M300SEL/image/construction/diary1/147.jpg
External image, not preserved — original: http://www.jawaly.org/M300SEL/image/construction/diary1/148.jpg
External image, not preserved — original: http://www.jawaly.org/M300SEL/image/construction/diary1/149.jpg
the wire went through
External image, not preserved — original: http://www.jawaly.org/M300SEL/image/construction/diary1/151.jpg
Looking good Wael! I'm impressed by the speed of this project.. good luck! a :arrow:
Yes, looking very nice indeed! Nice job, and great progress! Keep it up, you are making us all look bad! ;)
AndreasB Thanks allot :thu: doublehelix Thanks for the nice words :) Hey its a small project , it is nothing compared to yours ! i have bean over your project several times and have learned great stuff , its Beautiful , i am interested to see how are you going to install the Doors , Keep the pics coming 8) By the way , how is your mom ?, i hope she is doing OK !
hanging the insulation on the frame for the inner walls was not easy , there is no wall to nail on it , but we worked that out , i made the FRK facing the outside, for it not to act as a third leaf , then started to put the walls , first the 1.8cm MDF board then the 1.5cm with Green Glue in between
External image, not preserved — original: http://www.jawaly.org/M300SEL/image/construction/diary1/152.jpg
External image, not preserved — original: http://www.jawaly.org/M300SEL/image/construction/diary1/153.jpg
External image, not preserved — original: http://www.jawaly.org/M300SEL/image/construction/diary1/154.jpg
External image, not preserved — original: http://www.jawaly.org/M300SEL/image/construction/diary1/155.jpg
External image, not preserved — original: http://www.jawaly.org/M300SEL/image/construction/diary1/156.jpg
External image, not preserved — original: http://www.jawaly.org/M300SEL/image/construction/diary1/157.jpg
External image, not preserved — original: http://www.jawaly.org/M300SEL/image/construction/diary1/158.jpg
External image, not preserved — original: http://www.jawaly.org/M300SEL/image/construction/diary1/159.jpg
External image, not preserved — original: http://www.jawaly.org/M300SEL/image/construction/diary1/161.jpg
Then the front wall/window framing
External image, not preserved — original: http://www.jawaly.org/M300SEL/image/construction/diary1/163.jpg
External image, not preserved — original: http://www.jawaly.org/M300SEL/image/construction/diary1/165.jpg
External image, not preserved — original: http://www.jawaly.org/M300SEL/image/construction/diary1/166.jpg
External image, not preserved — original: http://www.jawaly.org/M300SEL/image/construction/diary1/168.jpg
External image, not preserved — original: http://www.jawaly.org/M300SEL/image/construction/diary1/170.jpg
External image, not preserved — original: http://www.jawaly.org/M300SEL/image/construction/diary1/171.jpg
External image, not preserved — original: http://www.jawaly.org/M300SEL/image/construction/diary1/172.jpg
External image, not preserved — original: http://www.jawaly.org/M300SEL/image/construction/diary1/175.jpg
External image, not preserved — original: http://www.jawaly.org/M300SEL/image/construction/diary1/177.jpg
External image, not preserved — original: http://www.jawaly.org/M300SEL/image/construction/diary1/179.jpg
Now i had to start pulling the Snake wires , it is the Pro-Co Sound StageMaster SMA0804FBQ-25
External image, not preserved — original: http://www.bhphotovideo.com/images/largeimages/166197.jpg
i rented the pulling wire and started pulling the XLRs first , two by two , i covered them with plastic wrap before
External image, not preserved — original: http://www.jawaly.org/M300SEL/image/construction/diary1/181.jpg
External image, not preserved — original: http://www.jawaly.org/M300SEL/image/construction/diary1/182.jpg
All came through
External image, not preserved — original: http://www.jawaly.org/M300SEL/image/construction/diary1/189.jpg
External image, not preserved — original: http://www.jawaly.org/M300SEL/image/construction/diary1/199.jpg
External image, not preserved — original: http://www.jawaly.org/M300SEL/image/construction/diary1/200.jpg
walls are done !
External image, not preserved — original: http://www.jawaly.org/M300SEL/image/construction/diary1/185.jpg
External image, not preserved — original: http://www.jawaly.org/M300SEL/image/construction/diary1/186.jpg
the ceiling was next , and man it was not an easy process , having only 30cm of space between the booth and the existing ceiling :? ! but we made it through
Congrats on your build. At this rate you'll be recording next week :!: All the Best cheers Alan
nice work :)