Hi Guys – I hope you and yours are all well. I can’t believe it’s been over four months since my last post, Man the year is flying through! :shock:
This is to bring you all up to date with what’s been happening, and where I am at the moment. Basically, the work that was supposed to go quiet around the middle of March just kept coming in, which is of course the right problem, but extremely frustrating when you’re trying to build a recording studio. I mentioned in my very first post ‘the ex-wife’ well, although off topic, on the 28th February, I finally completed on the sale of what Divorce Lawyers here in the U.K. call ‘The Former Matrimonial Home’ (not where I’m trying to build btw) after five and a half years of sheer hell and financial nightmares. I can now therefore confirm that I’m finally able to get on with my life and move on. For any of you that have been unlucky enough to go through this, you’ll know it’s a tremendous weight off the mind.
Now to far more important issues, and a chance to share with the newcomers my experience with local planning offices, and to offer some help with how to avoid the crap so that your build can possibly go a little more smoothly.
I apologise in advance if what I’m about to say seems irrelevant to our U.S and Australian cousins but this could be really helpful to anyone building in the U.K. :oops:
Government legislation dictates that every domestic property in the U.K. has a ‘Permitted Development Right’. In simple terms, this represents a mandatory right to extend/develop your dwelling without the necessary need for planning, if you meet certain criteria. For a semi-detached property this is currently 50 cubic meters, and for a detached, it’s 70 cubic meters. Now what this means in reality, is that if you visit your local Council Offices and pick up their leaflets on planning, you’ll look through the flowchart of questions, and if you answer 'no' to all those questions, you’ll almost certainly not need ‘Planning Permission’. This is exactly what I did back in Dec last year before I joined the forum. Not infringing a public highway, not building higher than the existing building, blah blah, you name it, I was totally within the planning criteria. It wasn’t until I went back to the offices in early March to let them know what I was intending, that I found out that the permitted development right for our home was removed by the Council themselves when it was built back in 1976! This did not show up on the 'Land Searches' when we purchassed. Shit, Bummer etc. Guys I urge you all to watch for this one as it proves, (Keith would rightly be so quick to point this out), that you can’t assume anything when it comes to ‘Codes and Permits’ (Building Regs/Planning in U.K. speak).
Ok, so what seemed then like a potentially disastrous set-back, turned out to have a couple of positives.
1. Since the Council removed the development right, we didn’t need to pay for the planning application. Nice one!2. More than that, since we had effectively no right to build, we didn’t need to apply for a ‘change of use’. Now this bit is critical since it was the change of use gag that could have potentially ruined the whole project, and I didn’t even know it.
Faced with this unexpected situation, I clearly had no alternative but to submit an application. This wasn’t easy as we want to build a conservatory on the back of the house as well. The next step had to be to get someone to design the conservatory, and then get an Architect to draw everything up so that all the building work could be submitted on the same application. This of course takes a shed-load of time, but, lo and behold, the application for a single storey garage extension to the front, and conservatory to the rear was submitted on the 1st May.
Now as anyone here in the U.K. will tell you, Local Authorities seem to take an unbelievable amount of time to get their act together – two months minimum to be precise!
No worries Lou, go have a chat to the neighbours before they’re informed by the Council of what’s going on. They were all cool, but concerned about, guess what, noise! How many times do we talk studio to the over fifty fives, and they automatically think of unbearable noise levels, :shock: heavy-rock bands turning up in dodgy vans at 1.00am, :twisted: groupies taking drugs, :?: pizza boxes all over the drive, :cry: empty beer cans in the street etc? (As if I’d tolerate pizza boxes on the drive!) :lol: This really hacks me off, but I kept my cool, went and saw them all, and explained that I’d been producing music in the house for over two years, and they in turn, confirmed that they’d heard nothing. (No they’re not all deaf!) So there I was thinking all was going as smoothly as it could, when I found out that one of them had put in a letter of complaint after meeting with me!!! Hypocrite!
Here comes the next bonus for U.K. builders, (if there’s no change of use issue), noise has nothing to do with planning. This is solely down to environmental heath, which in turn means, build it properly to give maximum isolation and absorption, and if there is no disturbance, your neighbours have no right to complain. They could of course winge on about increased traffic, but hell, we’re not cutting peoples’ hair! A client in a studio is likely to be there all day, hardly highway congestion! :roll:
What this all translates to, is that I’m currently just over three months behind schedule, and at the real risk of upsetting the very people here who have offered me so much help: Kendale, Gulfo and of course John – (thank you all again). :oops: I had no idea that there might be an issue with this, and nether would I have started posting back in December if I thought there would be.
The end result, (I hope you’ll all be glad to know), is that my application was approved and ‘rubber stamped’ on the 28th June, so in short Gentlemen we are ‘clear to go’ and there’s nothing anyone can do to stop it - yippee! :lol::lol::lol:
Now to something for our ‘State-Side’ brethren, Al Gore may have a point, (off topic but relevant), the weather here in the U.K. has been appalling. We’ve just had the wettest six weeks on record, I’m not sure if it’s ‘An inconvenient truth’ global warming, or just simply climate change, but even if I’d been digging in April as originally intended, I’d still be digging now! The downside of this is that any half decent builder around here is currently stacked up with a backlog of work that has to be completed before they can take on any more. :x:x
So, my posting will hopefully soon be on the construction site with pictures of mini-diggers carving up my drive! I’ve yet to design all the framing, ceilings, wiring, air-con etc, (much help needed here!) :oops: and my sketchup skills still suck, but at least you guys will be able to see things happening.
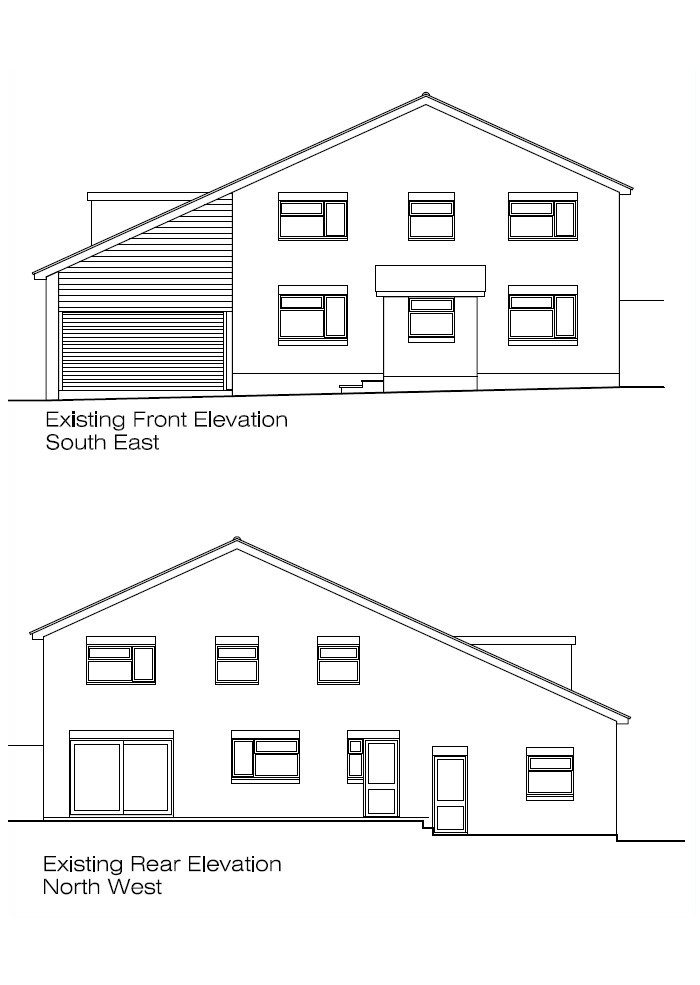
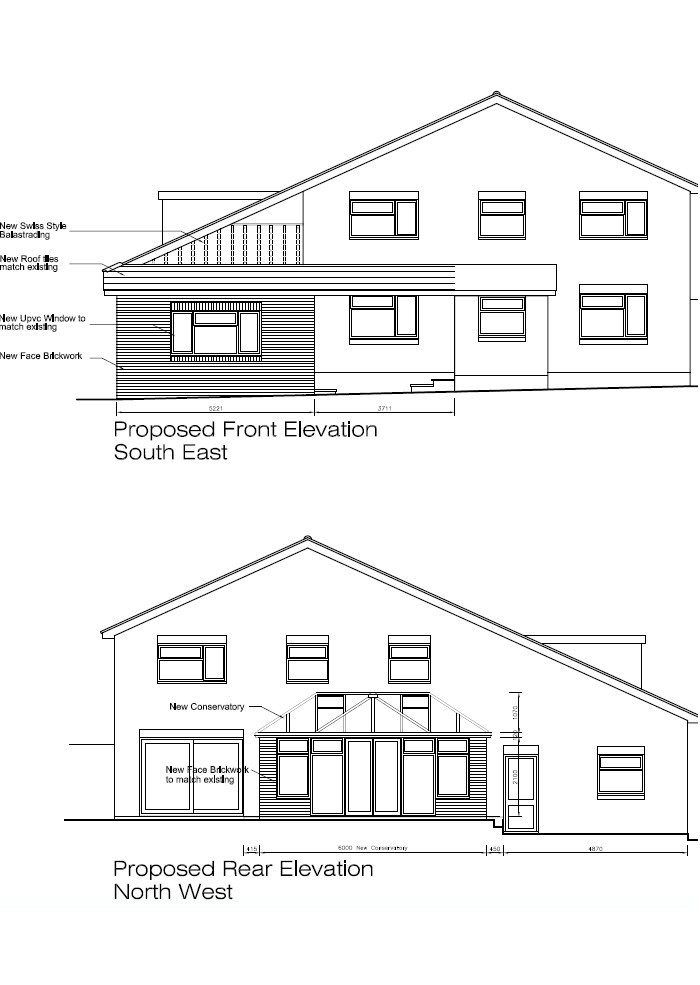
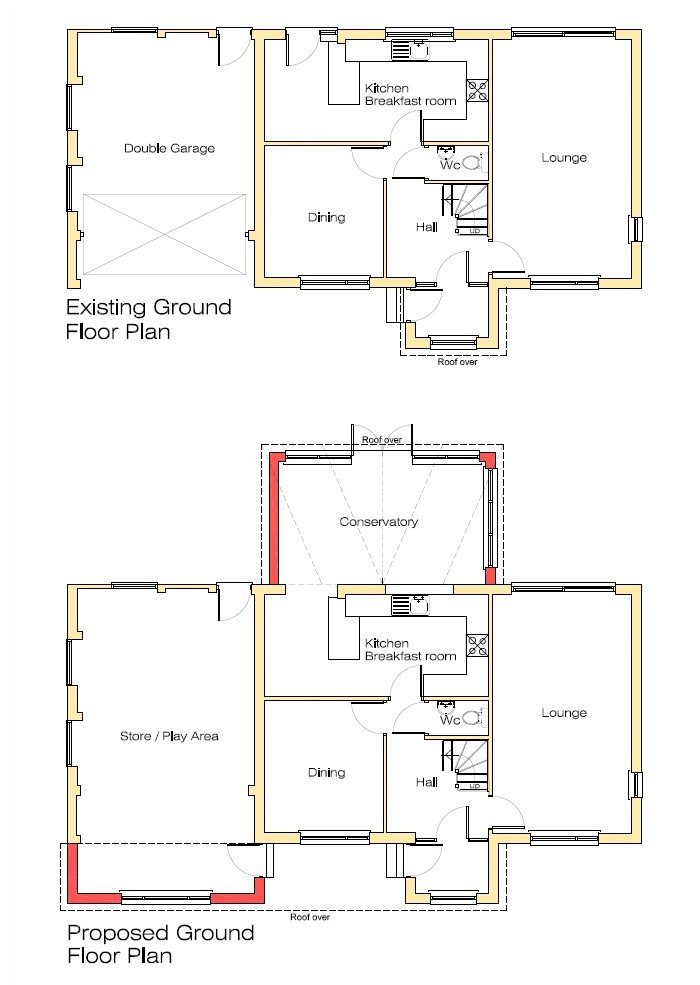
Here then, in all their glory, are the Architects drawings which we will all be working from. I sincerely believe I’ll really have my work cut out to finish the studio side of this before the end of the year, but it will, I hope, prove to be a worthwhile experience for all concerned, and of benefit for others to read.
On a side-note, (slightly off topic), I write an online theory article (total beginners to advanced), for a Guitar Magazine, (no this is not a spam!), if any of you want to brush up on your harmony knowledge please feel free to read, download, and absorb. I’m not getting paid, more like the moderators up here, just trying to help. The tutorials (stickys) are currently arranged in the wrong order (still a relatively new site) – hardest first, but it might be of use to some of you, I’m just trying to put something back, and, like this forum, it’s free. Here’s the link.
http://www.alloutguitar.com/education/lessons/theory
P.S. Massive apologies to Steve, Keith and Sideshow for not yet putting ‘The Glossary of terms’ together, It’s been a totally mad few months, and I just haven’t had the time. I’m still up for it but it’ll probably become a generic part of the build – if you get my drift!
Take care Guys,
Warm regards as always, diggers and bricklayers at the ready,
Lou. 8)8)8)
PS. I think this is gonna get moved real soon!
http://www.johnlsayers.com/phpBB2/viewt ... sc&start=0
Hi Guys, I hope you’re all OK! Just to let you know it’s been a totally mad few days, and, that after almost seven months to the day since I joined this forum, Studio 4 is finally under construction. Yippee! :lol:
You’ve already seen in my previous post the state of our garage, but there was a lot of work to be done elsewhere before we could actually begin. Here then are the pics with brief explanations to bring you all up to speed.
I remember Keith commenting on ‘planning the job properly’, boy was he right, this has been something of a logistical nightmare just to get me this far!
First off, you can’t have machines running around your house if they can’t get to it, so we had to create access routes. This started with a quiet ponder whilst gazing at what will become the ‘musos’ main chill out area between takes.
All that crud in the garage had to go somewhere, and yes, it did break my heart to throw this lot away, but I have no use for it now as it’s pretty much obsolete, and when you need to clear space, sometimes you just have to be ruthless.
Span – as always, ready and able to resolve the situation, but not without regrettably blowing both rear tyres, resulting in an hour and a half delay, and a call-out charge for them to be fixed on site at 5.45 Saturday evening. Bummer! :evil:
Next, simply dig out the old manhole ready to take the new one and, the foul water feed from the new toilet. The blur on the shovel clearly shows the speed of work that Pete is capable of! Go on my Son! (English expression)
Then yet more of this relentless bloody rain! I understand that our freak weather has even made CNN, although extremely frustrating, we are so lucky that we haven’t been hit on anything like the scale they have just 100 miles north-west of here.
So that’s where I am at the moment chaps and all achieved in a total of 66 man hours!
Ken, if you read this, please advise if this needs to be transferred to the construction forum now, or whether it’s more appropriate for me to start a new thread there, as my next question will relate to cable ducting in the new floor, and when in the construction process to do it!
Many thanks as always Ken, John and Glenn,
Happy viewing, any comments feel free, but go easy on any criticism as I’m shattered! :wink:
Regards,
Lou. 8)
Aloha Lou,
Congratulations on your groundbreaking phase! Whoa! You guys sure get a lot done and quickly. Great job on the pics.
please advise if this needs to be transferred to the construction forum now, or whether it’s more appropriate for me to start a new thread there, as my next question will relate to cable ducting in the new floor, and when in the construction process to do it!
Lou,
That's a nice series of pictures giving a good oversight of a nice job.
:) Just teasing:
I thought studios and music where constructive, and you title the thread: Construction ....
:twisted: This is more demolition ........
Many thanks Ken for all your help, please hang around to keep an eye on the design!
Eric, thank you as well kind Sir, yes you're right, it is demolition at the moment, and this bloody weather is holding us back big time but we're cracking on!! :wink:
Regards,
Lou. 8)
Best of luck with your studio build.
Just finishing my little studio off down in Kent, and I know the pain of the red tape!
I look forward to watching your progress.
Oz
Hi Oz - really great to hear from you Dude. I've been watching your story for months and, as I've already said, (in American terms at least) we're practically neighbours! :D
Just about to go and take pics of my driveway before I clean up after the 3rd 20 tonne load of crap that was picked up yesterday. Yes, it will be me driving the digger without supervision from Span or Pete, :shock: but I have 6 palletts of brick and block - plus sand, insulation, etc, being delivered tomorrow with no 'clean' area to drop. :roll:
I'll show you how it looks when I'm done. It's gonna also get real busy at the weekend as I have 6 cubic metres of concrete (chill-out footing) on order for 9.00 am Saturday and we have to wheelbarrow it in. I have half an hour before I'm charged waiting time, so many hands and all that, and yes folks, it's still bloody well pissing down. :evil::evil::evil:
I apologise unreservedly for the linguistic slip in forum etiquette, but....... 8)
Warm regards,
Lou.
Hi JWL - many congrats on your progress too kind Sir, and thank you for the encouragement - much appreciated!
The words exuberance and contagious immediately spring to mind! :lol::lol:
Warm regards to you and yours,
Lou. 8)
Morning Chaps – well, as I said, the next step was a bit of a clear up operation on part. Here then are the all important pics!
Good old John turns up for the 3rd time in the pouring rain to get as much as he can in the Grab Lorry. To be honest he was probably overloaded since the muck was so wet. He could hardly make it up the hill.
The ground is so soft now that those tyre tracks are around 18” deep, and I can tell you that driving through there and turning 90 degrees was hairy to say the least. (We don’t need any more overturned vehicles!) :evil:
After an hour or so I finally managed to get to this, and if I’m honest, I felt quite pleased with myself given that I’ve never driven a digger until the other day. I now have total respect for the skill of professional machine drivers and of course, a clear area for this afternoon’s delivery of 6 pallets of bricks and blocks, 1 tonne of sand, 30 bags of cement blah blah blah.
As I mentioned in my previous post, tomorrow’s gonna be a killer, and time really is of the essence. We start at 7.30 am with digging out the rear footing, and we’ve only got an hour and a half before the concrete arrives! :shock: Praying for a dry day, I’ll let you know how we fair.
Wish us luck!
Regards,
Lou.
8)
Yup. The weather's pretty much gone mad this summer. That rain passed (pissed... 8) That's kinda fun to say!) over south Sweden last night, so I got a nice little portion of it too........
Cool pics!!! This will surely be a great thread to follow!
Best of luck!
/J.
Good afternoon people – much warmth to you and yours, and I hope you’re all enjoying your respective weekends. Johan – thanks for the encouragement, and nice to hear you’re hooked already!
Loads to show and tell, so here comes the update, whilst I still have the physical strength to type.
OK, so, Friday afternoon – clear area, and time for 2nd drop of materials.
This Guy was really helpful and managed to get the truck so close to the property that he was able to offload and still leave enough room for concrete access in the morning.
Although half an hour early, the concrete Guy on the left (he’s real of course - not made of concrete at all) was so cool, and quite prepared to hang around until we were ready. Introducing ‘Trev’, he’s someone I’ve known as a 'pub buddy' for around twenty years and has a heart as big as the planet. Totally ‘Top Bloke’
These barrows are bloody heavy, and even with, as it happened, only 4 cubic meters, we still had to manually pour 4.8 tonnes! I could hardly lift mine, let alone push it uphill and around the back of the house.
And, Voila! After just 2 hrs 50 minutes, a 13m x 0.5m x 1 m deep trench has been dug, and filled with nearly 5 tonnes of concrete to almost millimeter accuracy. :D
Absolutely unbelievable.
Cheers Mate and many thanks for not charging me waiting time. Yes they normally do that here too to make you spend the extra £350.00 on hiring a 50’ pump.
Introducing the ‘Man in the Red Shirt’ Another old schoolmate who will be doing all the brickwork. He starts tomorrow. He’s real pleased that his right hand thumb is exactly where it should be on that tape.
“Give me the bloody disk cutter” Arty shot again! (Yup, that's 140 amps of mains Electricity in the vertical black cable on the wall, with a bit of mains Gas in the yellow pipe for good measure!)
Voila again! Still only 1.30pm and everything is all plumbed in and finished. From top to bottom the brown 4" pipes are as follows:
1. New foul feed for Studio Toilet.
2. Replacement foul feed from existing house.
3. Replacement sink waste from existing house.
4. New washing machine waste from exisring house.
Then, my round in a 'local' (English term for a regularly visited Public House) for a very well earned beer. From left to right – Trev, Pete, Some Muso Nerd, and Span. :wink:
These Guys have been amazing, not only are they only charging me ‘Mates Rates’ (which is considerably cheaper than the norm), they’ve gone ‘all out’ and worked like Trogans again this weekend. I’m deeply grateful, and also, totally indebted to them. Thanks Guys, this definitely wouldn't be going so smoothly without you.
Tomorrow the brickwork starts on the chill-out area, another grab lorry to come in, and hopefully an inspection from building control re the drainage. Happy viewing, cos all the questions are coming real soon! Sorry if this post is ‘overdone’ but you all say you love pictures! (There’ll be less once the shell’s up – promise) All in all – a cracking couple of days. Cheers! No wonder I feel so happy. :D:D:D
Thanks Ro – cheers to you buddy! 8)
Morning Guys, I hope all is well with you. It’s been busy around here so here comes the update, a bit of ‘off topic’ satire, our first potential hold up, and then the first (of what will surely be many) couple of questions.
Monday morning, bang on 8.00 am, and the first trench blocks go in. Introducing the man in the red shirt again, who is actually ‘Phil’ another old classmate.
Span rightly advised me to get the Building inspector to visit the site and confirm that he was happy for the dig to continue at this depth. Now, as I’m sure Oz will verify, that’s not easy, especially when you bear in mind that my Architects Regulation drawings are currently stuck in the post (thanks to a postal strike) together with the cheque for the council to register them. I phoned Building Control this morning and finally got through to someone helpful who was able to send a Building Inspector to see me just 20 minutes ago! He approved the drainage in the garage, and said he was happy with everything so far. Result! Span and Pete now have the unenviable task of finishing the dig tonight so that another Building Inspector can re-inspect the finished hole tomorrow, prior to the concrete pour Saturday. Red-tape and logistics can be really frustrating sometimes, but we just have to get over the obstacles.
Now for the off-topic bit. I’m sure I mentioned somewhere up here that I’m a total gadget geeky nerd, so here’s the proof. The watch I chose as an engagement present.
The main analogue dial is U.K time, the digital display bottom left is Honolulu time -10 hrs (Kendale), and the dial top right is Sydney time +10 hrs (John), well you never know. :lol: Bottom right is a compass so that I can always find the pub! It also has a barometer (very handy in this weather), an altimeter (which even recognises when I'm upstairs in the house), a thermometer, chronograph, alarm and calendar. Oh yeah and it’s shockproof and waterproof down to 100 feet – Cooool! 8):roll:
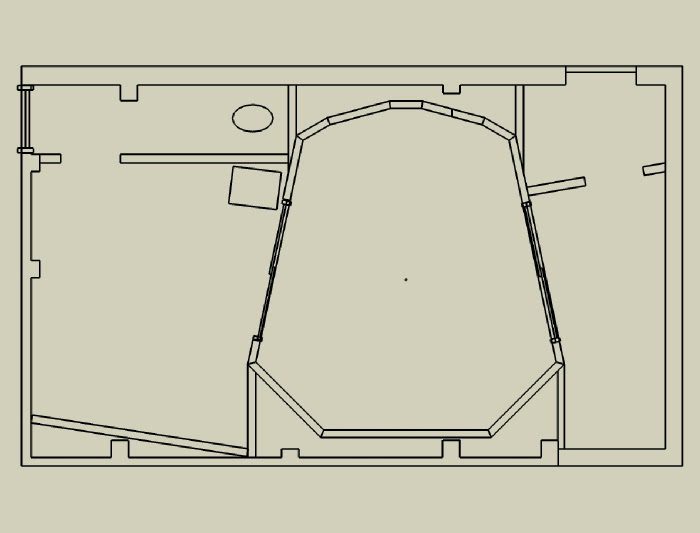
OK, so then to the questions. For those of you who didn’t catch the design thread, this is what Kendale and John gave me so much help designing. Many thanks again Gentlemen. This doesn’t show the additional walls and patio doors either side of the control room, so is intended as a layout guide.
Would one of you ’eagle eyed’ kind Sirs give my proposals for the floor construction a look? I want to make sure I’ve got the concept correct as per the isolated slab design on page 41 of Rod’s book.
My second question is a two-part one concerning ducting. Would you Guys agree that its’ almost impossible to lay the ducting at this stage since I don’t know exactly where my final walls will end up? If you approve of the construction, do you agree that it would be much more sensible to build up to ‘screed level’, chalk out on the concrete the exact location of all the walls, and then set out all the ducting prior to the screeding?
Now onto something that’s been causing a real headache – where to place the ducting. As I see it, I’ll have three separate ducting systems carrying three types of cable to all parts of the floor area, Audio, Midi, and A.C. Mains. The following diagram shows my plan for the mains only. Blue is ‘Domestic’ mains fed back from the house consumer unit to the studio consumer unit (red box), red is ‘Technical’ mains which has its own ‘Technical’ earth (Green).
Rather than trying to bring the ducting out of the screed within the rooms, I’m intending for all ducting runs to finally come out of the floor between the cavities or voids in the rooms – (between the leaves if you like). This way, I’m sure I’ve got a much better chance of not screwing things up both in terms of flexible location, and audible sound transference between the rooms via the ducting. Sorry if I’m not making sense, but try to visualise a sort of ‘sub floor’ rat run leaving 3 or 4” diameter holes dotted around the perimeter of the floor 4” away from the existing walls to still allow enough space at the edges for my outer leaf ‘beef-up’
Guys – thanks for reading, stress rising, jpeg of floor layout attached in case any of you fancy a doodle! :wink:
Regards,
Lou. 8)
Wait untill tomorrow! front of studio dig done and dusted :o I don't know how they've done it, but they have - crap ground 'n all, mains Gas, Electric, foul sewer, you name it. One wrong move here and I'm screwed. :D:D:D !
Pics to follow, but meanwhile, proper jpegs that are slightly larger for those of you that are kind enough to be interested.
Regards as always Guys,
Lou. 8) ( ,8, )
Image not preserved: Proposed Floor Construction.jpg
Good Morning fellow builders, I’ve just realised that my last post looks a bit over excited and I seem to have almost uploaded the same jpegs twice! To be honest, I was excited at the achievements of yesterday, and to quote someone whose wisdom and humour I really miss up here, “It was tired and I was late” :lol:
Anyway, check this out, all chill out area brickwork complete, and the colour match is awesome! (Main house 32 years old - Chill-out area 32 minutes old.)
6.00pm and Span and Pete arrive as promised for the high pressure challenge. Bear in mind they’ve already been working on a 400 home housing estate since 7.30am.
Definitely a two handed job – the communication between these Guys is fascinating to watch, but I couldn’t, too much at stake. “Stick to your Music Geez!” (English expression for clear off and leave us to get on with it.) :oops:
How they did this without any damage, under this sort of time constraint, and after a full days’ work already is frankly beyond me. To all the Guys involved in this, you’re adding a new dimension to the expression: “Yeah, well that’s what Mates are for.”
All chill-out area brick and block work done in 4 days!8m x 0.5m x 1.6m front footing dug in 2 hours - amazing,
Thank you soooooooooooo much! :D
You know my height, so you’ll no this footing is deep enough, and although these two have known each other for 34 years, (scary) it’s the first time ever, that Span has looked taller than me in a photo! :wink:
It’s now 1.00pm Fri and I’m now going outside to ‘bottom out’ the rest of the hole before the building inspector re-visits, I need him to be happy or…………… Concrete already ordered for 10.30am drop tomorrow!
Wish me luck,
Warm regards,
Lou. 8)
Building Inspector just been - :shock:
Totally cool with the dig, and very impressed with the preperation/organisation.
We are clear to go in the morning with the next lot of concrete. :D
Stay tuned.
Regards,
Lou. 8)
Now onto something that’s been causing a real headache – where to place the ducting. As I see it, I’ll have three separate ducting systems carrying three types of cable to all parts of the floor area, Audio, Midi, and A.C. Mains. The following diagram shows my plan for the mains only. Blue is ‘Domestic’ mains fed back from the house consumer unit to the studio consumer unit (red box), red is ‘Technical’ mains which has its own ‘Technical’ earth (Green).
Lou,
sorry I haven't been following this closely (did love the pics) - but will try to play catch-up......
As regards the above - your best bet is to feed all AC mains above grade and low voltage below grade.
The only exception to this being the power you feed directly to the board and the gear placed at the board - which I would run down a wall and bring in at a right angle to the low voltage wiring - and would keep it at least 2' away from any LV when doing that.
Another item would be the seperate grounds- very bad idea-
you will have feeds to power from the same transformer - the same power - the same neutral (earth ground from the power company) - and at the main - an earth ground for the entire service -
Although you're trying to avoid it - you're setting yourself up for ground loop problems........
better to do it like I show in the book - run seperate lines for isolated ground - but take those back to a small ground buss and then tie directly to your service ground.
Rather than trying to bring the ducting out of the screed within the rooms, I’m intending for all ducting runs to finally come out of the floor between the cavities or voids in the rooms – (between the leaves if you like). This way, I’m sure I’ve got a much better chance of not screwing things up both in terms of flexible location, and audible sound transference between the rooms via the ducting. Sorry if I’m not making sense, but try to visualise a sort of ‘sub floor’ rat run leaving 3 or 4” diameter holes dotted around the perimeter of the floor 4” away from the existing walls to still allow enough space at the edges for my outer leaf ‘beef-up’
I don't see a big problem here - 1st off - the only place you need cables coming up from the floor is in the contro room - in the remaining roms all connections shouldbe in the walls.
BUT - I don't like the ideaa of using in between your walls as a sort of junction box where you bring up a set of conduits and then feed another set - you will have to install access panels because you can't bury junction points - nor should you.
I wuld make it a point to locate my desk and then set them inboard of the back of the desk by 8" or so - you should not be that far off from correct if you are beginning with your seating in the 38% range.
Rod
Hi Rod – many thanks for the post, really great to hear from you, and something of a relief to know that you’re in the background I can assure you.
:D
I picked up your message late Fri night and decided to wait until I had the time to reply properly. I’ve re-read pages 99 – 105 several times and have to admit that I’m still a little confused, and, to be fair to you, my mains schematic looks misleading, the red ‘T’ s do imply junction boxes which is not my intention. When I get the chance, (hopefully later today), I’ll draw a more complete diagram to better explain my intentions. In any event, I’ve taken the somewhat corporate decision to get the ‘shell’ finished, take the build stage as far as the ‘oversight’ (up to insulation level), and then stop to take stock of the situation and iron out any problems before proceeding to the concrete and screed stages.
For now then Gentlemen, here’s the update.
8.00 am yesterday and the final preparations are underway for the front footing concrete.
That’s it for the moment Guys, this afternoon we’ve got to dig the soak-away for the chill-out area as the machines are getting picked up in the morning! :roll:
More later, – stay tuned,
Regards,
Lou, 8)
Hi Lou,
I (finally) read through this entire thread a couple of days ago on my itty bitty Treo 650 screen -- which, by the way, often cannot display more than a handful of pictures, and that was the case on this thread. I made a point of coming back to it on a real computer so that I can take in all the photos and put the commentary into context.
Wow!! This project is nothing less than amazing.
I'm really impressed with the quality and speed of the work being done.
I excerpted your council application story on the "Permits, Codes, Licenses -- and WHY YOU SHOULD CARE! thread, since it does provide a fair warning to your fellow UK dwellers that there can sometimes be complications lurking in the background that can get in the way. Congratulations on your success in navigating through those obstacles. 8)
Keep up the great work, and keep up the great posts and great photos!:D
--Keith :mrgreen:
Hi Lou
This thread is amazing, thanks so much for posting. the first thing i do when log on is go straight to this thread!
Now i'm wondering if I am in trouble...let me explain:-
I live in North Oxfordshire and in January filled in Cherwell District Council online form that they have for planning. Its essentially a questionaire that they can process quickly which, based on what you tell them, allows them to determine if you should apply for planning.
So i answered no to all the usual questions, ie my standalone single story structure would be less that 30sqM, less that 4M with pitched roof, at least 1M from boundaries, less than 50% of ground used and built with non combustible material
They responded in writing that in their opinion it did not require planning but that it may need building regs. So i sent a letter to building regs and they wrote back and basically said, as long as you are 1M from boundaries and more than 5M from main house, we dont care how you build it.
So armed with these two letters, i proceeded to clear garden and did trenches for footings...which is why i'm so jealous of your build cus' i dug trenches right before monsoon season :? , now i've drained them for about the 4th time... so wish i did wat you did andpoured concrete right after dig
Anyway, dont know if you feel like giving me any advice on planning/building regs above (be gentle!) but anyway, keep the pics coming, they have given me such a morale boost over the past week
cheers
John
Hi Guys – hope you’re all ok!
I’ve got to tell you that I have a confession to make, basically, I woke up this morning (cue the ‘Blues’ track) feeling a bit despondent. Yesterday was a really frustrating day with lots of hold ups that were out of our control. In short, I was pissed off. During coffee this morning I started thinking about Oz’s ‘red-tape’ aggro, Andy’s rotten basement, the lousy drywall fix, and all the other nightmares I’ve read about on the construction forum.
It occurred to me that in reality, we are doing bloody well given the amount of time we’ve been at it, and that although we haven’t even scratched the surface of this project yet, there’s been so many tenacious efforts shared on the forum that I simply had to stop feeling down, sort out the crap and just get on with it.
To that end, I went on line, and straight to the forum to look at Cathy’s barn conversion again or Aaron’s awesome wiring when I noticed that I’d had a couple of replies to my thread.
Guys, you’ve know idea how much better I immediately felt. :D
Keith what can I say Mate, to be thought of as an esteemed forum member by someone as highly esteemed as your good self, is nothing short of an honour. Very many thanks for the compliments and the excerpt, which I might add, I was intending to reply to since I’ve gained some more knowledge in the planning area. (More on this in a moment).
John – hi my friend, what a really thoughtful post. Very many thanks for the kind words, glad you’re enjoying the thread.
I’ll get to the update in a minute, but for now John I’ll help and advise all I can Mate, that’s what this forum’s all about. Hell – you wouldn’t believe the help I’ve had here.
So here goes (I don’t know how to get your comments to appear in the different colour) first off I’m no expert, believe me, but Ill willingly try and point you in the right direction. Local Authority practices naturally vary up and down the country, but one thing’s for certain; they’re all working under the same Government Legislation. Housing demand in this country has increased dramatically over the last decade, to that end; all Local Authorities are required to build more housing. Great – but where? Well, where there’s room of course, and this is why more and more ‘green belt’ land is being used up, and there’s loads of that in the Shire Counties as you know.
We have a local shopping precinct with a chemist, dentist, baker, newsagent takeaway etc, and they’ve built 12 flats in the corner of it! 24 flats have just been finished on an industrial estate right next to a main line railway! You name there’s property going up in all sorts of places to meet this massive demand.
Now, if the above is coming across as political waffle, bear with me. This massive demand puts a massive strain on resources. Local Authorities are so undermanned, that they simply don’t really have the time for the likes of you and me. We’re not building build 400 home housing estates or 20 unit apartment blocks, and we certainly aren’t ‘backhanding’ council officials to get applications through. :evil::evil:
What this means for you at present, is that in my very humble opinion, you cannot, and indeed should not, take anything Cherwell District Council says for granted. John – in certain situations you would need a planning application for a garden shed! :o
Your ‘standalone single storey structure’ sounds a bit like you’re trying to build a detached double garage (more info would be helpful here). If this is the case, then my advice would be to go to the council, make an appointment and ask for someone from the planning office to visit your site, they probably say that isn’t necessary, which you can interpret from now on to mean they don’t have the time.
I really would suggest that you make a Formal Planning Application, if you don’t, and you go ahead and build, without planning permission you could be ordered to take the structure down. It only wants one neighbour to complain and then you’ll be amazed at how much time Cherwell District Council has on its hands. Once you have permission granted, you cannot ever be put in this position. I wouldn’t tell them that you’re trying to build a recording studio for obvious reasons, but it’s essential that you let them know you are building a permanent structure which is to be used as a habitable space – store and play area/workshop is usually fine for this.
Now onto the most worrying part of your post.
“We don’t care how you build it” John – I’m sure that’s what they wrote, but believe me, I’m equally sure that’s nothing short of total bullshit! Excuse the French!
You need to be totally clear that some time ago the whole planning process changed, (and is due to change yet again in October), so that now there are two completely separate areas:
1. Planning Permission.
2. Building Control.
Here’s where it gets real fun, (NOT), they have absolutely no control over each other at all. In fact, if you build with permission, and your structure doesn’t comply with Building Regulations, your work will be classed as unauthorised, which means it will not be insured, and thus dramatically affect the value of your property. Let’s face it John, you’re almost certainly building a permanent structure, and you definitely want it to be habitable, which is why you're duty bound to yourself and anyone you sell to in the future to build it properly. Building control can't order you to take the structure down because you've obtained permission for it to be there, however it will show up at the Land Registry when you sell in the future because they'll have no knowledge of the structures' existence since it wasn't built to Building Regs!
I strongly urge you to adopt the attitude that you must make a Building Regulations Application. All this means for the scale of your project at least, is that they’ll want to inspect the construction at various stages of development, footings, drainage, oversite, roof etc.
I phoned my local building control office 5 times and kept getting told that all I had to do was call them again when I was ready to pour the concrete – too busy again. This simply didn’t sound right to me so I contacted my Architect and he said “Oh yeah you’ll definitely need regs drawings”
The process isn’t cheap. £188.00 to register the drawings, £118.00 to cover the Building Inspectors first visit, and £350.00 for the Architect to do the drawings. To date, my Planning and Architect costs stand at £850.00 but at least its all legit! :roll:
I wish you well John, hope this helps.
OK now for the update.
Mon 8.00am and Phil cracks on with the studio front brickwork.
Tuesday morning, and Dave gets on with the ‘lean-fill’, a dry mix of ballast and cement which sets very slowly over time as moisture in the ground penetrates the foundation blockwork.
Then hopefully use this space to create a wall of materials to stop the 10 tonnes of rejects that I’ve ordered from spilling all over next doors driveway.
Well that’s where we are at the moment Chaps, Phil and Dave are away for a fortnight from Monday, so the next stages may look a little boring but I’ll post them anyway. Next thing on the agenda is to concentrate on the ‘chill-out’ area oversite, get the gas and electric re located and connected, backfill the studio brickwork, and then the studio oversite! Oh yeah, and getting rid of, and a refund for, the crap I can't use whilst ordering and paying for the stuff I can - and quickly. :roll:
Stay tuned,
Regards,
Lou. 8)
It occurred to me that in reality, we are doing bloody well given the amount of time we’ve been at it, and that although we haven’t even scratched the surface of this project yet, there’s been so many tenacious efforts shared on the forum that I simply had to stop feeling down, sort out the crap and just get on with it.
Welcome to the club, Lou! :D
This forum is indeed so much more than a source of information.
It is a source of inspiration.
It is a source of support when we are in despair about the realities of our situations.
It is a source of enlightenment when we discover that, usually, there is a way -- often with compromises, but compromises we can and typically do willingly accept.
It is a source of comraderie when we share experiences.
It is a source of friendship.
It is a source of understanding in a world where oftentimes those who are closest to us don't share the passions of our dreams and simply don't get what all the fuss is about.
And, for some, it is a source of mentorship where we can grow and feel good about helping others in need.
Lou, if you hadn't run into any complications, that would be a sign that you were doing something wrong! :lol:
Sometimes there are construction projects going on in this forum that I wish I could see with my own eyes. This is surely one of them. 8)
--Keith :mrgreen:
Keith - you're a bloody star, and thank you my friend, another really kind post. :wink:
Bonus pic, just for you, in case you missed it first time around.
Much better day so far today. :roll:
Warm regards,
Lou. 8)
PS - my ride's in the background - Volvo V70R. one of only 600 ever made for the Volvo '97 touring car season. It took me nearly 2 1/2 years to find it! Guess who drove me 250 miles to pick it up..........Spot on - Span.
Standard 260 b.h.p. - chipped to 330 b.h.p with uprated E.B.C. 'Superstreet' sports breaking system and 'limo' tints as far around as is legal! Told you I was a gadjet geek nerd. It flies like the wind and stops on a postage stamp. :wink:
Someone's bound to say - "surely your ride's in the foreground Dude!" Right?