I recently reached the stage of putting up ceiling clouds. Wanting them to be aligned perfectly and to all be 3 inches off the ceiling to improve absorption I went looking on the net for how best to do this. I didn't really find too much. After standing around in Home Depot for a long while looking at what I could use to make these work out well - I ended up doing the following.
I took photo's so I could post them here to help anybody else needing to do the same for their studio project. Steps / photo's below and some text explaining.
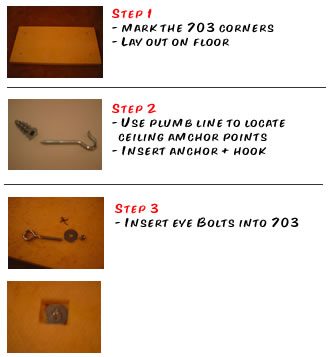
Hope somebody finds this useful :DRecovered from web.archive.org — originally hosted at http://www.the-backhouse.com/cloud1.jpgThe clouds are supported on 4 corners - so first mark the points on the corners with a marker pen. I did 5inches in on each corner (make a cardboard template so you don't have to use a tape measure on every corner of every cloud). My clouds are 3" 703, with one being 4" 703
It's hard to measure on the ceiling, but luckily the floor in most cases is an exact match of the ceiling. Lay out the 703 clouds on the floor exactly in position of where you want them on the ceiling. Its a lot easier to use a tape measure on the floor to get them prefectly aligned than it would be to try and measure the ceiling.
Using a plumb line - find the exact spots on the ceiling that matches the marks on the clouds then insert a drywall anchor. I looked at a few different anchors. I didn't want to use the ones with spring loaded wings - you have to put too big a hole in the ceiling. The ones that have a bar that pops over don't work in double layer drywall. I went with these metal wide thread screw in ones that accept a threaded hook. Pre-drill the hole with a thin drill bit. These are pretty strong and easily strong enough to hold up the clouds (my ceiling is 2 layers 5/8 on RC-1). The good thing about these also is you don't introduce much of a hole into your ceiling.
Then after you have done that for all the corners of every cloud you are free to move the clouds on the floor. Insert the eye bolts into the clouds - push thru the mark and then on the other side make a cut-out in the 703 - put on a large washer and a nut.
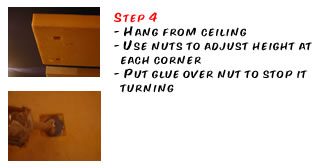
Recovered from web.archive.org — originally hosted at http://www.the-backhouse.com/cloud2.jpgNow hang from the ceiling and use a tape measure to adjust the height of each corner (using the nut) so that it is perfectly level. I set it to 3" off the ceiling.
Put glue on the nut so it can't move. Also mark the orientation so when you put the finished cloud up you put it back exactly the same eye-hook.
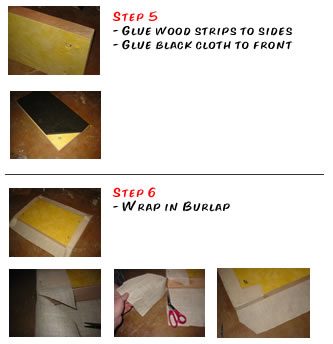
Recovered from web.archive.org — originally hosted at http://www.the-backhouse.com/cloud3.jpgNext step is to glue wood strips to the sides so the fabric stretches over and looks nice. HD sells 1/4 hobby ply - this is 4x2 same size as the 703 - so its easy to cut 3" x 4 ft strips off one sheet and 3" x 2ft strips off another sheet. I used the spray adhesive to stick these on - sticks great.
I put a sheet of the black cloth used to stop weeds growing the garden on the front. Burlap is wide weave so this stops the yellow 703 showing through. Quick spray of glue to keep it in place.
Next step is to wrap in Burlap. The photo's show how to do the corners to make them look neat. Use the spray glue - the burlap sticks well to the wood sides and also to the back of the 703. I put in a few staples also (the staples are not very strong going into the 703 but the hold the burlap tight pretty well until the glue sets). You could also run a glue gun along the seams on the back.
Recovered from web.archive.org — originally hosted at http://www.the-backhouse.com/cloud4.jpg
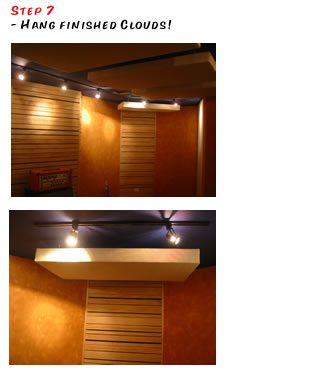
Final step (the most enjoyable part) is to put the back on the ceiling. They end up looking great, perfectly aligned. If you paint the hooks the ceiling color then you can't see them and they look suspended as if they are floating.
Final final step is sit back with a beer and enjoy looking at them :D
Andrew
Good stuff.
This page is now linked about 85% of the way down on
http://www.bobgolds.com/AbsorptionCoefficients.htm
as
Andrew McMaster's Guide To Building Ceiling Clouds
(If you'd like it de-linked, just let me know)
Hey Andrew,
Where did you get 703?? I'm in Hattiesburg and I haven't had any luck locating it. I also can't find GAF TP-4 TPO roofing roll anywhere either.
I've got a good source for Titebond acoustic caulk. About $3.75 a tube 30oz.
Thanks,
Tapp
I got it from MA-Supply http://www.ma-supply.com
They bought out Reily-Benton who made this stuff. The boxes I got actually had Johns Manville labels on - they are apparently producing it for them. They call this stuff hullboard. It is identical to 703 - they have it in 1,2,3 inches thick and in full & half boxes.
The factory making this is 10 mins from my house so they charged me $20 to have some guy run it over in a truck, but I am sure they would ship it. Shipping would add some cost, but it would still probably be way cheaper than buying it elsewhere.
I have the email of the sales guy but I don't want to post that on a forum - if you PM me I can give it to you.
Home depot sells the roofing roll. I don't know about the GAF TP-4 name, but just look for the stuff that is about $13, a roll, has rocks embedded in the material and weighs so much you'll pull a muscle getting it in the cart.
thanks a bunch for the run down...
i was doing a search and this was in like...the fifth page...
i've seen some great stuff here in the past, but it was all worked in the middle of tremendous threads...