I have some links, they mostly point right back to Mr. Sayers forum:
http://buildthisroom.com/hvac-baffles-and-plenums/
Specific details can be located in the link marked "Mini-Prod Studio - Construction Phase"
But these are at least the most current and informative that I have been able to get my hands on.
Thanks so much for the links Brien ! that's VERY useful !
(I actually already come across Carsten's Mini-Prod Studio - Construction Phase.... GREAT build and very informative indeed!). - GRAZIE :-)
Thanks a lot Ro for you encouragement !
Speak soon
Simo
Hello
already back :-)
Hope you are well !
I've got two questions for you ... just for a change :-)
For my ceiling rafters I ordered 200mm x 45mm, and the ceiling central beam is 200mm x 75mm.
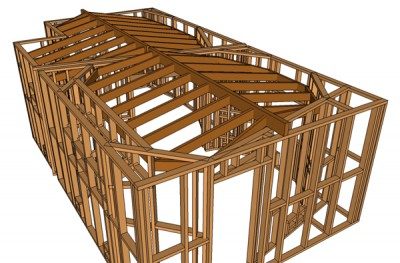
Simo tot frame.jpgQ) Won't the final resulting ceiling structure be too heavy, considering also that above that structure there'll be two layers of 15mm plasterboard (1 x fireline@ 37Kg and 1 x soundblock @ 41 Kg)?
Or will that be fine?
(I just ordered them but they haven't been delivered yet, so I can change / swap them for a more suitable timber section if necessary - What's your thoughts?)Q) in addition to the previous question, do you think that the ceiling structure connected to the studs (and not sitting on top of them) would safely support the overall weight of the ceiling ..."for life"?
Simo front.jpg
Image not preserved: Simo rear.jpg
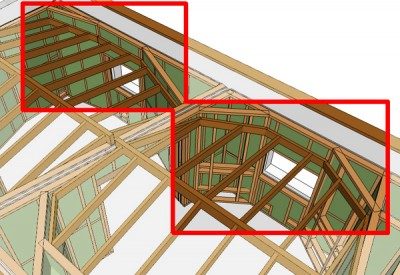
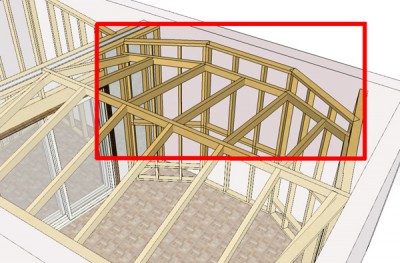
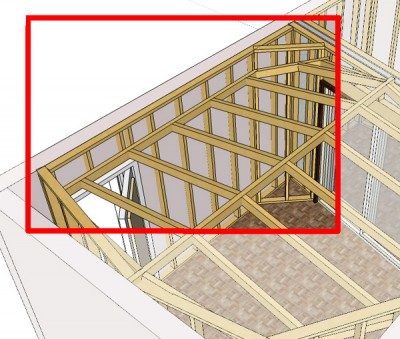
I've seen this approach on John's "Small Studio" design
John Small_Studio front.jpgJohn Small_Studio rear.jpgand it was actually built on "Silva Productions" (another of John's designs!)
John - Silva Production 1.jpgJohn - Silva Production 2.jpgso I guess that it WILL be fine, but just wanted to check once again before building it that way for peace of mind!
...As I already mentioned I have never built anything in this scale or even close to this scale, so I'm really concerned about the stability and safety of the building (as well as its acoustics obviously)... so sorry if this subject as already been covered somewhere else here.
Or it would be better (or even safer) to encase part of the rafters into the studs like so?
What you are doing is nothing like what Mr Sayers was doing...you have to pay strict attention to these things or mistakes are going to happen.
Here you can see the false ceiling frame at an angle as well as
the 4" insulation. A layer of thin plastic and finally the cloth...."
Hi Brien,
Thanks for your quick response.
Unfortunately I don't get 100% what you are suggesting :-(
Actually, I was planning to do exactly what is shown in the pic you attached (false ceiling at an angle with 100mm insulation and covered with cloth), so I really can't see the difference you mean? Could you elaborate that please?
The only difference I can see between the two designs is that I am planning to put plasterboard layers above the ceiling structure (or using "ceiling panels" between the studs like the ones used by SideShow in his Songcave Studio), whereas in Silva Prod. they built a flat ceiling with rockwool and plasterboard and then below that a false angled ceiling with rockwool and cloth.
Sorry but I'm confused :-(
Simo
"The only difference I can see between the two designs is that I am planning to put plasterboard layers above the ceiling structure"
And that is the 6.5 pound per square foot additional load difference:)
One is like a 2X4 with a soft ceiling spaced at 24 inches and yours is 2X8 with additional load, so they are as far apart as light and heavy and do not compare with each other, saving just to look at them.
Your framing ridge/beam that you show in your SU models should have transfer studs at both ends of the ridge/beams to transfer weight from the ceiling framing all the way to the bottom plate.
I see that you have the ridge/beams falling directly on top of your door openings. Make certain that you have a sufficient header over both of those doors and that it is blocked to transfer the weight of the ridge/beam to the header.
Hi everyone,
it's been quite a difficult time... I had my 1 month old daughter hospitalized with bronchiolitis, with oxygen tubes and in isolation... It was really sad to see her so small and so poorly... I'm so glad and thankful she's back home now and slowly recovering.
Anyhow, today I started once more to look at my project and managed to think about what Brien kindly pointed out - about my ceiling structure being not sturdy enough to hold the overall cladding load... and I came up with the following solution:
Firstly, I will build a flat ceiling frame resting directly on top of each perimetric wall to help transfer the weight down to the bottom plates.
Image not preserved: inner ceiling frame.jpg
(the rear half of this frame will need to be slightly angled downwards, as in that side of the room (CR rear) the outer ceiling is at is lower height)
Image not preserved: outer structure.jpg
I'll place 100mm (45 Kg/m3) rockwool slabs between the studs
Image not preserved: rockwool inner ceiling.jpg
and then two 15mm gyproc layers will be screwed into the ceiling frame
Image not preserved: inner ceiling cladding.jpg
Secondly, below this inner ceiling I will build a "false ceiling" at a 12º angle to the floor.
(this will share the central beams with the flat inner ceiling (above it))
Image not preserved: inner False Ceiling.jpg
Image not preserved: inner False Ceiling 2.jpg
which will again have 100mm (45 Kg/m3) rockwool slabs between the studs
Image not preserved: False Ceiling insulation.jpg
that will be covered with a stretched cloth
Image not preserved: False Ceiling cloth cover.jpg
Before now I didn't explore this approach at all as In my confusion I was wrongly considering the false angled ceiling as another leaf... but after a bit of thinking I noticed that actually there's no difference between this false ceiling and the angled walls (both in the control room and live room) built just in front of my inner leaf, which are used to house the required acoustic treatments (slots resonators, hangers and absorbing walls).
Well, it makes sense to me now, but what do you think?
I'm obviously really focused on creating a correct acoustic space (or at least as good as I - and my budget - can), but safety is something that I DO need to make sure is right.
Thanks again for your input!
Ciao
Simo
Simo,
Well, I wasn't suggesting that your ceiling design wouldn't work, only that yours and the soft treatment ceiling are in fact two different things so should not be looked at as one a reflection of the other.
I mentioned the support (in the walls) at the ends of your ridge, in the previous design, in support of the design since it is carrying a load, dead though it may be :) and always has the potential to "spread" the interior walls out of plumb with no other visible method of support.
Sorry I misled you my friend.
Glad to hear the little one is doing better,
Many Thanks for your kind words Glenn and Brien !
Brien - I know you weren't suggesting to scrap my previous ceiling design in favor of the method used by John in his Silva production design so you didn't mislead me at all... actually, your comment made me analyze less superficially that specific design which DID clear my doubts - Cheers!
In fact, firstly I tried to support the central ridge/beams in the walls with transfer studs as you recommended. This was fine on the north walls (where the entrance door is)
Image not preserved: Transfer stud.jpg
but couldn't do the same on the south wall, as the sliding door prevents me from having a stud (from top to bottom plate) below the ridge.
Image not preserved: Transfer stud Sliding door.jpg
(...but you never know... if the sliding doors will prove to be too expensive for my budget when I get the quote, I could replace them with a door+window design and always have this option as my "ace in the hand":-)by running the transfer stud between them !)
Anyway... I AM happier with my last option as it seems to be a much more solid structure (with the added benefit of helping to support the walls as well) and using smaller sections (so much cheeper!) studs too :-) ... and I DO like cheeper !!
I also took in the greater Header suggestion for an additional ceiling load support and replace them accordingly along with Cripple, Jack and King Studs (for a safer door support).
Thanks for the heads up !
...well, it's now time for me to stop chit-chatting and to actually start to get some work done !!
Long Life to this Forum !!
Ciao
Simo
p.s.In my rambling search of possible options, I briefly opted for a "V"-type ceiling structure as it seemed to have the benefit of distributing the overall load by resting directly on the top plates.
Image not preserved: V ceiling option.jpg
I then dumped this idea as my room height is too low for this to work.... But I thought Id mention it here as perhaps someone with a bigger space might find that a suitable approach?:-)
Hi everyone,
Hope you are all well !
I've been out of this forum for a long time now… been quite busy before Christmas (which is always good) but I did manage to make some steps forward in preparation for the new year.
First of all, the wood on the original order was the wrong section so it was redelivered with the right section but with twice the length requested…
Image not preserved: DSC05579.JPG
(well, not too bad as it can turn out to be handy when I need wood for the bottom/top plate longer than the originally ordered 2.4m… and I just need to cut it in half to get the same result).
First thing I did was I marked the CR dimensions on the floor
Image not preserved: DSC05604.JPG
Image not preserved: DSC05605.JPG
Image not preserved: DSC05654.JPG
and then started cutting the wood accordingly.
Image not preserved: DSC05607.JPG
Image not preserved: DSC05657.JPG
I then marked on the bottom pate where the studs were supposed to be
Image not preserved: DSC05652.JPG
Image not preserved: DSC05653.JPG
Image not preserved: DSC05655.JPG
and then reported those marks onto the top plate
Image not preserved: IMG00379-20110104-1458.jpg
I actually marked the studs position all around the plates
Image not preserved: IMG00380-20110104-1506.jpg
as I thought it would be useful to see where they are when attaching the plasterboard on the back of the walls and where to attach the internal acoustic treatment.
.....carry on on next post :-) .....
... and here we are again.....
Then holes drilled through bottom plate and concrete floor
Image not preserved: IMG00376-20101228-1154.jpg
Image not preserved: IMG00375-20101228-1146.jpg
Image not preserved: IMG00374-20101228-1146.jpg
Here is the front wall:
Image not preserved: IMG00004-20110118-1405.jpg
and then tested the whole thing:
Image not preserved: IMG00001-20110116-1459.jpg
Image not preserved: IMG00002-20110116-1500.jpg
The studs height is 2.35m, which then summed with the bottom and top plates (each 5cm wide) gives me the overall wall height of 2.45cm.
… So, with such a height I have to attach the gyprock at half the width of both the top and bottom plate as the gyprock sheets measure 1.2m x 2.4m.
Here's a pic to (hopefully) explain my rant a little better :-) :
Image not preserved: Plasterboard 1.png
Would this be ok? ( considering that this very same situation occurs overtime when two plasterboard sheets share the same stud)?
Image not preserved: Plasterboard 2.png
Or - would I be better to dismantle the top plate - trim off 5cm at the top of all the studs - and then re-attach the top plate (thus reducing the walls' height down to 2.4m) ? Is this necessary in your opinion ?
Also, since my next step will be to attach the insulation on the back of the second layer of gyprock, what should I use to do this? Glue? Staples? What would give me the most permanent solution?
Thanks a lot in anticipation (as always!)
Looking forward to hearing from you
Ciao
Simo
Your next step would be to frame the ceiling , right?
After that you install your sheet rock to the framing above and that should take care of this gap, make it go away.
Hi Brien,
Thanks a lot for your quick reply !
Actually, when I got it I just finished to trim the last stud, as I thought that 5cm shorter won't kill me but (apart from avoiding this annoying problem) it would indeed allow for more space between the outer and inner ceiling (already very limited) for running the HVAC ducting.
Also, since my walls are built inside-out, it would have been very difficult for me to install the sheet rock to the above framing as I'm building the walls on the floor and then lift them up in position (which is just 10cm from the outer walls - so nearly impossible to steer my drill to screw them in).
Aaaanyway, onwards we go !!!
… by the way, any idea on how to attach the insulation to the sheet rock?
Best Regards
Ciao
Simo
I wanted to see real framing :) Anywho...once you install the framing...oh, nevermind, you said you already cut your studs down, right?
Seemed like with framing installed you could have cut the 5cm in half with your upper sheetrock and then possible stripped the bottom joint.
But it's a done deal now right?
;)
Hi Brien,
yep - now the wall is 5cm shorter in order to match the sheet rock dimensions (and in order to gain a little extra space for the HVAC ducting).
I thought that doing that would make my life easier when i come to install the sheet rock layers and if for "any" reason I need to have those 5cm back I could always install a second top plate on top of the existing one!…. but I doubt that I would need such a thing :-)
Grazie
Ciao
Simo
Hi All,
...ok, another issue !
I purchased rubber strips (15mm thick) to install under the bottom plate of my walls, mostly to compensate for variations in level of my concrete floor (which in certain areas is quite uneven).
I thought I ordered strips adhesive on one side, but I've been delivered non-adhesive ones.
What do you recommend to use to glue the rubber below the bottom plates?
Many Thanks !
Ciao
Simo
Rubber glue? Seriously, the pressure and floor anchors (which need to be decoupled from the floor and frame) should mostly hold it. You could get double sided tape (soft gummy type) to hold it while building.
Thanks for your reply Glenn,
yes, as you said, it was just to hold it in place while moving the wall in position.
Being the wall very heavy, I thought it would be easier the have the rubber attached (even temporary) below it, instead of having it placed where it should be and then try to position the wall on top of it without the risk of slipping around :-)
Thanks for the tip of using double sided tape :idea: , I'll try that.
Have a great week end!
Ciao
Simo
Thanks Brien for your advice,
Actually, the caulk I'm using is adhesive as well
Image not preserved: IMG00051-20110206-1241.jpg
Image not preserved: IMG00052-20110206-1243.jpg
Image not preserved: IMG00053-20110206-1243.jpg
so I'll try to use that to see if it will hold the rubber in place whilst installing the walls (as I've already got it)…if it won't work I'll get some double sided tape, as kindly suggested by Glenn.
Today I installed the first layer of gyprock (Firestop).
I marked where the studs are to clearly see where to secure it with screws….
Image not preserved: IMG00046-20110204-1754.jpg
…and here is how it looks finished
Image not preserved: IMG00048-20110206-1210.jpg
Image not preserved: IMG00050-20110206-1212.jpg
Q) Do I need to caulk between two sheets of gyprock and on the screw heads, or won't that be necessary (considering that another layer (Soundstop) will go on top of it) ?(I will of course seal with caulk inside the cavity between studs all around them, when I will lift the walls up right !).
Many Thanks as usual
Ciao
Simo