Build from scratch UK practice room / recording studio

How thick should my walls be, should I float my floors (and if so, how), why is two leaf mass-air-mass design important, etc.

Moderators: Aaronw, sharward

xSpace
Moderator
Posts: 3823
Joined: Sat Aug 25, 2007 10:54 am
Location: Exit 4, Alabama
Contact:

Re: Build from scratch UK practice room / recording studio

Post by xSpace »

Stonedhouse wrote:
Regarding the existing slab I did not indicate any moisture barrier there as we just do not know whether one is there or not -
Yes you did sir:

Poly sheet membrane (1200 grade)

This will classify as a vapor barrier in standard concrete pours.
In your case, depending on the age of the building and who built it for what...it is a potential dual vapor barrier.
Stonedhouse
Posts: 25
Joined: Wed Nov 07, 2012 8:34 am
Location: Stonehouse, Gloucestershire, UK

Re: Build from scratch UK practice room / recording studio

Post by Stonedhouse »

Sorry to correct ya - but the "Regarding the existing slab I did not indicate any moisture barrier there" was referring to the existing slab portion and therefore the build content for that portion was just defined as -

Existing hardcore layer (200mm - 300mm)
Existing concrete slab (100mm - 150mm)

... as we did not know what was within that slab I did not want to second guess what was down there - hence the whole "did not indicate bit"

But the 1200 grade sheet is part of the new build portion - which I agree I well and truly indicated a barrier there ! :D

Now that we have just (today) cut back the existing slab edges in order to make a start on the new foundations it has revealed there was an existing moisture barrier down there there - the slab did look to be in good condition with no moisture issues anyway - however the architects, building regs folks and builder have all assessed it and agreed on the subsequent layers including a new damp proof setup which does encompass / protect the cellotex layer. Being one of the most damp, wet and miserable countries going :roll: and with more building regs red tape than most then I'm kinda confident they know what they are up to.

From a sound point of view though the next step needing addressing whilst we approach floating the new / upper slab on the Regupol is to get some conduits planned out for running cables / pipes through the new / upper slab in order to keep any subsequent wall penetrations to a minimum. Aside from a couple of heating radiators and the main electrical supplies I guess it is safe to assume that the more flexibility / options I give myself for running audio cables the better ! Although this is predominantly a practice room but then with the option to do some tracking in the adjoined office (loosely termed a control room !) then I won't need to go too mad but I'd certainly like to be covered for a reasonable amount of audio channels and I am happy to only need to dip under the adjoining wall keeping close to either side - therefore needing only short runs of conduit (half a metre if that).

I'll start planning out just how many runs and of what that I will need but if there are any thoughts / recommendations of how to group them or preferred materials for the conduits etc. then any advice is always appreciated.
Stonedhouse
Posts: 25
Joined: Wed Nov 07, 2012 8:34 am
Location: Stonehouse, Gloucestershire, UK

Re: Build from scratch UK practice room / recording studio

Post by Stonedhouse »

Well I feel somewhat embarrassed :oops: to saunter in here a mere 4 YEARS :shock: after my last post but a job change and a few other things meant I got a little distracted.

I did however finish the practice room / recording studio and my 2 sons with their respective bands and myself have been enjoying it immensely. It ended up bang on our expectations and although I have not yet got round to doing an official sound reduction measurement I can basically walk all around the outside and even stand at the window and not hear my lad's 5 piece metal band playing at full tilt. And although not a professional recording studio, the recording we have done there has been great fun and has benefitted from the very high level of sound isolation we achieved.

I did start a Facebook page under "Stonedhouse Studios" https://www.facebook.com/StonedhouseStudios/ where I did a step by step photo story of the complete build just as a quick handy record if case anyone is interested (scroll down to the bottom). I'll happily list it all out here again if it is of assistance to anyone, in the meantime below are a few "teaser" photos - but whatever works best for the forum.

Most of all though I wanted to thank Stuart (Soundman2020) and Brien (xSpace) for their previous expert help which really got me well on my way and was much appreciated.

Thanks

R

***Edit*** I've now deleted the sample photos from this post and below follows the full build sequence.
Last edited by Stonedhouse on Mon Aug 14, 2017 10:52 pm, edited 1 time in total.
Soundman2020
Site Admin
Posts: 11938
Joined: Thu Aug 21, 2008 10:17 am
Location: Santiago, Chile
Contact:

Re: Build from scratch UK practice room / recording studio

Post by Soundman2020 »

Hi again Roger! Welcome back! :) :yahoo: :thu:

It's REALLY good to see that you finished the place, and even better to hear that it worked out so well! Or maybe it would be better to say that it's really good to NOT hear... :) ! (As in "not hear what's going on inside, from the outside!...)


Thanks for the photos, and feel free to post more. The place is looking pretty darn good, from what I can see.
Most of all though I wanted to thank Stuart (Soundman2020) and Brien (xSpace) for their previous expert help which really got me well on my way and was much appreciated.
Glad to be of help! It's always very satisfying when someone comes back to post the final results of their studio build, and tell the story of how well it worked out, after following a bit of our advice.

So there's only one thing left for me to do now...

Put you at the top of the list! http://www.johnlsayers.com/phpBB2/viewt ... 42&p=40923 .

Great job! And many thanks for dropping in again to report... even if it is four years later! :)
Stonedhouse
Posts: 25
Joined: Wed Nov 07, 2012 8:34 am
Location: Stonehouse, Gloucestershire, UK

Re: Build from scratch UK practice room / recording studio

Post by Stonedhouse »

Thanks Stuart.

As promised here is a bit more of a storybook of the build.

1st section - demolish and start building.

The existing garage to be demolished. There was no skip access to site so every brick was hand loaded in a 6ft x 4ft trailer and driven to the local tip, to be offloaded by hand again - over 10 trips :cry: .
Image

Garage gone, new foundations dug and build commences. Main shell is being built in accordance with standard UK build regs. The thing wrapped in green with the vertical copper pipe is, somewhat annoyingly, the gas main and meter which sat just behind the old garage wall and ended up just in front of the new wall. It did get re-routed in the end (by the authorities) but not after we had to do a fair amount of foundation digging and initial build work around it, somewhat carefully! :shock:
Image

Lower floor shell progressing. To match the main house we are incorporating 2 large sash windows, one which will be in the main studio room and one in the control room. Just the last thing you want when trying to soundproof but should we sell the house it needs to work as a normal extension.
Image

Beams arrive for the block and beam upper floor.
Image

Laying the block and beam upper floor - this will be topped off with 100mm solid screed.
Image

2nd floor shell progressing.
Image

Next section to follow very shortly
Last edited by Stonedhouse on Mon Aug 14, 2017 11:04 pm, edited 2 times in total.
Stonedhouse
Posts: 25
Joined: Wed Nov 07, 2012 8:34 am
Location: Stonehouse, Gloucestershire, UK

Re: Build from scratch UK practice room / recording studio

Post by Stonedhouse »

2nd Section Main Studio Build


The 2 floor exterior shell and roof is now built - the upstairs is additional living accommodation for the house. Now to focus on the Studio and control room / office. Concrete block partition wall is up for the control room /office and you can see the lower side of the beam and block floor.
Image

Here's another view standing in the same main part of the studio - the red brick is where we knocked through in to the main existing house. The grey wall to the left is part of the main new shell and is built to standard UK building regs i.e. red brick outer wall, 100mm cavity and then inner thermalite blocks, the only difference being we used the higher density thermalite blocks and whereas a traditional house would now have plasterboard dotted and dabbed to those walls, instead they will be subsequently sealed with a render and then we are going to float another floor slab on top of the regupol rubber mat (roll of which is in the picture). On top of the regupol will be 100mm of thermal insulation (for building regs) and then 100mm screed slab. Then on that floating floor we will build an internal stud cage / plasterboard "room within a room". Only the main L shaped room will be floated - the control room will not be - hence the concrete dividing wall already in and going from floor to ceiling.
Image

Regupol layer now down and coming up the walls by just over 200mm
Image

2 conduits for audio cables coming through the control room wall and then up through the subsequent floating floor.
Image

Then we chose the hottest day of the year :shock: for the screed to be delivered out in the lane (due to access) and 4 of us had to use buckets to take the upper floor screed in to the house and up the stairs, then wheelbarrowed the lower floor.
Image

Lower floor screed going down (100mm thermal insulation now down as well)
Image

Upstairs, main studio and control room all down within a morning.
Image

Now for a few days rest for it all to set.
Image
Stonedhouse
Posts: 25
Joined: Wed Nov 07, 2012 8:34 am
Location: Stonehouse, Gloucestershire, UK

Re: Build from scratch UK practice room / recording studio

Post by Stonedhouse »

3rd Section - Room within a Room build

With the screed floor dry and the inner walls sealed with render it was time to order some timber and insulation. Because it is holding up a fair bit of plasterboard - 3 layers of varying thickness up to 19mm - and the whole lot had to be self supporting as it was not to touch the walls or ceiling in anyway - I had the structural engineer design the wooden cage to ensure it held up - all timber was certified, and having a friend who owns a timber yard meant I got all the really straight bits !
Image

First wall going up.
Image

And the 2nd.
Image

My youngest lad was keen to help where possible - teenagers and power tools :shock:
Image

Looking more like a medieval weapon I built up a central supporting beam for the ceiling.
Image

Support beam now in place.
Image

Nearly all done.
Image

Then all the Rockwool insulation went in - and what a weird experience when you speak in the room - that's one dead room !
Image
Stonedhouse
Posts: 25
Joined: Wed Nov 07, 2012 8:34 am
Location: Stonehouse, Gloucestershire, UK

Re: Build from scratch UK practice room / recording studio

Post by Stonedhouse »

4th Section - Windows and doors

Windows
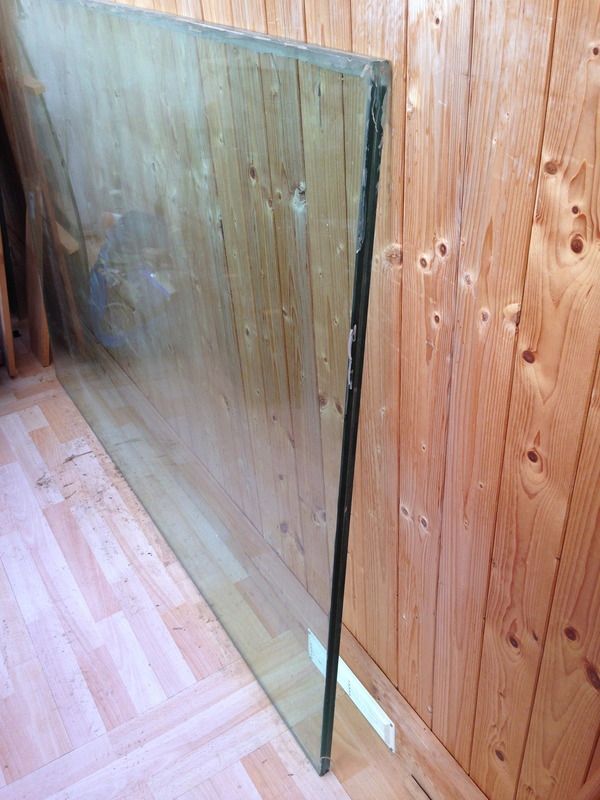
Because we are accommodating a practice room / studio in an extension to a normal house which we ultimately might sell one day this meant incorporating 2 traditional sash windows - sash style being to match those in the existing house but which do not lend themselves to being easily or cheaply beefed up for sound isolation. Luckily a local Studio was upgrading their control room window which was just a bit bigger than our sash windows so I devised a design which looked to work and purchased the 2 pieces of extra thick laminated glass for a decent 2nd hand price - can't recall the exact thickness now but each piece was in the region of 25mm.
Image

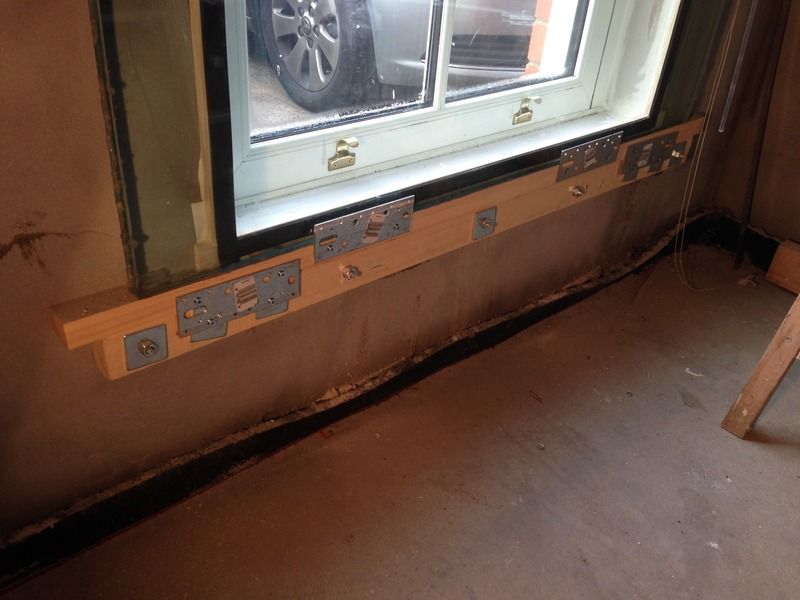
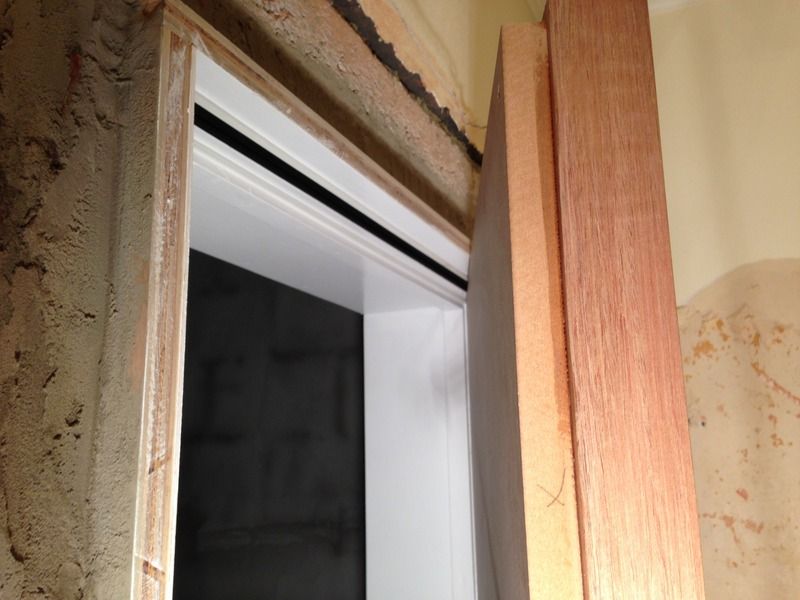
With the standard Sash window fitted to the main shell I created a solid frame behind that and then put a strip of sponge acoustic tape (the black line in the photo) around that edge. Then fitted a wooden support bar below the window - having had the structural engineer calculate the bolting method as each piece of glass was very heavy. The studio glass was then pressed up against the sponge tape to provide a nice seal. That was the outer piece - the inner piece (not yet shown) would be incorporated within the wooden stud work "room within a room" shown in the previous section. Therefore there would be no contact between the 2 pieces of glass or their frames and with approx 100mm air gap.
Image

Doors
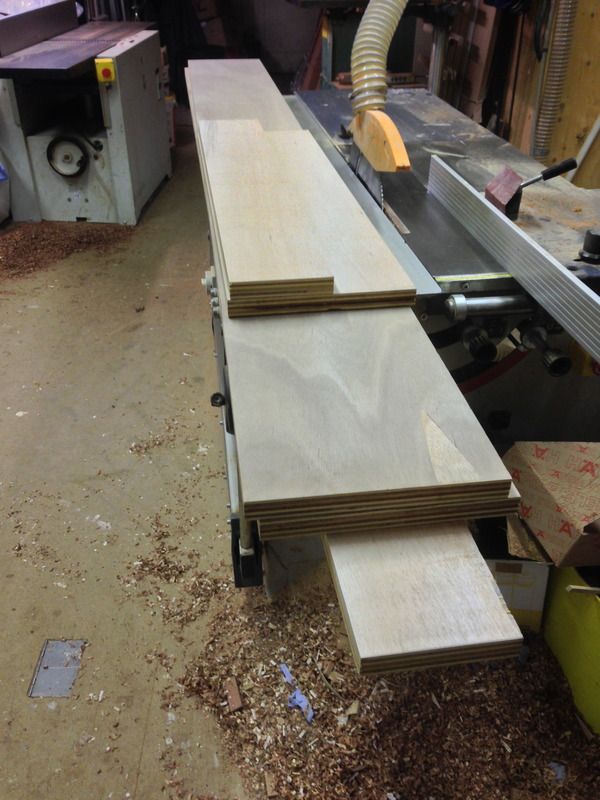
The layout meant we would have 2 sets of twin doors - one set to enter the main studio (from the hallway of the house) and then one set from the studio in to the control room. There would only be approx 250mm air gap between the door pairs in each set but due to the house design that was the only real way to go. I opted to construct my own doors from standard blank fire doors - good solid and ready available. One of each set would be 1 hour fire rated - 54mm thick, heavier and more expensive (approx £120 each) and the other being a 1/2 hour rated fire door - 44mm thick, lighter and cheap (approx £28 each). The plan was to then screw / green glue a 25mm sheet of mdf to each door - approx 10mm smaller than the door to create a step effect allowing for acoustic seals (both face and perimeter) to be used. The door frames would be made from sheets of 25mm marine plywood, stacked up to form the corresponding staggered shape. Having a close friend as a joiner and with a local workshop was extremely handy.

Strips of marine ply cut up to form the frames
Image

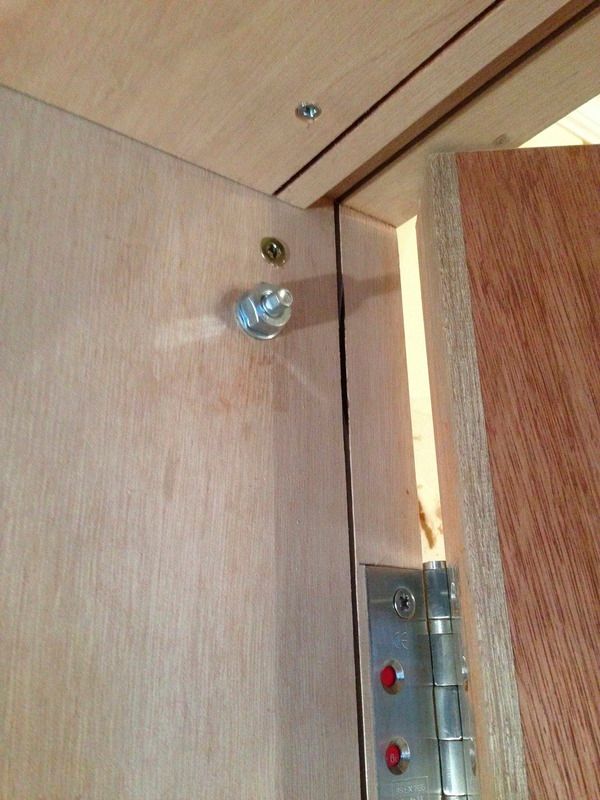
The layers being built up to form the frames. The 2 top cross pieces are shown along with the first of 2 side pieces - the first side piece being held in by chemical anchor bolts for strength - the exposed head of the bolt shown will be trimmed and incorporated in to the 2nd side piece once it is fitted. The thin slots are to accommodate some acoustic seals. I am using a mixture of slot-fit and adhesive seals as a bit of an experiment.
Image

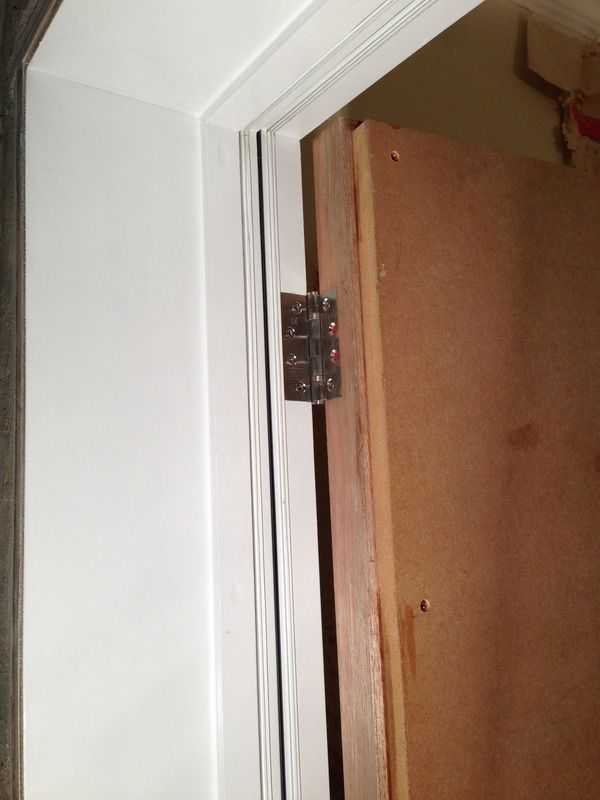
The 2nd side piece of the frame is now fitted and painted - the unpainted door is also mounted and has the screwed and green glued mdf layer fitted. Some of the acoustic seals are now also in place - face seals, perimeter and corner were all used, thanks to a local company having a number of "free samples" :D
Image

Everything sitting nicely prior to all the gaps being filled. The patterned floor tiles are from the house being Victorian - circa 1900. The brickwork was absolutely solid - good from a build point of view, not so good when trying to alter !
Image

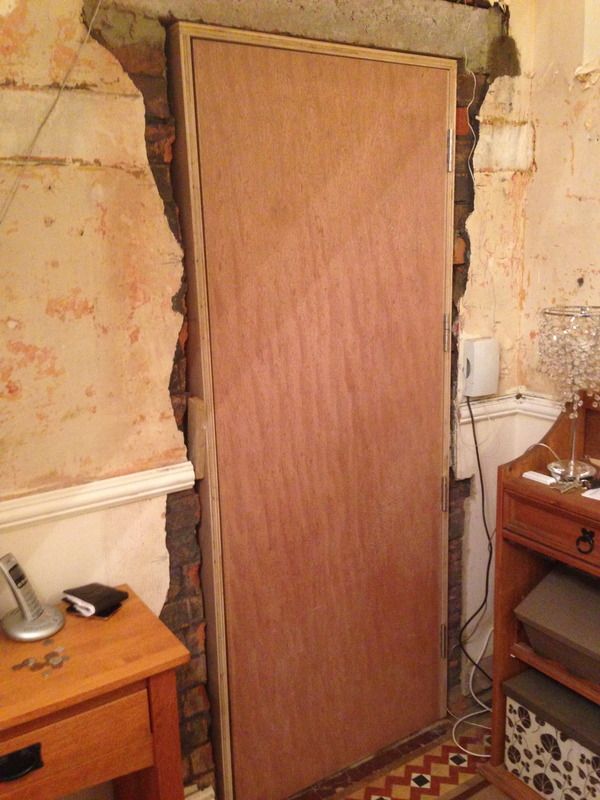
The bonded marine ply meant we could get mortar packed in tight without fear of distorting the wood.
Image

As the door is in the hall way of the main house I fixed some thinner MDF to create a matching pattern to the existing doors in the hallway and gave it a paint. The extra large handle is needed as the door is held in place purely by the action of the perimeter acoustic seals which has worked out nicely as it saved me having to buy / install closers. It just needs a bit more pressure than normal to open / close but has worked great.
Image

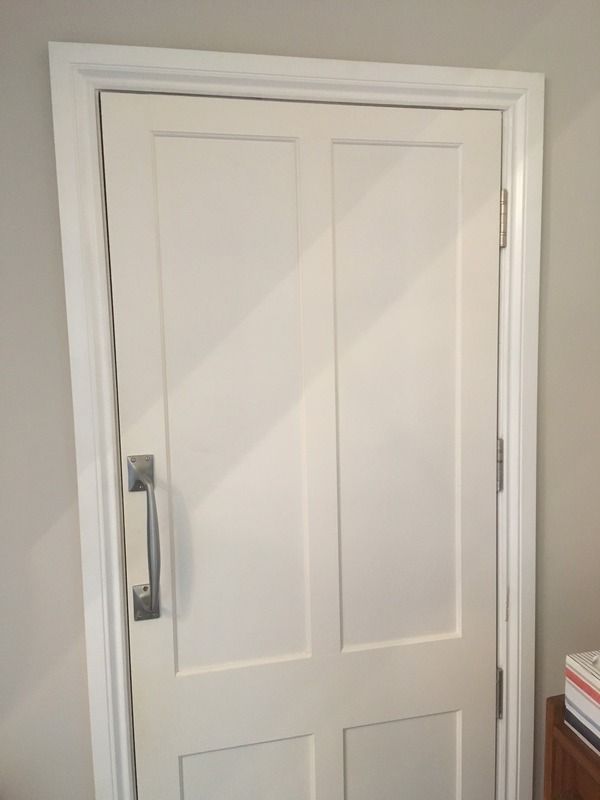
I'm really pleased with the outcome - the doors were always going to be the weak link in the whole design but they work nicely - the kitchen diner is just the other side of the door from the studio and even with my lads metal band going full tilt the noise when sat in the kitchen / diner is reduced down to that of someone having a radio playing through a typical bedroom door so we are pleased. Doing all the work myself and having the free help of my joiner friend meant that all 4 doors / frames and the materials probably cost me around £500 in total + a few beers for my friend. I even bagged all the acoustic seals free of charge - being in the sales game myself the "gift of the gab" does come in handy at times 8) :D
Stonedhouse
Posts: 25
Joined: Wed Nov 07, 2012 8:34 am
Location: Stonehouse, Gloucestershire, UK

Re: Build from scratch UK practice room / recording studio

Post by Stonedhouse »

5th Section - Internal Room within a Room

This was now just a case of getting all the plaster board up - and incorporating the inner 2 doors and window in to the framework, and some ventilation.

I used three layers of plasterboard of differing types and thickness. 2 Layers were the higher density soundlam / soundcheck type and one layer the thick 19mm type. I originally thought about using acoustic channel to mount the plaster board to the frame and then also Green Glue but after a lot of thought I took the decision not to use the channel and to only use one box of green glue for the area around the outer window and between the control room and main studio. Budget was not the only concern, I was fairly confident I would get a decent level of isolation from a well constructed / sealed inner shell of 3 players of plasterboard mounted on a floating floor and with little / no flanking paths to the the 2 outer skins of brick from the standard wall construction. Having to build all this part myself I also favoured the neatness and practicality of screwing the plasterboard direct to the wooden stud work frame - I really didn't fancy the added hassle factor of the acoustic channel.

So after about a billion plasterboard screws :shock: and having drained all local suppliers of their stock of AC acoustic sealant up it all went.....
First layer - note the inner doors also are now in. They are the slightly thinner ones and sit in the internal stud structure with their own separate frames similar to their matching thicker outer counterpart doors. The edges of their frames do butt up against the outer frame but with a slight gap filled with a silicone type sealant just to try and reduce flanking.
Image
Image

This and the stud work I found to be the most tiring part. Having to do 99% of it all on my own and using improvised props to support the other end of the plasterboard was a major slog, plus my right elbow was killing me from all the screw work. There were a few dark times when I questioned my sanity :?
Image

But perseverance prevailed.......

For air circulation, because this is a home practice room / informal studio that was only going to be used on a more occasional basis I discounted air con (yeah like we need to keep cool here in the UK :D ) so I just opted for a simple twin fan set up to bring in fresh air / expel warm air. After constructing all that solid, well sealed cocoon it took me quite a while to bring myself to core drill 2 x 100mm holes right through to the outside and just after doing it I spent a while sitting inside the studio looking out across my garden through the 2 large holes shaking my head :D
But using this corner set up to add some more layers in front of that ended up working fine.
Image

Then it was down to the plaster skim - a job I'm not even going to attempt myself so another friend was brought in.
Image
Image
Stonedhouse
Posts: 25
Joined: Wed Nov 07, 2012 8:34 am
Location: Stonehouse, Gloucestershire, UK

Re: Build from scratch UK practice room / recording studio

Post by Stonedhouse »

6th Section - Office / Control Room

I work from home so the control room doubles up as an office. Its not huge but just big enough to fit 3 or 4 (at a squeeze) when doing the control room tracking sessions or mixing.

This was early days just getting a worktop and basic gear in.
Image

A little later I re-jigged things to bring it all together better.
Image

Gearwise it is fairly basic - I'm pretty much 100% ITB these days using a MacBook Pro running Pro Tools. A Focusrite Saffire Pro 40 and its sister Octopre MkII dynamic give me 16 pre amp channels - all running through Mix Control which gives a flexible latency free monitoring path. Hooked up to a Presonus HP60 6 Channel Headphone amp - all hooked in to Mix Control allows very flexible monitoring routing back out in to the studio. All pretty modest but more than good enough for what we need. The shape and size of the control room does not lend itself to ideal monitoring but I find using the near fields, then headphones, then the car to be a reasonable method for our level of fun - we are far from a professional studio and the bulk of the time it is a practice room...... great fun though :yahoo: Shortly I'll post up a couple of fun sessions we have had in there.

I hope sharing this has been of some use though and if anyone has any questions I'd be thrilled to answer them.

Image
Post Reply