Hello all,
I come with a sound proofing design question. Although it's a studio, it's not for recording, it's a music teaching studio.
My wife is a music teacher, and we're adding soundproofing to a room in our home so she can cut the commuting and teach from here.
She teaches a variety of instruments but the two most relevant to this purpose are saxophone and piano.
We have a room set aside for the studio. This is the point we reveal one of the compromises we made when we bought the house; the room is on the adjoining wall with our neighbours. Currently the noise transmission is pretty bad, despite being concrete floor and brick built walls.
A typical saxophone lesson, with both her and the student playing, is loud and clear in the neighbour's house.
The house is early 1960s block built. Cavity external walls, block built internal walls (old 3 or 4 inch breeze), and brick built party wall with next door. I'm not sure whether the party wall is a cavity or not but I assume it is. Concrete floor.
We have been doing some research and have pretty much decided we have to go for a "room within a room" setup, building plasterboard walls isolated from the main house with heavy rockwool in the wall and several layers of acoustic plasterboard on the face with green glue or similar between the layers.
This is also the plan for the ceiling, although we may have only two layers of board on the face.
The first question I have is this:
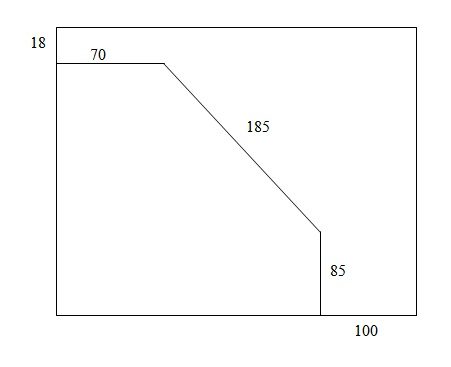
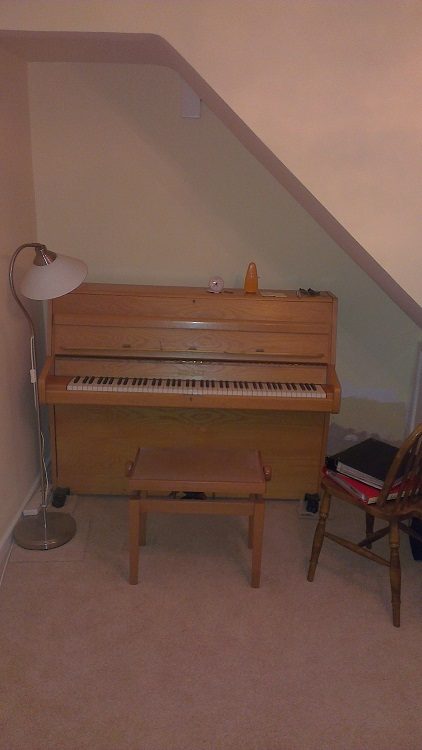
One wall of the room has space under the staircase. This is where the piano lives at the moment. As I see it there are two ways we could work this.
1: Build the isolated walls to take the shape of the stair wall and leave the piano where it is
2: Build the isolated wall so that it makes that wall completely flat, and maybe make a walk-in cupboard in the space where the piano was.
Option one makes the room a lot more space efficient, but I'm wondering if having the sound originating from such an odd shape space is making a rod for our own back both on noise transmission and the acoustic properties of the room.
The second question is this:
Currently we are planning to build new walls in front of the adjoining neighbour wall and the internal wall that joins it (left side and top side on the plan). Do we need to treat the outside wall as well? Even if not in such a sturdy construction as the party wall, I wonder if treating this would avoid noise travelling next door through the front of the house.
We will be making changes to the window on the outside wall with probably a second double glazed unit on the inside.
I've attached a plan of the room, and a rough plan showing the stair line on the wall in question, although it's missing the ceiling height of 2.2 metres. Also a particularly poor photo of of the piano in the room as it is now.
Cost isn't really a factor. We have budget available to cover pretty much anything we need to do.
I hope you can help us with some of your thoughts. Either specifically on the questions, or general comments all welcome.
Thanks
Alec
Soundproofing a Home Teaching Studio
Originally posted at johnlsayers.com, topic 17983.
Hi Alec, and Welcome to the forum! :)
Not a problem! Sound waves behave just the same way in teaching studios as they do in rehearsal rooms, live rooms and control rooms. And neighbors get just as annoyed!Although it's a studio, it's not for recording, it's a music teaching studio.
can you get hold of a sound level meter somehow? Beg, borrow or buy. It would be useful to know how loud you are in there at full blast, and how loud that is in the neighbour's house. That will give us real-world objective numbers to work with, rather than just "guesstimates". It will tell us several things that are needed to successfully design and implement your isolation plan.A typical saxophone lesson, with both her and the student playing, is loud and clear in the neighbour's house.
IS there any way you can find out for sure? It makes a difference, from the point of view of isolation. The issue is this: an isolation wall is a tuned system that resonates at a specific frequency, which is designed to be much lower than the lowest frequency you need to isolate. A proper isolation wall has only two "leaves" in it with an air gap between them, where a "leaf" is just solid, massive surfaces, such as brick, block, concrete, glass, drywall, etc. Adding a third leaf to such a system forces the tuned frequency to rise, which is bad, as it means that your wall will actually isolate WORSE in the low frequency area: That's why you'll often see folks here talking about the evils, dangers, scariness of the dreaded "three-leaf wall". It is best to avoid building 3-leaf walls, and only build 2-leaf walls. However, sometimes it is inevitable, you just have no choice, and you have to build a 3-leaf, in which case you need to design it a bit different to compensate for the "3-leaf effect". So in your case it would be good to know if your party wall really is a cavity wall (meaning it is already 2-leaf), or if it is just a single solid mass of bricks. So if you can find out, that would help a lot.and brick built party wall with next door. I'm not sure whether the party wall is a cavity or not but I assume it is.
That probably is the way to go, yes. However, your biggest issue might not actually be the walls at all: you might have "flanking" going on, which basically means that sound is finding a way around the walls, floor and ceiling, such as through doors, air vents, electrical conduit, chimneys, the ceiling, or windows. Just leaving the windows of both houses open creates a major flanking path! If both windows are open, then no amount of isolation will stop sound going next door. The ceiling is another major suspect here: You didn't mention what the ceiling is made of, or if this is a single story or two story house, so that might be a big issue. Town houses that share party walls often have the problem of the party wall ending at the ceiling line, not going all the way up to the roof. So if you have a conventional ceiling, with drywall hung from joists, then sound can get through that easily, through the attic space, over the top of the party wall, and down through the neighbour's ceiling. If this is a single-story house, then there's a good chance that this is what is happening. Thus, it is important to know how your ceiling is built, and what is going on above it. Can you get into the attic space, and take a look to see if the party wall goes up to the roof, or if it stops short?We have been doing some research and have pretty much decided we have to go for a "room within a room" setup,
Both of these are options. #1 will require some fancy carpentry to follow the same angles, and you will lose a lot of space anyway, since the isolation wall has to be spaced away form the existing walls. So it might not be worthwhile, considering the amount of space that will remain. You might not even be able to get the piano in there any more. #2 would be much easier, but you won't be able to use the space under the stairs at all. Isolation walls must be sealed absolutely airtight, so trying to put a door in there to get to the closet space is more trouble than it is worth. The door would have to be very massive (heavy), and have double seals all around the edge, which is really not worth the trouble. I'd forget about being able to use that space.One wall of the room has space under the staircase. This is where the piano lives at the moment. As I see it there are two ways we could work this. 1: Build the isolated walls to take the shape of the stair wall and leave the piano where it is 2: Build the isolated wall so that it makes that wall completely flat, and maybe make a walk-in cupboard in the space where the piano was.
I'm not sure I understand the reason for this. If you are going to do the full "room-in-a-room" thing, then why do you also want to add extra walls here? That doesn't make a lot of sense.Currently we are planning to build new walls in front of the adjoining neighbour wall and the internal wall that joins it (left side and top side on the plan).
The window is not shown on your plans, and isn't in the photo either: where is it? In any event, the correct way of doing that is to seal up the current window so that it cannot be opened, and maybe also replace the glass with thicker glass, then add a new window to your inner-leaf wall to complete the 2-leaf isolation system.We will be making changes to the window on the outside wall with probably a second double glazed unit on the inside.
Your basic plan is fine, but before you go to all this trouble and expense it would be good to get some readings on that sound level meter I mentioned, and also to see if the problem is actually not the wall at all, but rather flanking paths. It might turn out that you can reduce the sound transmission considerably by suitable sealing and other simple steps, rather than by building the new room-in-a-room. - Stuart -general comments all welcome.
Thanks for the detailed reply. I'll add some responses to the points later. We do have access to a sound meter so will try and get some readings at the weekend.
Sorry for leaving this a few days. Run-up to Christmas means lots of gigs for both of us, so time is tight.
I'll answer some of the points made in some semblance of order first.
The party wall is definitely a cavity wall. Brick built with a cavity of 5 centimetres. No insulation in the cavity.
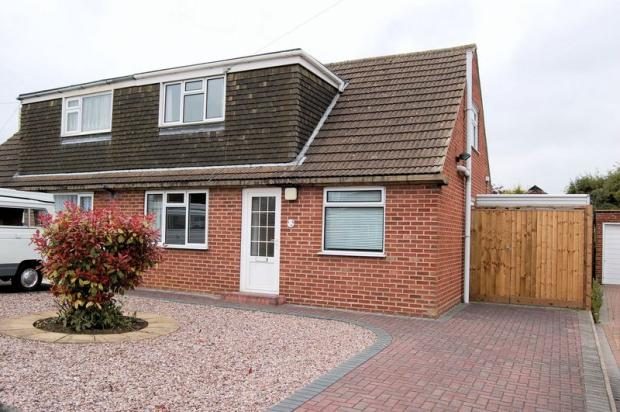
The house is two story, but the upper floor is in the roof space, if that makes sense. So the studio room has the eaves above for a few feet and then a room above. I've attached a picture of the house. The studio room is to the left of the door.
The joists run front to back. The ceiling is a thin layer of plasterboard (drywall?) with wood joists above and wood floorboards. There is no insulation within the ceiling at all.
When I said in the original post, "build new walls" these are the isolated walls of the inner room. We were hoping to build two sides of a room-in-room, and leave the exterior wall and inner wall untreated. So on the plan, we would build in front of the left and top walls, leaving the right and bottom walls as is. Would this be a terrible idea? I'm rather fearing it will be. Our logic (?) being that we would spend more to do the two walls better rather than doing all four just adequately.
The window is on the bottom wall of the plan. The picture of the piano in place was taken through it.
We went next door this morning and had free run of their house to do some sound tests. Also have gathered some anecdotal evidence of where the noise appears to be coming through. When in their downstairs room that directly adjoins our studio, the sound seems to come from high up in the wall. When in their upstairs room, the noise seems to come from below (obviously).
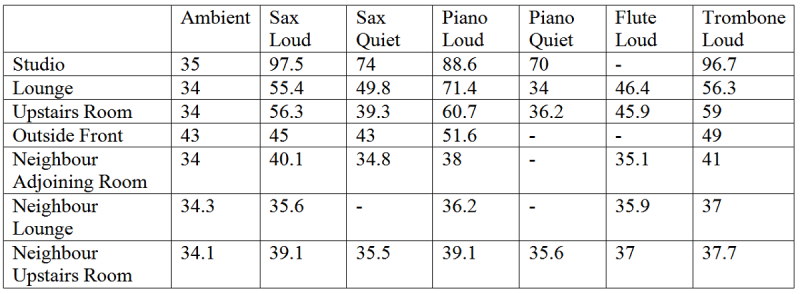
I've attached a table with the readings on. These are using the dBa setting on the meter. I was quite surprised how little extra dB was generated for a fairly clearly audible sound. <edit> I should add that the Lounge is the room to the rear of the studio, that the piano is against the wall of.
Hope this helps. I'll try and answer any further questions a bit quicker.
Hi guys,
I know the FAQ asks not to bump threads, but we could really use some input on this. We've completely drawn a blank with professionals in our area, so while I don't want to be all dramatic and say you're our only hope, you kinda are :)
If you need more info do please ask.
Thanks
Alec
OK, you should be getting reasonable isolation from that, just from the mass of the bricks. I'm assuming that there are wire ties joining the bricks across the cavity? If so, that's not such good news, but it is common practice, so you are probably stuck with it.The party wall is definitely a cavity wall. Brick built with a cavity of 5 centimetres. No insulation in the cavity.
That's what I suspected, and it is a weak link. Depending on how much isolation you decide to go for, you might have to attack that. Ideally, you would need to take off the drywall (plasterboard), seal the flooring above air-tight (with acoustic sealant), perhaps add some mass to that subfloor in between the joists, and then add insulation plus your final inner-leaf ceiling (more on that later).The joists run front to back. The ceiling is a thin layer of plasterboard (drywall?) with wood joists above and wood floorboards. There is no insulation within the ceiling at all
Once again, it depends on how much isolation you are aiming for, but if you want decent levels, then think of it this way: Sound is like water... it takes the easiest path out. If you have a room with three great walls and one lousy wall, the sound will take the "lousy" wall path out, totally ignoring the "great" walls: Extend the water analogy to a fish tank: if you want to build an aquarium, can you do it with glass on just two sides, a piece of wood on the third side, and a piece of carpet on the fourth side? :) Even though the glass offers great "isolation" to the water, the other paths don't, so the water will leak out through the wood and carpet. And once water is out, then it is out, splashing around all over the place. Same with sound: if it gets out, then it is out in the open and can be heard all around, even on the sides with the "good" isolation. That is more true for low frequencies, but pianos certainly can put out some pretty low frequencies, way out there on the left end of the keyboard... So that's the issue: doing two walls great and two badly is probably worse than doing all four to a mediocre level. And in fact there are six "walls", not just four: sound travels in three dimensions, so the floor and ceiling also count. Then there is also the issue of windows and doors: You can have the best isolated room on the planet, but if you open the window, it no longer has any isolation! So airtight seals are part of the game plan for isolation. If air can get through the gaps around your doors and windows, then so can sound. To understand this, go sit in your car in heavy, noisy traffic (hopefully with some idiot playing his radio really loud!) with all your car windows closed, and the vent closed, and listen. Now open just one window a tiny crack, maybe 1 mm or so. Listen again: Notice the large difference in sound levels? Just that tiny little air gap, only a few mm square, negates the entire sum total of all the isolation offered by the entire rest of the car. All those tons of steel and glass are worth nothing next to that little tiny air gap. So sealing is critically important to obtaining good isolation. In fact, just sealing all the air gaps in your room right now would probably make a substantial difference to your isolation! This is often the least thought about solution, but the most effective. All that is just to say that your doors and windows will need special attention, as will your electrical system: Correct me if I'm wrong, but if I recall correctly, houses in the UK are wired through metal conduit embedded in the walls, running from every switch and plug back to the main distribution panel? And conduit is, obviously, an open passage for sound: it is just air surrounded by pipe. So that needs to be dealt with too. (There are methods for handling that, simply end effectively.)When I said in the original post, "build new walls" these are the isolated walls of the inner room. We were hoping to build two sides of a room-in-room, and leave the exterior wall and inner wall untreated. So on the plan, we would build in front of the left and top walls, leaving the right and bottom walls as is. Would this be a terrible idea? I'm rather fearing it will be. Our logic (?) being that we would spend more to do the two walls better rather than doing all four just adequately.
OK, got it. That looks like an "operable" window, meaning that one or more of the panes can be opened. Correct? If so, that needs to be sealed up air-tight, for the same reasons as above. Liberal doses of acoustic caulk should take care of that, and maybe a couple of well placed nails or screws, plus removal of any mechanism. If you are aiming for high levels of isolation, you might also need to replace the glass with thicker laminate glass. What type/thickness of glass is in there right now? Is it double-glazed, or just single? I'm hoping you say "single, and thick"...The window is on the bottom wall of the plan. The picture of the piano in place was taken through it.
Ouch. That's what I feared. There's some form of flanking going in through the walls somewhere. Do you happen to have electrical outlets on both walls (yours and theirs), for example? Air vents? Chimneys? Something similar? But more than likely it is where the two upper floors meet in the cavity walls. I wonder of the floor joists/beams run all the way across? It would be hard to find out for sure, but it would not surprise me that you are sharing the same floor support structure, through the walls. You might need to make a small hole in your ceiling and take a look at how the joists go through: there might even be holes there.When in their downstairs room that directly adjoins our studio, the sound seems to come from high up in the wall. When in their upstairs room, the noise seems to come from below (obviously).
dBc would be better for this type of measurement. Yes, dBa is probably what your municipal inspectors would use, and probably what the regulations talk about, but C-weighting is more useful, since it gives you flatter response in the low frequencies, which is what you need to know about.These are using the dBa setting on the meter.
Exactly. That might be due to the A-weighting, which is less sensitive than your ears are to low frequencies. Your readings are rather interesting, and I suspect that they would be a bit different if you switched to "C" weighting on your meter. You seem to be getting around 30 dB of isolation within your own house, and around 50 to your neighbors house, which as actually quite good, and might even meet legal requirements. But "legal" is not necessarily "neighbourly"! You should be able to improve on that a bit with your "room-in-a-room" plan, but it gets harder and harder to make a difference as you go up the scale. Decibels are logarithmic, so increasing isolation from 30 dB to 40 dB is easy: but increasing from 30 to 50 is ten times harder, since you need to block ten times more energy. Increasing from 30 to 60 is one hundred times harder, and increasing from 30 to 70 is one thousand times harder. You get the picture. I'm not trying to scare you! Just pointing out reality. You should be able to get another 10 dB of isolation, realistically, and probably more, but I would not expect to get another 30. That said, 10 dB of isolation equates to the sound level dropping by half, subjectively, and 20 dB would drop it by another half, so your neighbors would perceive the level as being about one quarter of what it is right now. That would be a realistic expectation. Fortunately, you are starting from a very good basis, and I suspect that just dealing with your weak spots might make enough difference. So before going to the expense of the "room-in-a-room" thing, I would suggest attacking your ceiling, as that seems to be the the biggest weak point from what you say. If this doesn't get you as much result as you need and you still have to go for "room-in-a-room", then it wont be wasted effort, as you would have needed to do it any way. Here's what I would do if that were my room: I would start by taking off your existing thin ceiling drywall (plasterboard), and getting a good look at what you have up there, especially where the floor joists above you meet the party wall. I would pay a lot of attention to that, to ensure that things are just as snug and air-tight as possible. Maybe add plenty of mortar all around, to get mass and seal up any air gaps, cracks, poor workmanship, etc. Then paint that entire area, all over, with a good quality paint that penetrates well into both wood and brick, to ensure good air seals (especially if there is bare brick / mortar up there: brick and cement are porous, and need sealing). I'd do the same around the full perimeter of the room, making sure that all of your walls are completely sealed up to the subfloor, so that you have a hermetic outer "leaf" around you. Then I'd carefully seal the underside of the floor above, filling all the gaps and cracks with acoustic caulk, and also add mass to it, by cutting strips of 16mm drywall to fit in between the joists, hold it in place with cleats nailed sideways into the joists, and seal around the edges with caulk. Add a second layer of drywall like that, if you want good isolation, and if the structure can handle the load (check with a structural engineer, to be sure). With that complete, I'd inspect every nook and cranny around the entire room, and pump oodles of caulk into any suspicious look areas. If you even suspect that there might be a crack, then seal it. And even if you are totally convinced that there is no crack, then seal it anyway, just in case... Your electrical system needs special attention too: If you do have conduit, then cut the power, take off the cover plates on all your switches and sockets, plug the end of the conduit with a piece is insulation rolled up and forced down the pipe a little way, and put a dab of acoustic caulk over the end. That way, if you do need to do electrical work in the future you can remove the caulk and pry out the insulation, then re-seal the same way. Next, your windows: I'd seal them as outlined above. Open the operable panes, lather caulk in place, close then, latch/nails/screw/bolt them in place so they cannot move, and remove all hardware, such as handles or external mechanisms, and caulk the openings where they were. Doors: replace them with solid-core wooden doors, and run good quality rubber seals all around the edges, top, both sides AND BOTTOM. The gap at the bottom of the door needs to be sealed too: You can buy proper acoustic threshold seals to do that, that drop down into place when the door is close and rise up as you open it. Zero International make a number of good devices for sealing doors. With all that done, repeat your measurements as you did above, and see how you are doing. You might have gotten where you need to go! If so, then replace your ceiling by putting Resilient Channel across the joists, filling the cavity with insulation, and carefully hanging a layer of 16mm drywall, or two layers, if you are paranoid. Done! But if you are still not happy with the isolation, then the final step is to build that "room-in-a-room". And the good news is that all of the above has already completed your outer leaf properly, so you only need to do the inner leaf. With a bit of luck you won't actually need to do the "room-in-a-room". Hopefully, just fixing up the things outlined above will be enough, but if not then none of that is wasted, as you would have needed to do it anyway for the "room-in-a-room". So that would be my approach. First ensure that your existing outer-leaf is as good as it can be, and if that isn't enough, then carry on with the original plan. Either way, use the forum to document what you are doing, post photos and descriptions so we can sort of be "looking over your shoulder" as you work, and maybe spot stuff you didn't notice. I'm looking forward to seeing how this works out! Oh, and Merry Christmas! A couple of days late, but better late than never... :) - Stuart -I was quite surprised how little extra dB was generated for a fairly clearly audible sound.
No idea on the wire ties, there's only one brick space in the attic that we can see into the cavity from.I'm assuming that there are wire ties joining the bricks across the cavity? If so, that's not such good news, but it is common practice, so you are probably stuck with it.
One of the joys of this house from this point of view is it has very few sockets. There is only one original single outlet in the room, not on the party wall; and one light switch by the door. We have added an extra socket on the top wall behind the piano but the wires are plastered directly into the wall with no conduit.your electrical system: Correct me if I'm wrong, but if I recall correctly, houses in the UK are wired through metal conduit embedded in the walls, running from every switch and plug back to the main distribution panel? And conduit is, obviously, an open passage for sound: it is just air surrounded by pipe. So that needs to be dealt with too. (There are methods for handling that, simply end effectively.)
It's double glazed and not very thick. UPVC frame. It's a very weak point acoustically. We were planning to install a similar unit on the inside. I presume from your comments that a thick single glazed window would be better than a double glazed one?That looks like an "operable" window, meaning that one or more of the panes can be opened. Correct? If so, that needs to be sealed up air-tight, for the same reasons as above. ....Is it double-glazed, or just single? I'm hoping you say "single, and thick"...
From what we've seen from upstairs when having floorboards up previously, there doesn't seem to be any floor structure into the party wall at all. The floor joists all run front to back. The chimney is in the back room. We'll pull down a section of ceiling in the next day or so and have a detailed look.There's some form of flanking going in through the walls somewhere. Do you happen to have electrical outlets on both walls (yours and theirs), for example? Air vents? Chimneys? Something similar? But more than likely it is where the two upper floors meet in the cavity walls. I wonder of the floor joists/beams run all the way across? It would be hard to find out for sure, but it would not surprise me that you are sharing the same floor support structure, through the walls. You might need to make a small hole in your ceiling and take a look at how the joists go through: there might even be holes there.
Damn.dBc would be better for this type of measurement.These are using the dBa setting on the meter.
That sounds like a really cool plan. I was thinking we would have to do the Room-in-room wall building before the ceiling, but if the ceiling can go in first then that makes a lot of sense. A question on materials. We have seen this acoustic membrane. Would including this within the ceiling make a significant difference? Enough to justify the extra cost? http://www.keepitquiet.co.uk/acoustic_membrane.html Also is it worth using acoustic plasterboard over regular? Such as this? http://www.keepitquiet.co.uk/acoustic_plasterboard.htmlHere's what I would do if that were my room: <a really cool plan>
Guess what.... you were right.
There's a beam supporting the top of the stairs that goes into the cavity wall. There's about a centimetre gap on the top and sides. Presumably there is similar on the neighbour's side.
We've mortared around the joist and tidied up the mortar on the brickwork as it was pretty poor. We might plaster along the wall above the ceiling too as we've got plaster left over from another room.
Once we've got into the meatier bits I'll start a build thread.
Excellent! glad you found the problem. I kind of suspected that there HAD to be some issue there, causing the results you mentioned.Guess what.... you were right. There's a beam supporting the top of the stairs that goes into the cavity wall.
:shock: Ouch! Plenty big enough to make a big difference. If you can persuade your neighbor to do the same as you did, on his side, that would help even more.There's about a centimetre gap on the top and sides.
It is definitely worthwhile doing that! Adding mass and getting a better seal is always a good idea.We might plaster along the wall above the ceiling too as we've got plaster left over from another room.
Correct. Having two thick panes (one in each "leaf" of the wall) is much better than having four thin panes (a double glazed unit in each leaf). But if it is too expensive, or too much hassle, to replace that one on the outer leaf, then you might be able to get away with leaving it in place, very much sealed air tight, and just putting a thick pane on the inner-leaf (this is assuming that you do eventually go with the "room-in-a-room" solution).We were planning to install a similar unit on the inside. I presume from your comments that a thick single glazed window would be better than a double glazed one?
It looks like plain old MLV under a different name. That's a good way of throwing away your money! :) when I see phrases like "lightweight soundproofing material", I just have to giggle. That's like claiming that you are selling "water that is not wet" or "heat that is cold". The most basic principle for isolating sound, is mass. If you don't have mass, you don't have isolation. It really is that simple. So "lightweight" and "soundproof" just cannot be used in the same sentence. The laws of physics prove that there are basically only four ways of stopping sound from getting from A to B: 1) You can remove all sound-conducting paths between A and B, which is fine if you happen to live in outer space where there is no air, but a little bit harder to accomplish here on Earth, since air is a great conductor of sound, and removing all the air from your house might not be such a good idea. 2) You can put a barrier between A and B that is so rigid (stiff) that sound waves cannot make it vibrate. There is no such material. A sufficiently loud sound can make any known material vibrate. 3) You can put a sufficiently soft barrier in the way, such that it absorbs all of the sound and thus prevents it from getting through: No such material exists. There are materials that are good at absorbing sound, but you need such a huge thickness that it is totally impractical. 4) You can put a barrier between A and B that is so massive (heavy) that sound waves cannot make it vibrate. There is no such material. Any sufficiently loud sound is able to make any amount of mass move. That's it. There are no magical materials that somehow bypass the laws of physics, and persuade the sound to stop in its path due to ephemeral intervention of the incantations... :) Of the above, #4 is your best friend: mass. In fact, combining all four concepts is what the "room in a room" design does: it decouples the two sides of the wall (solution #1), except for the air. It puts rigid barriers on both sides (#2), that resits as best they can. It puts absorption inside the wall (#3), to damp the resonance. But above all, it puts loads of mass on each side (#4). Without the mass, the other three are no use. So any product that claims to be "lightweight" soundproofing is also claiming that it does not obey the laws of physics... :) OK, that's not to say that MLV is not use: it does have its uses in acoustics (very limited used, in unusual circumstances), but even then, not the "lightweight" stuff...A question on materials. We have seen this acoustic membrane. Would including this within the ceiling make a significant difference? Enough to justify the extra cost?
At least they are honest about this product. The very first line of the description says: "PLEASE NOTE THIS PRODUCT IS NOT ENOUGH TO SOUNDPROOF A WALL OR CEILING ON ITS OWN. IT HAS TO BE USED WITH ADDITIONAL SOUNDPROOFING MATERIALS FOR BEST RESULTS". Very true. OK, once again this boils down to mass. Is this stuff massive? Yep. It sure is. But then again, so is ordinary drywall! So the question then comes down to: "How much are you paying per kg of mass?": Sound waves can't read the price tags, and they really couldn't care how much you PAID for the mass: all they do is react to it. So get the least expensive mass that will do the job. If that acoustic drywall turns out to be less expensive per kg than ordinary 16mm fire-rated drywall, then by all means use that. But if it is more expensive, then you have to wonder about your pocket, and why you would take more coins out of it than necessary... :) So, getting down to materials for your ceiling: If you want to get a head-start on the "room-in-a-room" idea, now is a good time to do it. If you can buy Resilient Channel, you can run that across the existing joists up there, to decouple your new drywall from the joists. It is just simple metal forms, sort of "S" shaped when viewed from the end, with slots or holes cut in it, to make it "bouncy" for the drywall. Good stuff. If you can't get that, then you could get some RSIC clips and use them, along with ordinary hat channel, which is a different soft of metallic form. It looks sort of like Resilient Channel, but does NOT decouple. Whichever you choose, the installation is fairly simple: nail or screw the RC, or the clips to the joists. If you are using clips, then install hat channel in the clips. Then screw two layers of 16mm drywall into the channel, one on top of the other, staggering the joints between them, and taking great care that no screws go into the joists! Only into the channels. That's it! Done! Of course, you still need to put fluffy insulation in the cavity BEFORE you put the drywall on! That is important. And you need to cut the drywall so it falls just short of the walls around the room, with a gap of a couple of mm. It must not touch the walls. Then fill the gap with acoustic sealant, or even good quality bathroom caulk (the type that never hardens, and still remains soft and rubbery, even when it is fully cured.) That fully isolates your ceiling from the joists above, and decouples from the walls, thus giving you an proper MSM system for your ceiling, which should improve things a bit as it will keep sound and vibration out of the joists. It also means that your "room in a room" (if you do need to do it) will now only involve the walls, as the ceiling is already done... :) So that would be my suggestion: that's what I would do if that were my room. And if I really wanted to go the extra mile, I would probably seal up the entire bottom surface of the sub-floor above (before putting on the RC or clips!), then do something called "beefing up": that means cutting strips of drywall to fit in between the joists up there, tight against the subfloor. Hold them in place with cleats, then seal around the edges with the same acoustic caulk or bathroom caulk. That adds mass to that leaf, and also ensure that it is totally sealed. A bit of extra work, but a LOT of extra results... :) - Stuart -Also is it worth using acoustic plasterboard over regular? Such as this?
Progress finally!
Last Friday the old ceiling came down, then I spend all weekend sealing the floorboards with acoustic sealant. The plasterers came yesterday and made very short work of putting up the plasterboard between the joists, then rockwool, then the resilient bars then two layers of 15mm plasterboard. Today they spent a couple of hours plastering the new ceiling. All done.
The trouble is that it hasn't worked. We spent a short time measuring next door and we've gone from 58dB attenuation previously to between 53 and 56. It is somewhat puzzling that we seem to be seeing absolutely no benefit at all from the new ceiling, either quantitive or qualititive. Are there any likely reasons for why this might be?
We only tested the saxophone this time. We got the following results:
Room dBa/dBc
Studio 101/103.9
Neighbour adjoining room 45.1/52
Neighbour upstairs 47.8/52
Our Upstairs room 60.6/67.7
Our Lounge 46.9/51.8
The peak readings outside the studio are all on the lowest pitch notes.
I'm prepared to accept that there are some variances in the measurement. However the point still stands that we now clearly have to do more work in order to achieve the result we want. The key to this seems to be stopping the sound getting into the solid structure of the building. So it's room in room after all. Another 10dB attenuation to next door would be ideal, but even 6 to 8 would be an acceptable return on investment.
Got some pictures of how that went in, the various stages as they worked? That's important to make sure they did it right! I was expecting a bit more of a change from that, but at least you got something. Curiously, you got a big change in isolation to your own lounge: That improved by 12 dB, which is pretty good! But the fact that you didn't get much improvement elsewhere suggests that you have a flanking problem elsewhere than the ceiling: my guess would be windows first (out yours, in theirs), ventilation systems (if any?), then walls. Anyway, as always, pictures would help a lot! - Stuart -Last Friday the old ceiling came down, then I spend all weekend sealing the floorboards with acoustic sealant. The plasterers came yesterday and made very short work of putting up the plasterboard between the joists, then rockwool, then the resilient bars then two layers of 15mm plasterboard.
Hello again
No pictures of the build I'm afraid. I was out at work most of the time. They did seem to "get it" though and were given clear written instructions too just to make sure.
The Lounge reading turns out to be a false alarm. There wasn't a lounge door when we did our original readings, there is now. So that probably accounts for the 12dB.
There is one thing that was wrong when we did the latest readings though. The plasterers left a gap at the walls as instructed. They sealed the first layer of board with acoustic sealant, but they plastered the ceiling without having filled around the second layer. We've since been clearing the plaster out from the edges to restore the few mm gap that is around the ceiling. I'm going to finish off filling this with acoustic sealant when I'm back from work tomorrow. Then we can test again.
We will enquire as to whether it's possible (or financially feasible) to replace the window with two leaves of heavy single glazing.
We would like to make the decision on whether to work on the walls soon though. The room is in bits currently and empty so it's in the perfect state to do this. We need to get some information on the triple leaf effect first though. I've spent ages searching for it but every single thing I've found is based on all three leaves being stud walls. As above, we've got a brick cavity wall. The only scant advice I can find is that it will be fine to build a decoupled stud wall as the resonances are different between the two constructions.
Am I correct in this?
"I've found is based on all three leaves being stud walls."
In respect to a leaf, it is a hard mass boundary, not the support system( the framing) that makes it a leaf. The framing can be a metal stud or it could be a stand alone brick (double wythe) wall, it is still a leaf. The hard mass boundary dictates the leaf.
So if you had a wooden framed wall with an enclosed hard boundary, that is one leaf, then you include an airspace, fully decoupled from the first leaf, and you have a self supporting brick wall then that is leaf number two. Now insert another air space, fully decoupled from the second leaf and then we have a concrete block wall, that is the third leaf.
It isn't the materials it is the physics or multiple air-spaces that makes the 3 leaf a less than ideal option.
Do the materials used not affect the resonance and the severity of the triple leaf effect at all then? I would assume there would be some calculable result from constructing with different materials and different air gaps. Is there such a thing?
Our transmission problem within our own house is worse the lower in frequency we go. At 170hz the floor of the room above reverberates noticeably when standing in the room. Lower notes are possible but unlikely in the general course of teaching Alto sax. All the observed behaviour and sound readings are done at the maximum possible instrument volume, which again is unlikely to happen during a lesson and physically unsustainable for long periods. We're looking at 85-90dBc for maximum normal volume in the room. We need to achieve ideally another 10dB loss to the neighbours.
The talk of triple leaf and the complete lack of any available documentation on how to calculate the effect leads to the obvious question of the effect of damping the existing wall.
So, would we be likely to see an effect from using resilient bars, whisper clips or similar with double sheetrock straight onto the wall with no airgap?
"The talk of triple leaf and the complete lack of any available documentation on how to calculate the effect"
Not so, at this link of my site http://epaper.buildthisroom.com/wall-ma ... trock.html you will be introduced to one person who is responsible for calculating this effect.
A Study of Techniques to Increase Sound Insulation of Building Elements
Wyle WR 73-5R (3 leaf panel)
Ben Sharp of Wyle Laboratories. On or about page 30 you will get your answer.
But this issue is bigger than you are able to grasp. It is not as simple a thing as to say "get this thickness add that airspace and you defeat the triple panel effect".
The main issue is that with every change there comes another change. And unless you have the wear-with-all to pursue the math, then you are searching for failure.
This is physics, not a simple math equation:)
The actual materials have very little effect: the equations for MSM resonance don't even have a variable for "type of material". The only variables that matter are the mass on each leaf (surface density), the size of the air gap between them, and the amount of insulation in the air gap.Do the materials used not affect the resonance and the severity of the triple leaf effect at all then? I would assume there would be some calculable result from constructing with different materials and different air gaps. Is there such a thing?
This is AFTER you did the ceiling with resilient channel, insulation, and 2 layers of 15mm fire-rated drywall? Are you SURE that there were no problems when that went up, such as drywall screws in the wrong place, hitting the studs behind the RC? Do you have photos of how that was done? You should not be getting any resonance at 170 Hz up through that ceiling. So if all is OK with the ceiling, then that must be flanking through somewhere else.At 170hz the floor of the room above reverberates noticeably when standing in the room.
Have you taken a close look at the seals around your windows and doors? That's a potential source of isolation issues.The key to this seems to be stopping the sound getting into the solid structure of the building. So it's room in room after all. Another 10dB attenuation to next door would be ideal, but even 6 to 8 would be an acceptable return on investment.
that should help a bit, but still doesn't explain the 170 Hz. resonance.We've since been clearing the plaster out from the edges to restore the few mm gap that is around the ceiling. I'm going to finish off filling this with acoustic sealant when I'm back from work tomorrow. Then we can test again.
There's a huge amount of data on that in the Wyle report that Brien linked you to. The simplest form of the 3-leaf equation is: f+ = (1 / (2 x pi) ) x SQRT( (3.6 x Rho x c^2) / ( m x d ) ) f- = f+ / ( SQRT(2) ) "Rho" means air density, "c" is the speed of sound, "m" is the mass of the leaves, and "d" is the air gap. For this equation to work, m1 = m3 = 1/2 m2, and d1 = d2. If not, then you need the long form of the equation.... There's much more info on that, if you search for it, but the Wyle report is the best for getting a basic understanding.We need to get some information on the triple leaf effect first though. I've spent ages searching for it but every single thing I've found is based on all three leaves being stud walls.
There's no difference in the calculations that depend on the materials: only the mass. As a general rule of thumb, when comparing the isolation of a 2-leaf and 3-leaf wall built with the same mass and gap, the two walls will provide the exact same amount of isolation at a frequency of four times the resonance of the two-leaf wall, and at that point it would be 24 dB better than mass law alone. At frequencies BELOW that point the 2-leaf wall gives better isolation, and at frequencies ABOVE that point, the 3-leaf gives better isolation. For example, if the equivalent 2-leaf wall had a resonant frequency of 50 Hz, then it would give better isolation than the 3-leaf wall up to 200 Hz, and the 3-leaf would be better from there on.As above, we've got a brick cavity wall.
As long as you compensate for the difference, there is no problem! If you increase the mass on the leaves, and/or increase the size of the air gap, then you are compensating for the reduced isolation. So by doing that correctly, you can get back to the same isolation as the two-leaf would have given you, with the added benefit of better isolation at high frequencies.The only scant advice I can find is that it will be fine to build a decoupled stud wall as the resonances are different between the two constructions.
No, because the resilient channel itself has thickness. So you'd have a very thin air gap, which means a very high resonant frequency, which means poor isolation... You need an air gap of at least 4" (10cm). Less than that and you are into the "diminishing returns" territory, where you have to add larger and larger amounts of mass to compensate, but that extra mass also has thickness, which reduces the air gap even more, so you need to add even more mass, which is thicker still, reducing the air gap more still, etc. Chasing your tail.... So, if you use 2x4 studs for your inner leaf, and space them one inch away form the existing brick walls, then you automatically have 4-1/2" of air gap (a 2x4 stud actually measures 3-1/2" deep, not 4"). - Stuart -So, would we be likely to see an effect from using resilient bars, whisper clips or similar with double sheetrock straight onto the wall with no airgap?
I'm not sure sure. I'm sure in that they're competent workmen working to very specific instructions. I wasn't here during the build so I can't be abolustely shure mic sure.Are you SURE that there were no problems when that went up, such as drywall screws in the wrong place, hitting the studs behind the RC? Do you have photos of how that was done? You should not be getting any resonance at 170 Hz up through that ceiling. So if all is OK with the ceiling, then that must be flanking through somewhere else.
Indeed there is. I'm spending a large part of this weekend working with that report to try and prove Brien wrong when he contends that I'm unable to grasp the concepts :?:There's a huge amount of data on that in the Wyle report that Brien linked you to.
OK, so one last practical querstion before I bury myself in the rest of this Wyle report. Would we see any benefit from increasing the mass of the existing wall. 2 or more layers of plasterboard straight onto the wall with green glue or similar (or without). Increasing the wall mass without adding a third leaf. There is the possibility we could do this to both our side and the neighbour's side.No, because the resilient channel itself has thickness. So you'd have a very thin air gap, which means a very high resonant frequency, which means poor isolation... You need an air gap of at least 4" (10cm).
Not much benefit, no. Let me explain: That wall is technically a coupled two-leaf system, since I'm 99.99999% certain that there are "things" tying the two sides together. So even though it is a cavity wall, and acts something like a 2-leaf system, it is also coupled, which means that it acts a lot like mass law too. So adding mass to it is also governed by mass law, not MSM. And mass law is not your friend.... You'd have to add a huge amount of mass to make a small amount of difference. Mass law says that each time you DOUBLE the mass of the wall, you get an amazingly tiny increase in isolation of just 6 dB. So if you were to add a second layer of bricks on BOTH sides (yours and your neighbor's), then the increase would be 6 dB. And that's a MAXIMUM of 6 dB! Mass law assumes that the mass is "prefect" mass, but real-world mass ain't so perfect... In reality, you'd be lucky to get an increase of 4 or 5 dB. And that's for adding a brick wall: adding a sheet or two of drywall is rather less impressive... The density of brick is about 2300 kg/m3. The density of drywall is about one third of that, at roughly 700 kg/m3. So to get the same effect as adding one layer of brick, you'd need to add drywall THREE TIMES THICKER than a brick! :shock: Maybe a couple of dozen or so layers of drywall... In other words, a layer or two of drywall is going to accomplish nothing much at all! That's the beauty of MSM: you get major increases in isolation from much smaller increases in mass. Theoretically, you get 18dB increase in isolation from doubling the mass of an MSM wall, vs. 6 dB from doubling the mass of a single leaf wall. MSM is your friend: mass law is not. - Stuart -OK, so one last practical querstion before I bury myself in the rest of this Wyle report. Would we see any benefit from increasing the mass of the existing wall. 2 or more layers of plasterboard straight onto the wall with green glue or similar (or without). Increasing the wall mass without adding a third leaf.
Got it. That was just the last nagging idea that I couldn't quite put to sleep with my own workings.
If you plan to work through the entire Wyle report this weekend, then that isn't the only thing that will need to get some sleep! :) When I first read it, it took me a few days and several reads of Wyle to get some of the concepts. So let me know when you are done with Wyle, I'll introduce you to IR-761... :lol: :shot: :blah: :) There's an awful lot more good stuff out there. - Stuart -... I couldn't quite put to sleep with my own workings
Hello again. A quick update, more for my ongoing sanity than anything else. I've been spending a fair amount of time on this lately. I've made some progress but I'm not quite there yet. Any comments or pointers on the following observations would be gratefully received...
I'm at the stage where I have a good grasp of the theory in the Wyle report (we'll call this "The Words") but I'm still working on the formulae (we'll call this "The Numbers").
Some sections I can produce plausible results, such as equation C5 (assuming I'm not misinterpreting the definition of very low frequencies). I can produce a result of 27.66 for the existing two leaf structure at 100HZ (assuming pc is 413.3).
I'm still working on the rest, but so far I have been able to work out the following:
The Wyle report suggests that densities should be in lb/ft2. So taking an average of house bricks being 2500kg/m3 this translates to 156 lb/ft3. The bricks being four inches deep makes the conversion to lb/ft2 logically simple as a division by 3. Therefore the density works out at 52 lb/ft2.
So that means that leaf1 and leaf2 are both 52 lb/ft2
Next is the hypothetical new leaf. Acoustic plasterboard is 12.6kg/m2, so two layers gives us 25.2kg/m2.
A board is 1200mm x 2400mm. This is 3.93ft x 7.87ft or 30ft2. 36.3kg is 80lbs. So that gives us 2.6lb/ft2 per layer therefore 5.2lb/ft2 for the leaf.
So m1=52 m2=52 m3=5.2 which gives M as 57.2
The lowest practical frequency we will encounter is 110hz and the highest is 2500hz. Lowest note of a tenor sax to the highest note of a flute. From current measurements it is the low frequencies that are of more concern and the principals in Wyle confirm this (dB reduction increases with frequency).
One thing I ran into in Wyle was the assumption that there is damping material in each cavity. This will be the case between leaf2 and leaf3 but the existing brick cavity is not insulated and cannot practically be insulated. At least not with a material that has any decent acoustic properties. Blown rockwool would likely be of insufficient density from my research. Is this likely to affect my results?
I'm going to carry on with this but do please shout if any of the above is fundamentally incorrect!
That might be your problem! You seem to be reading the order of doing the calculations incorrectly. The MSM equations mention the term 3.6 pc^2 (where "p" is air density and "c" is the speed of sound). But writing that out more completely to clarify the order, it is : 3.6 * p * (c^2). In other words, first you square the speed of sound, then you multiply that answer by 3.6, then you multiple that one by the air density. So there is no such term as "pc" in the MSM equations. Unless you are looking at a different equation? If it did exist, "pc" would indeed by about 413 in the metric system (84 in imperial units), but it doesn't exist. The correct term "pc^2" is more like 142,250 (metric) or 94,812 (imperial). But there are also simplified versions of the MSM resonance equations, which assume certain constants to be true always (standard air density, pressure, temperature, fixed speed of sound, etc.). These equations are: Where the first leaf is very massive (such as a thick reinforced concrete wall), and the second leaf is drywall, then the equation is really simple: F = 60 / ( (m * d) ^.5) where "m" is the surface density of the second leaf, and "d" is the size of the air gap. This is for metric units, not imperial. Where there are two leaves of similar mass: F = 60 [(m1 + m2)/(m1 * m2 * d)]^.5 where "m1" and "m2" are the surface densities of leaf 1 and leaf 2, and "d" is the size of the air gap. This is also metric. In both cases, change the constant of 60 to 43 if the air gap is filled with insulation, or leave it at 60 if there is no insulation. That might make your life a little easier! :) - Stuart -(assuming pc is 413.3).
As usal, thanks for that. I've not made much headway on this for various reasons, but I'm getting back into it this week now. I've run through those equations you posted, just to check again if I'm on the right track.
So, taking a drywall second leaf with a mass of 25.2 km/m3 (sum of 2 layers). And an air gap of 25cm F=60/((25.2*.25)^.5) F=60/(6.3^.5) F=60/2.5 F=24 That is of course assuming the air gap is expressed in meters. Doubt our brick cavity, even with infinite wire ties, counts as a very massive wall.Where the first leaf is very massive (such as a thick reinforced concrete wall), and the second leaf is drywall, then the equation is really simple: F = 60 / ( (m * d) ^.5) where "m" is the surface density of the second leaf, and "d" is the size of the air gap. This is for metric units, not imperial.
Brick being roughly 2500kg/m3. Bricks being a negligible amount over 10cm deep. Therefore each side of the wall is 250kg/m2. In this case d is .04 to represent a 4cm cavity. F=60[(250+250)/(250*250*0.04)]^.5 F=60[(500)/(2500)]^.5 F=60[0.2]^.5 F=60*0.45 F=27Where there are two leaves of similar mass: F = 60 [(m1 + m2)/(m1 * m2 * d)]^.5 where "m1" and "m2" are the surface densities of leaf 1 and leaf 2, and "d" is the size of the air gap. This is also metric.
Existing wall at 60, and new wall at 43.In both cases, change the constant of 60 to 43 if the air gap is filled with insulation, or leave it at 60 if there is no insulation.
Well it doesn't give me the answer but it gets me closer. Can you (the collective) look over this lot above and again call me out if I'm doing it wrong. I probably am doing it wrong :?That might make your life a little easier! :)
Yup! 23.90, to be more precise... :) And therefore the wall does not isolate until 33.47 Hz, isolates reasonably well above 47.81 Hz, and quite well above 71.71 Hz...So, taking a drywall second leaf with a mass of 25.2 km/m3 (sum of 2 layers). And an air gap of 25cm ... F=24
Yup! 26.83 Hz. Meaning no isolation until 37.57, reasonable isolation above 53.67, decent isolation above 80.5.Brick being roughly 2500kg/m3. ... F=27
Right. So the numbers above for your new wall would then be 19.17, 26.83, 38.33, and 57.5. Pretty good, actually. However, considering it is somewhat more like a 3-leaf than a 2-leaf, I would suspect that the numbers in reality would be closer to f+ = 30 Hz, f- = 22 Hz, with isolation starting ay around 42 Hz, reasonable above 60 Hz, and decent above 90 Hz.Existing wall at 60, and new wall at 43.
Nope! Looks like you got it right to me! :) - Stuart -I probably am doing it wrong
Well that's good news.
I suppose my next step, now we are fairly sure we're not going to make things worse, is to work out an approximation of the attenuation for the new structure.
Once that's done then it's out with Sketchup and finalising how it all goes together. Am I in the right place for precise things like that or would I be better of starting a new thread?