Hello everyone,
as being new to this forum I should give am short introduction about myself. OK, my name is Thomas, I live in Germany, I´m playing drums in some rockbands for about 15 years, but never on a real professional level, just made a few record on small independent labels or through self-distribution, always put more money in that we got out of it.. ;)
Anyway, I soon got interested in that “recording-thing”, hanging around in the controlroom when the rest of the band was watching videos etc., and eventually started doing recordings myself, first on an old tascam 8-track 1/2” machine, than on PC. Mainly for my own bands, and from time to time for some friends. Recording is done in the rehearsal-room (which luckily dosn´t sound to bad), while I do the mixing at home.
I´m just sitting in a regular apartment-room without any special treatment, and even if I´m not too unhappy with the results I get, I now have the time and a little money (my budget is about 1000€ at max) I want to invest in doing some acoustic treatment. And – surprise – that´s the point where I´m looking for help now.
I think I am a typical case, I started searching on that topic in the internet, reading lots and lots of stuff in the last weeks, threads in different forums, DIY-tips on youtube, the BBC research whitepapers were really interesting, as was the book from Philip Newell about recording studio design etc., and I learned a lot about this very complex subject. And I sure found a lot of inspiration around her in the forum. But it´s still very challenging to put all this information into a working concept for my room, I will really appreciate any help, tips an suggestions.
OK, so this is the starting point: The good thing is, I have no problems with the neighbors, so I don´t have to think about soundproofing, I can concentrate completely on acoustic treatment to make the room sound better / more neutral. The bad point is, it is a regular apartment , it´s rented, so I can not tear some walls down and start from scratch. I must work in a way that it´s possible to get the room back into the original status relatively easy. Sure I can drill some holes in the walls to hang absorbers, or even to fix some framing to the Walls, but for example I can not make major changes like making the door open to the outside of the room, or building brickwalls etc.
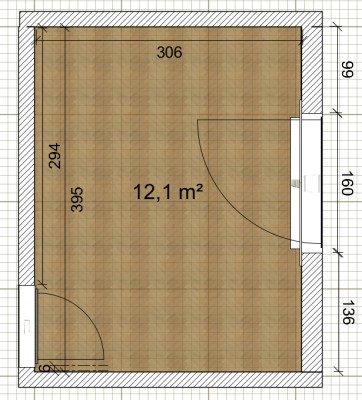
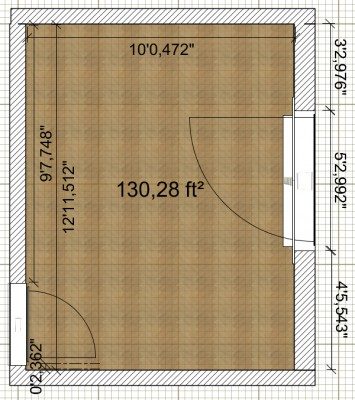
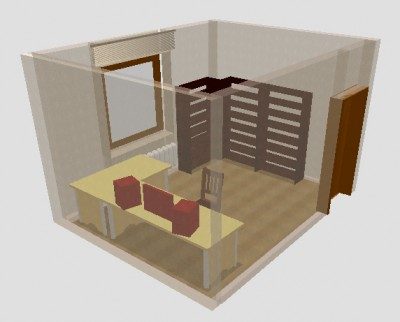
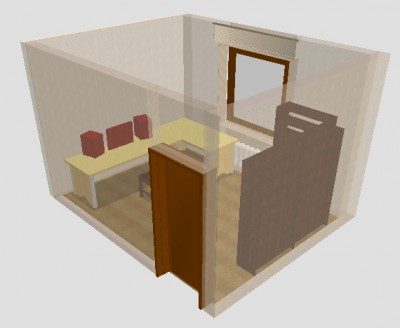
The room ist about 3 meters (9,8 ft) wide, 4 meters (13,1 ft) long and 2,75 meters (9 ft) high. The walls are solid stone walls, the floor is concrete covered with laminate. I´m not sure about the ceiling, could be thin drywall or hardboard, it´s definitely suspended cause when I knock against the ceiling it don´t feels very solid an I get a hollow sound. This might be important because it could be critical when treating the ceiling. I would not risk to hang something heavy there.
I´ve got these sketches:
Floorplan
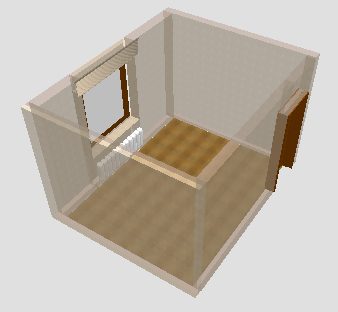
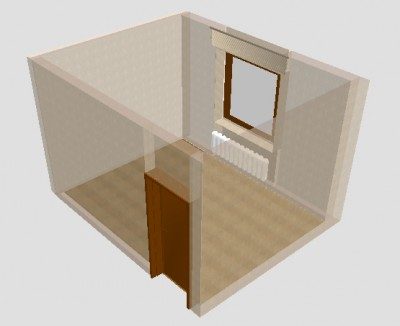
ground cm.jpgground ft.jpg3D from two angles:
empty1.jpgempty2.jpgAnd this ist what it actually look like (but I could get rid of at least one of the shelves and make the table a lot smaller. But I need at least a little space for some shelves where I can store some stuff, since our apartment is not that big an my girlfriend would be quite unhappy :evil: if I spread all these boxes with cables, microphones, replacement-parts for my drumkit etc. through the other rooms):
actual1.jpgactual2.jpgFrom what I read, for such a small room it would be best to go for what in Philip Newells book is called the “non-environment approach”. A reflective wall at the front (the wall I am facing and where the speakers are), a reflective floor that already is there) and all other walls and the ceiling as absorbent as possible.
I would also try to flush-mount my speakers (event 20/20) if this makes some reasonable improvement. Is this a good idea, or do I loose to much precious space, especially when I flush-mount the speakers for what I probably would have to build a rack and and hardboard or chipboard wall, and where I could put a lot of absorption in?
Another point is, as far as I understand, symmetry is important, and if you take a look at the sketches, even if the room itself is very symmetric, the placement of the window (where I can not build something solid up front cause it´s the only source of fresh air – no aircon in our apartment) at the center of one of the long walls with the radiator underneath and the door at the back of the other long wall (which unluckily opens to the inside that probably makes the treatment of the small wall close to it more complicated) creates a situation that all walls are somehow different, hence I can not treat opposite walls all the same.
OK, so the first thing I am unsure with is, what should be my front wall (the wall I am facing when I work)? My first choice would be the same direction I´m working now (as you can see in the “actual – sketch”), but if it makes sense to change it, I would do so. Maybe facing the window would be an option, so I have the window as a part of the "reflective front" if I stay with the “non-environment approach”? But than flush-mounting the speakers could be a problem, and even if I don´t do that they would be pretty far apart (the Window is 1.6 meters wide and about 1.6 meter high, 0.85 meters above the floor), and the best listening position would move rather far back to the wall behind me, wouldn´t it?
Or should I go to the opposite Wall with the Window in my back? But how could I than do proper acoustic treatment with the window and the radiator in my back? I could hang thick curtains there, maybe even build an removable absorber that fit in the window sill, but the radiator still have to be free. Sure, I´ve got that problem with the window area anyway, but in that case, it´s at a very critical position. I thing the 4th wall is not an option because of the door opening directly to the wall, right?
And the next big question is of cause the selection of the right absorbers and the placement.Since my room looks a bit similar to the “bed room studio” layout here on the homepage, could I use that as a starting point? It looks to me that porous absorber panels and cornerblocks out of rockwool or glasswool are the most easy to build diy, but they probably won´t cover the whole frequency spectrum evenly, even if I build them quite thick. There are so many options, slot resonators, corner slot resonators, panel absorbers, plate resonators, acoustic hangers, tube traps etc. And do I need diffusers in such a small room (I know that there is no hard rule)?
I´m sure all the answers are already out her in this great forum, and I probably read a lot of them already. It´s just for a newbie to this subject, it´s really not that easy to get all these Informations together into a concrete, working concept.
Well, that´s about it, thanks for reading and sorry for my bad English, it´s been some years since my last English-lesson in school, and as I said, I will really greatly appreciate any help, tips and suggestions.
Thanks in advance,
Thomas
P.S.: I did the sketches with some freeware software before I found out that google sketchup is preferred her. If it´s necessary I could try to do them again in sketchup.
P.P.S.: I am not sure if this post would better go into this acoustics-section of the forum or in the studio design section and I don´t want to post the same question in to sections at the same time, so if I´m wrong here, maybe a moderator could move this post to the right place.
welcome!
the wall you're currently facing is fine. measure the acoustics using a good quality omni mic and REW. i probably would not soffit mount first. i would treat the corners (both vertical and wall-ceiling) with super chunk trapping and then add some absorbers on first reflection points and on the back wall perhaps behind the shelves. this should preserve most of the space in the room. re-measure the acoustics. on the window, maybe an absorber easily moved when you need to open the window. make sure the listening position and monitors are symmetrical - on the wall as well as each other. the ceiling may be a problem so you might mount several absorbers to dampen the resonance of the ceiling itself, but the space above it may already be helping to provide some trapping.
Dear Glenn,
wow, that was a fast answer, great, thanks a lot.
I just started moving all the furniture out of the room, and now I realize how much absorption or at least diffusion all that stuff in the shelves gave to the room. Now as it is empty, it really sounds bad, lot´s of flutter-echos, and the low end frequencies are getting a lot worse. I will do some measurements tomorrow and can than post a frequency-response and a waterfall-plot. I don´t have a calibrated measurement mic, but my small condenser oktava MK012 with the omni-capsular has a good flat response, so I think that will do.
OK, I will start with the superchunks, sound´s like a good starting point, and won´t be to complicated. I can put them all around the "wall to ceiling-corners", and in the corners from floor to the ceiling at the front wall. But at the rear wall, there is the door opening just into the corner, so no space for superchunks. Should I put one in the other corner of the rear wall, or would it be better to keep the symmetry and leave the other corner empty as well?
If I need bass-absorption in every corner I could try something different there, like this new style of plate-resonators where a 2.5 mm metal plate is glued "freefloating" to some acoustic foam (even though that would be more expensive and more tricky to build). It´s said that they go quite deep to the low frequencies (80% absorption at 40Hz) even if they are only about 10 cm thick. In Germany they are called VPR, didn´t found out how they are called in English yet.
Some more questions comes to my mind.
For the window, would something like Arthur Noxon explains at the beginning of this video be a good idea?
For the ceiling, I think about gluing 5cm rockwool plates all over it. They should not be to heavy, and with the thin, suspended ceiling that surely is kind of a resonator, I maybe could "flatten out" the responding frequency of the ceiling and get something that works like a broadband-absorber to some degree that way. And I could put one or two clouds up there as well for even more absorption, if I find out how to securely fix them. Any idea how I can find out where the framework for the suspended ceiling is, other than just knocking around the whole ceiling and listen where it sounds the least hollow, or to drill tones of "test holes" till I find something solid :wink: ?
Thanks again, best regards,
Thomas
perforated metal absorbers have been around a while and may be useful for spot treatments once you complete your measurements. the rationale for the upper super chunks was to compensate for the lack of corners elsewhere. maybe interspacing the perforated metal absorbers with the plain cloth absorbers will provide the balance on the two long walls.
on the ceiling, maybe a "stud detector" or similar device can indicate where you have something you can tap into. otherwise, you might just cut a 400x400mm opening and stick your head up there and look.
i don't think you need to build a window plug for your CR window, just put some heavy drapes you can pull over during mix time.
Dear Glenn,
thanks again for the reply. yes, maybe I should go for something more simple with the window. It´s just there are so many informations spinning around in my head, and than you starts to think "oh, if you don´t do this and this and also that, you will never get it right".
Dear Andre,
I searched the Forum for "VPR" and didn´t get a hit, so I thought it might be called different in English, more so as it the short version for the german word "Verbundplattenresontor" :oops: . Are these VPRs not so often used in the "DIY-world"? I think I will try do build at least 2 of them for my rear wall. Maybe I take some photos of the construction and post them in another thread.
But I will start with the cornerblocks/superchunks, and i didn´t got the time to work on the Room in the last two days, so I will take a few days.
Best regards,
Thomas
sometimes called "composite panel absorber". if you search the patents databases you can find several variations on this theme and the details behind how they are constructed and calculated.
Dear Glenn,
ah, yes, that is more or less a 1 on 1 translation of the german word. I already found the original patent papers, and some DIY versions in german forums. So I think I will give it a try, as they would be perfect for my rear wall because of the small depth.
On more thing is going through my mind as I am a little bit in a delay (waiting to borrow a truck from a friend to start shopping all that insulation and wood that I would not get into my small car). You recommended not to flush/soffit-mount my speakers at first. I´m still unsure about that as so many people in this forum are very pleased with the benefits from flush-mounting their speakers (especially as John wrote in the "soffit mounting"-Thread that he once soffit-mounted "my" Event 20/20s and they sounded fantastic :D ).
To get this right, do you not recommend this for my room in general, or did you just say I should not start with that, but do it in a later step during progress?
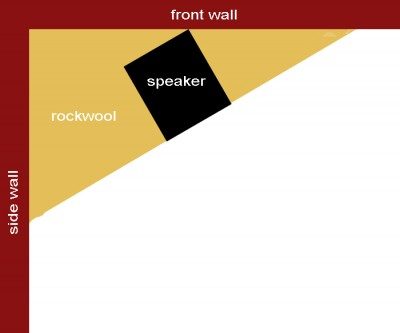
I ask because I was thinking of some how building a "superchunk with integrated soffit-mounted speakers" as one unit. That would probable by less work than doing it in two steps. I Could stretch the superchunks more to the center of the front wall and than just put the speakers inside it.
Just a very basic sketch:
corner1.jpgDos this makes any sense?
Thomas
the speakers will need much more stability than sticking them in a superchunk trap. plus the purpose of the soffit (baffle) mounting is to provide an extended baffle to the speaker which then transitions the lower frequencies more smoothly into the room (and this requires the appropriate baffle step compensation). you would also look to mount the speakers on a 30° angle unless you had no option except to go with a different angle. do some reading (on this site) on how the baffle (soffit) mounting works.
Oh, I´m very sorry, I think my sketch was too basic, I should have put in more detail.
I made it that simple because it was at first just a general question if soffit-mounting could be an option, or if I should forget about it anyway. In your first answer you wrote that you would not soffit mount first, but it was not clear to me if it is not a good idea at all, or if you say that i should start with the cornerchunks an than build something to soffit mount later. Just for the second case, I thought I could make both at once, as a combination.
OK, here is a sketch with a little more detail:
Image not preserved: speaker2.jpg
My idea was to put the speaker on a regular speaker-stand - concrete blocks decoupled with rubber - an than screw a buffle, about 100 cm high and from wall to wall made out of 18 mm chipboard (would that be solid enough?), to the wooden frame I would build anyway to keep the rockwool in place and to staple the fabric cover to.
As far as I understand what i read about soffit mounting in the threads her in the forum, it´s not necessary to have a sealed box around the speaker?
The floor plan is made to scale, and the speaker is at an 30 degree angle. The center of the speaker would be 33 cm from the front wall in to the room, and from that point (centered to the middle of the room), that would gibe me a listening position at 137,5 cm following the 38% rule of thumb.And the tweeter would be at ear-level at 125 cm from the ground. Is that a correct calculation, or did I make a mistake somewhere?
I wish a could sit a little bit nearer to the front wall, but than I would have to move the speakers more to the center of the front wall, and that would make the superchunks a little do deep and to space consuming.
That probably is a point that speaks against soffit mounting, or at least against combining that with the superchunks. I´m still not sure about that.
Again, I really thank you for the time an patience you spend answering all my questions.
Best regards,
Thomas
my first suggestion was to not soffit mount. but if you are going to soffit mount, then you need to consider a couple of things: ventilation of the speaker - especially if it powered and symmetry. otherwise the baffle doesn't have to be sealed but you want it to extend about 2.62 x (speaker radius x pi) or for an 8" (200mm) LF driver - 33" (750mm) approx centered in top, bottom, sides. the basic principles for building the soffit doesn't change just because you want to fill the absorption space... i recommend you read the stickie on soffit mounting.
Dear Glenn,
I didn´t want to just "fill the absorption space", I just thought I could to kill two birds with one stone, while still following the principles. I read the stickie and some other threads about that subject, but maybe I misunderstood something and probably still do. I thought that the (2nd) sketch I made would fit to the requirements, as I have a solid baffle around the speaker that would be about 100 cm in hight and about 125 cm wide, hence even more space than the 75 cm for an 8" LF driver. Ventilation won´t be in issue since the speaker are passive. Sure there wouldn´t be an explicit bass trapping (panels) underneath as in johns design, I thought I could compensate for that by the broadband absorption. But I probably have to do a lot more reading - and understanding... :oops:
Anyway, I decided to follow your suggestion and start with "simple" corner-absorption at the front wall and around the ceiling, and than treat the first reflexion points and the rear wall. After that I can see what more is needed. I probably shouldn´t be to ambitious on my first project. One step at a time...
Thanks again,
Thomas
not a problem, just wanted to make sure you understood there's a few aspects to baffle mounting and if you don't do it right, then it may not perform as expected. you can always build out the soffits later once you determine you want to spend more time on building it out. for many people, proper absorption is sufficient to make their room work for them.
OK, time for a little update - and more questions... :wink:
I´m almost done with the superchunks in the 4 wall to ceiling-corners (I´ll post some pictures later), and the two at the two corners at the front wall. The wall to ceiling-superchunks are just mineral wool covered with thin fabric. I´m not sure what to do with the two at the front wall? Also only fabric, or would it be better to cover them with plastic foil for so HF-reflections and than fabric, so that the room dosn´t get to dull in the HFs?
Right now the room is not dull at all (btw, the room already sounds a lot (!) better, even my girlfriend notice it at once), but there will be more treatment and maybe it could become "over-damped". So should I take that in account now, or should I just stay with the fabric for the Superchunks, and than work with something more reflective, like slotted panels on the first refection point absorbers or at the backwall, if I get problems?
try it out with the cloth, worst case you can pull it off (or built a frame to hold the cloth...) and put on plastic or add some widely spaced slats over the cloth. but overall, it sounds like good progress!
Well, as promised :wink: here are some pictures of the progress I made so far. As you will see I went for the "corner block variation" of a superchunk, as I was to lazy to cut all this triangle pieces :oops: .
Two layers each of 20 cm thick mineral wool cut to 30 cm depth (couldn´t do it 40cm because of the window), fixed in the corner with some chicken wire. I fixed a slat at the wall, and than used a staple gun to fix the chicken wire. I could go directly into the ceiling since it´s drywall, no need for a slat there ...
Image not preserved: C0002.JPG
...covering with fabric, also with the staple gun...
Image not preserved: C0004.JPG
One side finished (the excessive fabric still have to be cut away on that pic):
Image not preserved: C0003.JPG
Frame at the rear wall...
Image not preserved: C0005.JPG
...filled with two layers of mineral wool, the one at the back slightly smaller than the top one to get a little angle...
Image not preserved: C0001.JPG
the finished rear wall (except for some fine tuning of the fabric in the corner), I didn´t need the chicken wire there, just the fabric keeps it in place:
Image not preserved: C0006.JPG
Frame for the front wall superchunks...
Image not preserved: C0008.JPG
...filed with two layers of mineral wool that makes the superchunks 40x50 cm thick...
Image not preserved: C0007.JPG
...and covered with fabric:
Image not preserved: C0009.JPG
And the ceiling of the front wall during progress:
Image not preserved: C0010.JPG
That´s all finished now except for some thin slats I want to user as a "end strip" (correct term?) to cover the stapled endings of the fabric - just for decorative reasons.
All in all it was a little more work than I expected. Maybe I underestimated the fact that I have to do it all alone - and that I did something like that for the first time. I think with two people it would be a lot easier. I probably looked quite silly on the ladder, pressing the mineral wool in the corner with one hand or even with my head, stretching the fabric with the other an the staple gun between my knees ... :lol: But I´m happy with the results so far, so no reason to complain.
The question is, what to do next? I think the ceiling should be the next step. The room already sounds a lot better (subjectively, as I couldn´t do measurements right now), it´s really "dry" now except for some HF-flutter echo that is left.
John often recommends two clouds for small rooms like mine, angled and with a solid top. The one at the front wall rises to the center of the room, and the one in the back falls down to the rear wall, like this one: http://www.johnlsayers.com/phpBB2/viewtopic.php?f=3&t=14058&p=98431#p98431
Would it be a good idea to do it that way?
Or are there any other recommendations what to do next?
First reflection points? I´m thinking about building some mobile units (you call them gobo, right?) and place them there. That would give me the possibility to maybe use the rear of the room for some vocal overdubs or for recording some acoustic guitars etc., and move the gobos over there for that purpose.
Rear wall? I´m not sure what to do there. My idea with the VPRs turned out to be quite expensive, just the acoustic foam and the metal plates for two 1x1,5m absorbers would be about 300 €.
Front wall? I would like to keep this untouched until the rest of the room is done, so I have the possibility to move the speakers and maybe build something for soffit-mounting later.
Best regards,
Thomas
the solid back clouds would work. or simply absorptive clouds. or several angled ones with various amounts of hard surfaces. depends on the desired effect and if you have room modes which need to be handled that way. the mobile side absorbers are an OK idea but most times best to find the spots and leave them. build mobiles ones for the other purpose. the back wall could be more absorbers, absorbers covered with widely spaced slats, or even an angled slat resonator.
Thanks again, Glenn.
I stuck a bit with the ceiling, because I still think about what to do with the original ceiling. Just paint in an use so large (or many) clouds that it won´t matter if the rest is untreated, or cover the whole thing with at least something a little absorbent. I should be clear with that before mounting any clouds.
In the meantime, I have build 4 simple panels, 10 cm mineralwool in a wooden frame, covered with fabric, 1,10m x 80 cm, so if I put one on top of another, it will be nearly floor to ceiling (correctly, up to the upper corner absorbers). With the superchunks at the frontwall 50cm into the room and the 80cm panels aside, If´got 130 cm of "pure sidewall absorption" :wink:, that should cover all first reflections (except for the ceiling of cause) as my listening position - following the 38% rule of thump - would be around 1,5 meters.
I will use them at least temporary as "mobile units" so I can move them around a bit, and even to check other probably "critical spots" in the room.
I still can fix them to the wall later, or build something a little better like johns sidewall-slat resonators, and use the panels somewhere else, store them away for the case that I will do some recordings in the room, or even take them to our rehearsal/recording room.
But with the corners done an the 4 panels at the first reflection points next thing I want do is take some measurements with RoomEQ Wizard. I took some in the emty room before I started this "project", so I hope that will give me a little more objective information what already changed and what more is needed. Could be helpful to check how critical the floor to ceiling room modes are, and than to decide what kind of clouds to build, wouldn´t it?.
Oh, and yes, the backwall will get more treatment for sure. For the measurements I think about using some of the mineralwool that´s left (still 7m x1,2m 20 cm thick) and just lay it against the backwall to check what changes with or without it.
But I think in the end I will need something a little more reflective there, like spaced slats up front as you mentioned, or maybe even some diffusers, like Ethan Winer promotes a lot (yes, I know that diffusion in a small room is considered very critical, just thinking about it as an option). I fear that otherwise the room will get a little do dead in the hights and mids, but that could be the case only because I´m yet not used to the room sounding so dry as it already sounds now compared to how it sounded before.
Anyway, that decision will come much later. The ceiling will be next after the measurements are done.
Best regards,
Thomas
Depending on close the clouds are to the ceiling would determine if you need more absorbers underneath. If you're off the ceiling by more than 300mm, I'd add them.
The room is about 2,7 m high, so I think 300mm would just be roundabout the distance where the clouds should go?
It would probably be better to cover all of the ceiling to be "on the safe side", and than use clouds just for optimization. But I´m still not sure what to use. Mineral wool would be dificult to fix up there an to cover properly, especialy as I dont want to do too much drilling in the ceiling since the room ist rented and the clouds will already need that.
The best would be to have something that could be glued, but when I look for comercial products, there are only this polystyrene panels that probably won´t work as a good absorber, or acoustic foam, this ugly gray pyramid-shaped overpriced stuff.
I think it´s time for another "sightseeing-tour" at my lokal home improvement store, maybe I find inspiration for something that will work.
Well, I just finished the measurements. Both the before and after where done "quick and dirty", so maybe the mic position was not a 100% the same, the speakers are still on my desk etc., but I think the setups has been quite comparable to each other.
So here are the graphs (I followed the max. 700pixel width forum-rule, so not much details):
Image not preserved: empty fr.jpg
Image not preserved: 1st treatment fr.jpg
Image not preserved: empty wf.jpg
Image not preserved: 1st treatment wf.jpg
Image not preserved: empty ir.jpg
Image not preserved: 1st treatment ir.jpg
Well, the frequency response is still far from great, in some areas even worse then before (the "holes" around 4khz and 16 khz, plus the big null at 200hz that wasn´t there before), but the bass range is already a lot flatter.
And the improvements in the decay time are huge, from 750ms to about 250ms, and the waterfall speaks for its own, I think.
But that´s only the "scientific" part of the story. The other part is, after I finished the measurements I could hear the (so far) treated room for the first time under real listening conditions through my monitors, not the old hifi-stuff I set up during the last weeks while I was working at the room - and WOW, what a difference. I mean, really WOW!!
I just played some of my favorite records that I also like to use as a reference. Abbey Road was first, an here comes the sun was never so sunny, I thought about getting my sunglasses... 8)
Coltrane/my favorite things - so intimate, Slayer/reign in blood - so much punch, Euro Boys/long days flight - so much detail, I just jumped from record to record, Black Sabbath, Nick Cave, RZA, Brian Auger, The Notwist, Miles Davis, Madonna, Lee Hazlewood, Johnny Cash...
OK, I won´t get to enthusiastic, but anyway, the difference is huge. Especially the bass is so much tighter and more focused, the stereo image spreads out much better, and lots of detail reveals that were hardly there before.
I expected an improvement, but not that it would be so dramatically so early during the process of optimizing the room.
Well, yes, I know there is still a lot to do, but a great feeling to know that I´m on the right track.
OK, enough for todays "report"... :wink:
Thomas