Supersoul-Studio DIY photos

Started by Purusha on 9 June 2010. 33 replies. In the Library under Build diaries. Key posts in this thread.

Originally posted at johnlsayers.com, topic 14459.

Step by step photos of my home studio project
External image, not preserved — original: http://www.diy-racked.com/studio/Studio%20DIY%20plan%201.jpg
External image, not preserved — original: http://www.diy-racked.com/studio/Studio%20DIY%20plan%202.jpg
External image, not preserved — original: http://www.diy-racked.com/studio/Studio%20DIY%20plan%203.jpg
External image, not preserved — original: http://www.diy-racked.com/studio/Studio%20DIY%201.jpg
External image, not preserved — original: http://www.diy-racked.com/studio/Studio%20DIY%202.jpg
External image, not preserved — original: http://www.diy-racked.com/studio/Studio%20DIY%203.jpg
External image, not preserved — original: http://www.diy-racked.com/studio/Studio%20DIY%204.jpg
External image, not preserved — original: http://www.diy-racked.com/studio/Studio%20DIY%205.jpg
External image, not preserved — original: http://www.diy-racked.com/studio/Studio%20DIY%206.jpg
External image, not preserved — original: http://www.diy-racked.com/studio/Studio%20DIY%207.jpg
External image, not preserved — original: http://www.diy-racked.com/studio/Studio%20DIY%208.jpg
External image, not preserved — original: http://www.diy-racked.com/studio/Studio%20DIY%209.jpg
External image, not preserved — original: http://www.diy-racked.com/studio/Studio%20DIY%2010.jpg
External image, not preserved — original: http://www.diy-racked.com/studio/Studio%20DIY%2011.jpg
External image, not preserved — original: http://www.diy-racked.com/studio/Studio%20DIY%2013.jpg
External image, not preserved — original: http://www.diy-racked.com/studio/Studio%20DIY%2014.jpg
External image, not preserved — original: http://www.diy-racked.com/studio/Studio%20DIY%2015.jpg
External image, not preserved — original: http://www.diy-racked.com/studio/Studio%20walls%2016.jpg
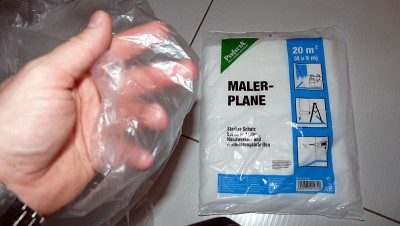
I have a question regarding the superchunks and broadband absorbers. Can I cover them with very thin layer of PVC folio before putting the cloth over? I am concerned to have the rock-wool micro fibres airborne in the studio if I cover them with cloth only. I believe also they use some chemicals in the process of making the rock-wool which could vaporize in time.
BUMP on my question....
If PVC folio is the same thing or equal to .35 mil plastic, yes you can cover them up. It has been suggested and even mentioned that you can gain back some of the audible highs in a room just by doing this very thing, which makes sense.
It's a very very thin and light plastic folio, for covering the furniture while painting. I attached a photo if it helps.
PVC.jpg
PVC.jpg
Thing is, the fabric will stop any air-borne particles. But you can install the plastic/folio if it makes you feel better/safer. Good luck.
OK, Thanks. I will use it. I prefer not to breath the formaldehyde from the rock-wool ...
More photos. Working on the ceiling ...
External image, not preserved — original: http://www.diy-racked.com/studio/Studio%20DIY%2016.jpg
External image, not preserved — original: http://www.diy-racked.com/studio/Studio%20DIY%2017.jpg
External image, not preserved — original: http://www.diy-racked.com/studio/Studio%20DIY%2018.jpg
External image, not preserved — original: http://www.diy-racked.com/studio/Studio%20DIY%2019.jpg
External image, not preserved — original: http://www.diy-racked.com/studio/Studio%20DIY%2020.jpg
External image, not preserved — original: http://www.diy-racked.com/studio/Studio%20DIY%2021.jpg
External image, not preserved — original: http://www.diy-racked.com/studio/Studio%20DIY%2022.jpg
External image, not preserved — original: http://www.diy-racked.com/studio/Studio%20DIY%2023.jpg
External image, not preserved — original: http://www.diy-racked.com/studio/Studio%20DIY%2024.jpg
First testing of the room so we can compare what was improved later on...
External image, not preserved — original: http://www.diy-racked.com/studio/Studio%20DIY%2025.jpg
External image, not preserved — original: http://www.diy-racked.com/studio/Studio%20DIY%2026.jpg
Superchunks in it's place....
External image, not preserved — original: http://www.diy-racked.com/studio/Studio%20DIY%2027.jpg
External image, not preserved — original: http://www.diy-racked.com/studio/Studio%20DIY%2028.jpg
External image, not preserved — original: http://www.diy-racked.com/studio/Studio%20DIY%2029.jpg
I'm looking and liking! I'm thinking that room is going to sound nice! :) - Stuart -
I really hope so. It would be sad to invest so much work and money and not having a good room to work in :oops: Next week I am making all the side and top absorber panels, than I have a marathon in making the 18 QRD panels.
Great work purusha, lotsa screws there in those ceiling panels! wow.. One question: I noticed you use wood for frames and have put wool in there. how did you do that? Just making the panels a bit bigger so they get "stucked" in the frame? Of have any construction behind the wool? I'm asking because I'm in the process of filling my woodframe with wool and am not sure if just cramming them in will do... love to hear from your experience.
The best way is to make the space -0,5cm less high and wide to fit in the panels tight. Check my photos, I used also a wire to make sure they can't fall out behind the panels. But it's not necessary IMO... if you are using the hard 80kg/m3 wool. Will post some nice photos in a day or two about the latest progress. 8)
Okay, thanks!
Latest update. Cloud is up...
External image, not preserved — original: http://www.diy-racked.com/studio/Studio%20DIY%2030.jpg
It took 5 strong man to lift it up :twisted:
External image, not preserved — original: http://www.diy-racked.com/studio/Studio%20DIY%2031.jpg
Side diffusion absorbers with some extra absorber panels.
External image, not preserved — original: http://www.diy-racked.com/studio/Studio%20DIY%2032.jpg
Close up photo. It took me almost 3 days to finish these.
External image, not preserved — original: http://www.diy-racked.com/studio/Studio%20DIY%2033.jpg
Aaaaa, parqet and new sofa is in :P
External image, not preserved — original: http://www.diy-racked.com/studio/Studio%20DIY%2034.jpg
First improvised mixing session.
External image, not preserved — original: http://www.diy-racked.com/studio/Studio%20DIY%2035.jpg
It sounds awesome already.
External image, not preserved — original: http://www.diy-racked.com/studio/Studio%20DIY%2036.jpg
Entrance ...
External image, not preserved — original: http://www.diy-racked.com/studio/Studio%20DIY%2037.jpg
Again the side diffusors ....
External image, not preserved — original: http://www.diy-racked.com/studio/Studio%20DIY%2038.jpg
Getting closer to my dream studio
Nice Studio, and nice pictures, really helped me to understand the building techniques, thanks ! Maybe I'll visit, I'm planning to go to Ljubljana next year ;) ! -fx
Thanks! fxdfxd, you are welcome. Next photos will be with finished furniture and microfibre all over the place. BTW, we did second measuring of the room EQ and it came out pretty good. I have one place with +/- 6db around 60Hz, the rest is only +/- 3db here and there. I will make some pouf resonators to fix this problem and put them beside the couch...
Oh, and I'm pleased to see that I'm not the only one with concerns about the wool fibers floating in the studio ! -fx
How what? :roll: I am concerned with wool as well. Although my designer's father worked in one company as health care guy and he said that rock-wool is not lethal for the health as the small parts will leave the lungs in time. It's not like with asbestos fibbers. Personally I am more concerned with glues and formaldehyde which they put inside. That's why I used nylon on the top places.
Good to know, and I edited my post above ;) What resilient material did you put under your wall framing ? Did you make some calculation to know the density, resilience, etc... or did you just throw it under and hoped for good results ? Thanks ! -fx
I just bought a 10mm rubber material and put it under. So fas so good :)
Ok, thanks ! I'll make it simple too ;) -fx
Hi Purusha One more question, what did you use to fix the framed wall to the floor ? Something special to avoid sound transmission ? Thanks ! -fx
I did not fixate it to the floor. The weight alone is fixing it enough and the frame around the room is fixed in it's self also. I did screw it on the top though, just to make it vertically correct 90°.