Lou's Studio - Construction Phase
Moderators: Aaronw, John Sayers
-
joey
- Posts: 185
- Joined: Mon Aug 21, 2006 3:43 am
- Location: south london uk
-
johnp
- Posts: 78
- Joined: Mon Apr 09, 2007 4:38 pm
- Location: Oxfordshire, UK
Hi Lou
Its looking awesome!
Thanks for the tips on building/planning control and took your advice
As fyi, i double checked with planning and building control as per your recommendation. All drawings are now in and hoping to hear in the next week or so. Both Builder and Architect seem to think there wont be any issues but we'll see.
Out of interest, it looks like (well at least from one of the pics) you are using Travis Perkins, wondered what brand was your ducting ?
Also, Are you planning aircon/fresh air etc for your room. What have you decided on ?
again for fyi, i've been in email to these guys http://www.global-cooling.co.uk/ and they seem quite helpful.
At first i was looking at the Daikin Ururu Sarara which came up on one of the other threads but they say that its not available in the UK due to its high ambient temperature required for cooling mode.
I'm hoping to have something very similar to "Scotts Studio" http://www.johnlsayers.com/Studio/Pages/Scott_1.htm (Thanks John and Scott for this link) and their suggestion is a Daikin ducted 6kW unit, with 2 x 100mm supply and 2 x 100mm return for each area, reduced down from the 2 x 200mm plenums. However if you prefer 200mm dia. ducting this is fine also.
The Daikin ducted range of air conditioning is possibly the quietest available.
An estimate for this price would be £ 4946-98 inc. vat @ 5% Rate.
This would include a fresh air induction kit into the ducted internal fan coil unit from outside, and acoustic insulated techtherm ducting, along with necessary air control manual baffles.
The Kit would be the Daikin FBQ60B + RXS60E with controller as BRC1D.
Its well early for me to be thinking of detail design here seeing as i'm STILL draining trenches but of all the build topics, the air con has me most confused
Anyway, this may or may not be any use but though i'd post the info anyway
Can't wait for more photos...and hopefully in about 4 weeks or so i hope to start my own build thread!
cheers
John
Its looking awesome!
Thanks for the tips on building/planning control and took your advice
As fyi, i double checked with planning and building control as per your recommendation. All drawings are now in and hoping to hear in the next week or so. Both Builder and Architect seem to think there wont be any issues but we'll see.
Out of interest, it looks like (well at least from one of the pics) you are using Travis Perkins, wondered what brand was your ducting ?
Also, Are you planning aircon/fresh air etc for your room. What have you decided on ?
again for fyi, i've been in email to these guys http://www.global-cooling.co.uk/ and they seem quite helpful.
At first i was looking at the Daikin Ururu Sarara which came up on one of the other threads but they say that its not available in the UK due to its high ambient temperature required for cooling mode.
I'm hoping to have something very similar to "Scotts Studio" http://www.johnlsayers.com/Studio/Pages/Scott_1.htm (Thanks John and Scott for this link) and their suggestion is a Daikin ducted 6kW unit, with 2 x 100mm supply and 2 x 100mm return for each area, reduced down from the 2 x 200mm plenums. However if you prefer 200mm dia. ducting this is fine also.
The Daikin ducted range of air conditioning is possibly the quietest available.
An estimate for this price would be £ 4946-98 inc. vat @ 5% Rate.
This would include a fresh air induction kit into the ducted internal fan coil unit from outside, and acoustic insulated techtherm ducting, along with necessary air control manual baffles.
The Kit would be the Daikin FBQ60B + RXS60E with controller as BRC1D.
Its well early for me to be thinking of detail design here seeing as i'm STILL draining trenches
Anyway, this may or may not be any use but though i'd post the info anyway
Can't wait for more photos...and hopefully in about 4 weeks or so i hope to start my own build thread!
cheers
John
-
Lou
- Senior Member
- Posts: 401
- Joined: Thu Dec 28, 2006 1:03 am
- Location: Hampshire, United Kingdom
- Contact:
Hi Guys – as always, hope you’re all doin’ Ok!
Thanks for the comments Chaps – always nice to know that people are interested.
Geoff………………….Hey! Of course Dude, as you’ll see, but many thanks for the thought.
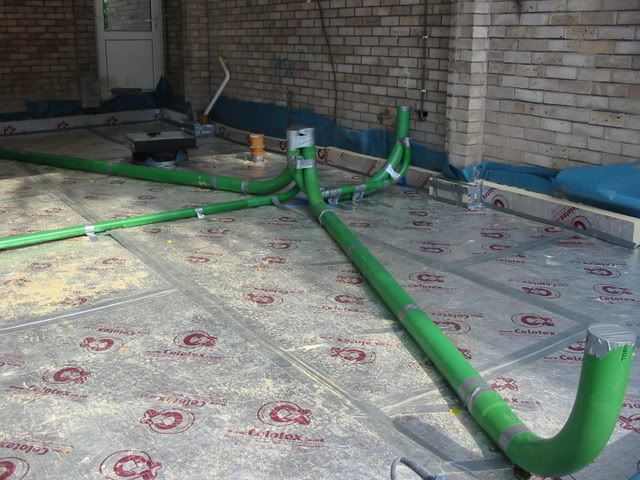
Joey – Thanks for the tip Mate, but to be honest, as lots of people up here know it’ll be many many weeks, probably even months before I need to start pulling cables through my ducting. When I do need to do that, I’ll use a simple steel tape (as shown in my previous post) to push through each duct, then attach two draw chords and pull them back through so that they both overlap either end by 300mmm or so. I then intend to pull my cables one at a time from each end of the duct as follows:
Attach the first cable to one of the draw cords and pull through, then, attach second cable together with the cord just pulled to the cord still in the duct and pull back from the other end. This ensures that there’s always one draw cord in the duct until you’re finished, and furthermore makes it much easier to pull since you’re not trying to pull 32 cables in one go!
John – nice to hear from you Buddy, in fact we were up your neck of the woods last Sunday! I decided to take heed of some of Len Morgan’s great advice in his sticky by remembering that my loved ones will far outlive any studio I build, so we all went for a day out to here:
Warwick Castle – a really great time! (Americans love English Castles!)

Unfortunately, my miserable neighbour followed us!

And, She had the last laugh!

Seriously John to your points, I’m real glad you’ve decided to go down the legit route with an Architect and planning permission etc, I promise it will potentially save you no end of grief, could I also suggest that you get him to draw up your regulations drawings for building control as well? He’ll probably cut you some sort of deal if he’s doing these as well as your site plan, location plan, elevations and floor plans! Yes Mate you need plenty of drawings but it’s worth it. One word on building control in the U.K. Just keep playing dumb, keep telling them that you’re just trying to get everything right, that you’ve never done this before etc (basically make them feel like a superior band of civil servants) and they will be oh so, so helpful.
Good luck – you’ll be fine.
As for my supplier – yes, I do indeed use Travis Perkins for all my materials. I opened an account with them. I would suggest you open an account with whoever is nearest to you, Travis, Jewsons, Elliots, Builder Center etc. I say this because you’ll then know that when it comes to delivery times you’ll always be first or last drop of the morning or afternoon. I could walk to my local TP in 15 minutes! Very handy indeed.
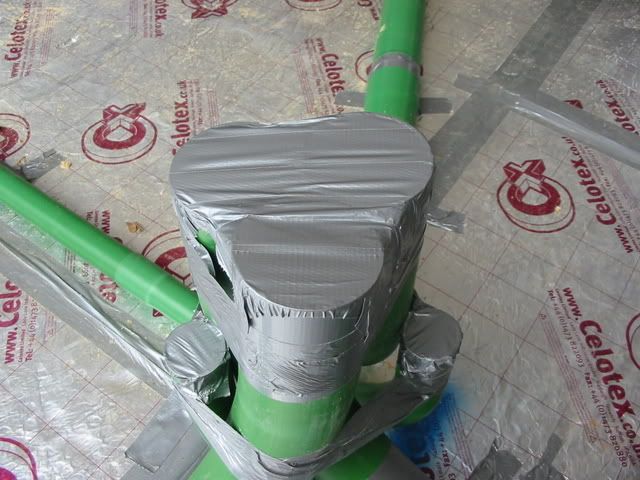
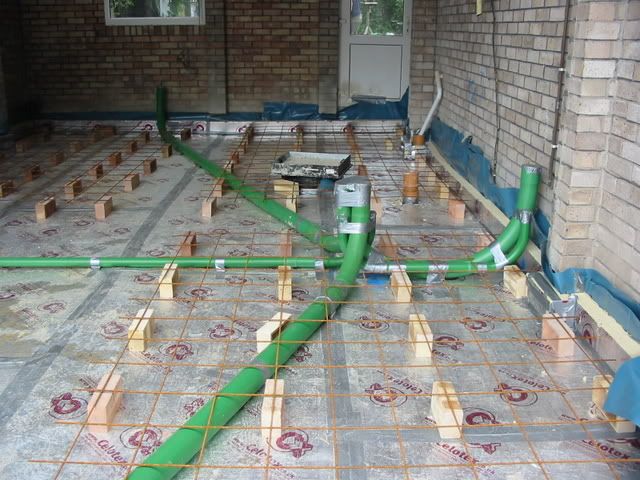
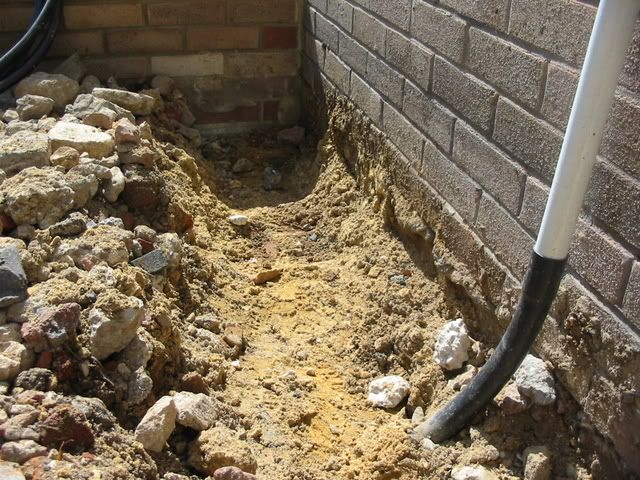
Re the ducting – as I said in my last post, a Mate literally dropped it free of charge on my driveway! I’ve checked for you, and there’s no brand name, but it is the same stuff as the cable TV guys use!!
Air – Con? Well, like you, it confuses me somewhat but I am finding that Rod’s book is helping. I have decided that I will need two systems; one for my control room and a separate system feeding both my live room and iso booth. As for make and model, I haven’t got that far yet but am very seriously looking at 3 or 4 solar panels on the roof to provide the power for it. I’ll let you know more when I’ve done more research!
OK, guys, here comes the update:
Especially for Geoff
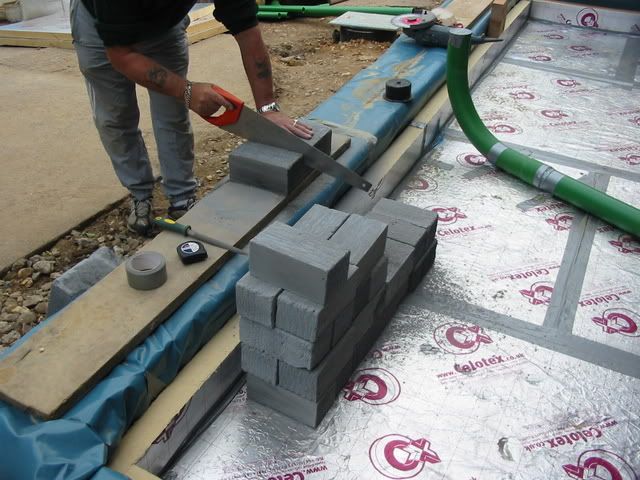
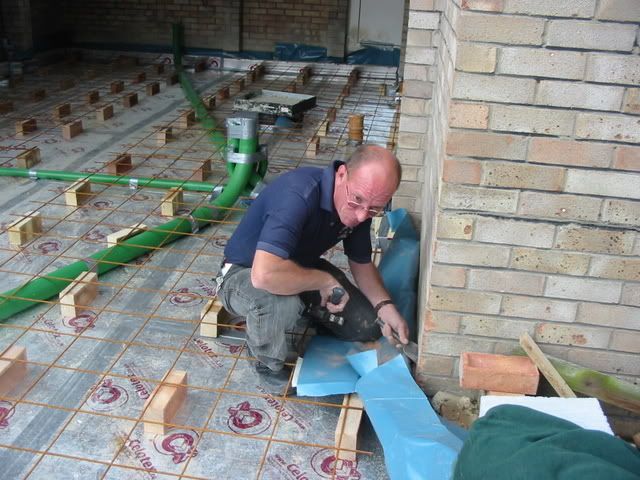
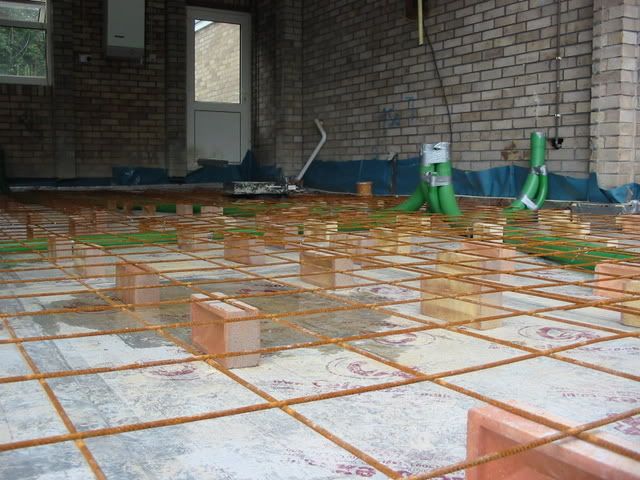
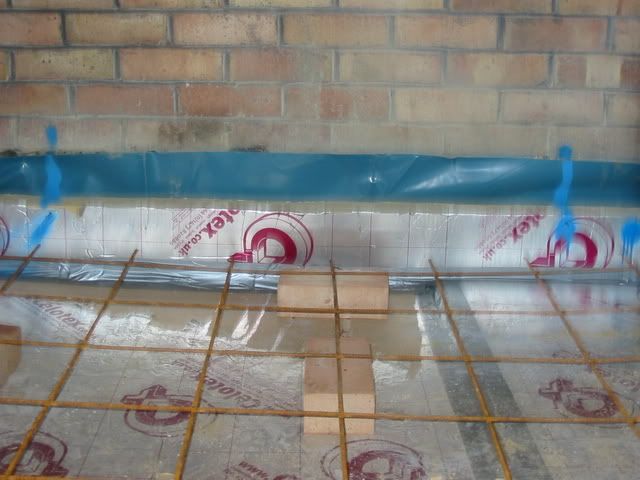
Then, an unintended cock-up. Trev and I painstakingly cut Thermolite blocks to act as supports for the steels (the ‘chairs’ are £5.60 each), only to be told by good old Span that we can’t use them as they could well float in the concrete.
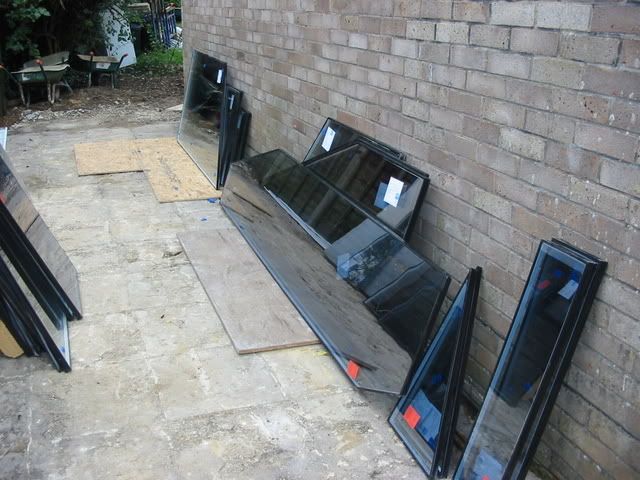
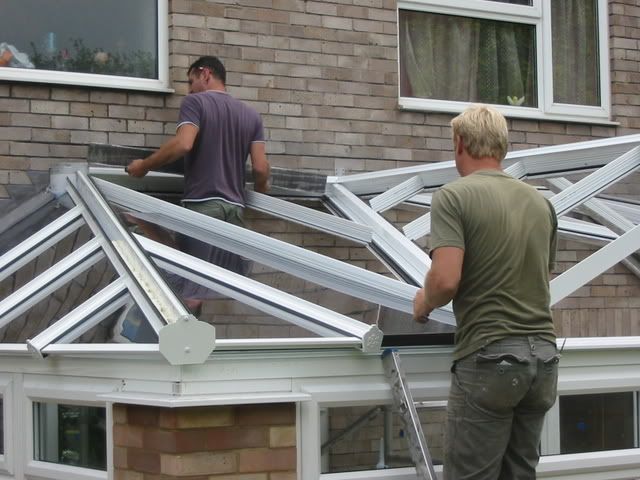
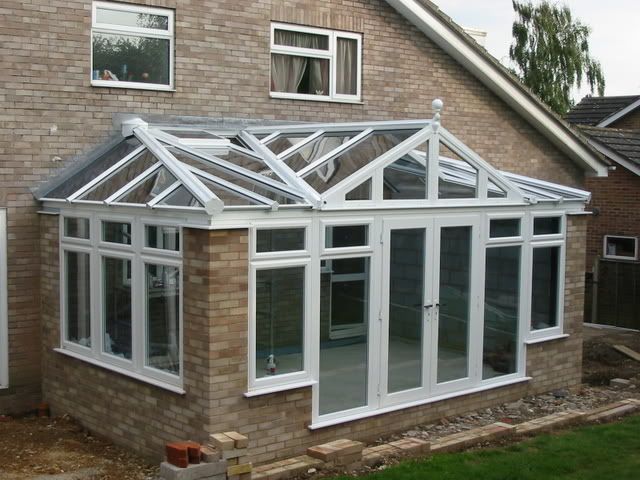
Chillout glass starts to arrive – this is the solar control tinted stuff for the roof
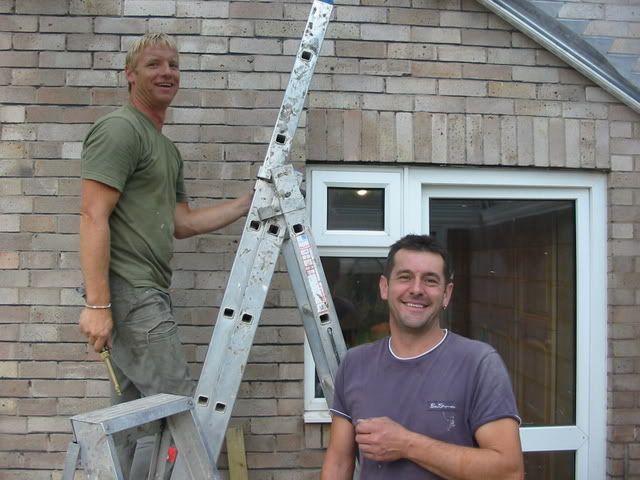
Phil and Steve crack on with the flashing
And pause for the obligatory photo call
The glass starts to go in
Steve – the ‘Mission Impossible’ shot!
Trev and I start assembling the steel – but this time supported with bricks
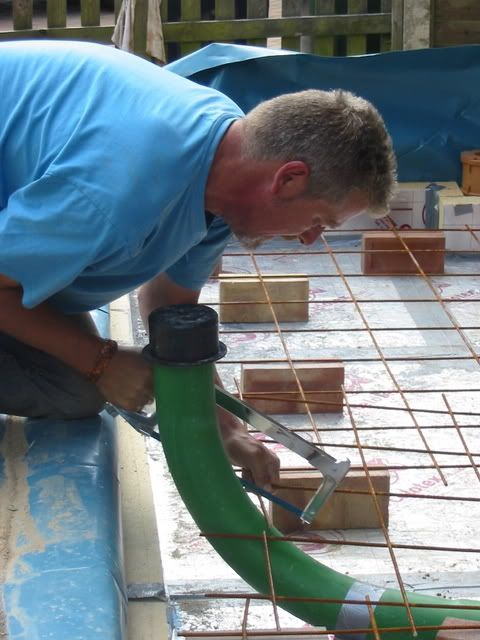
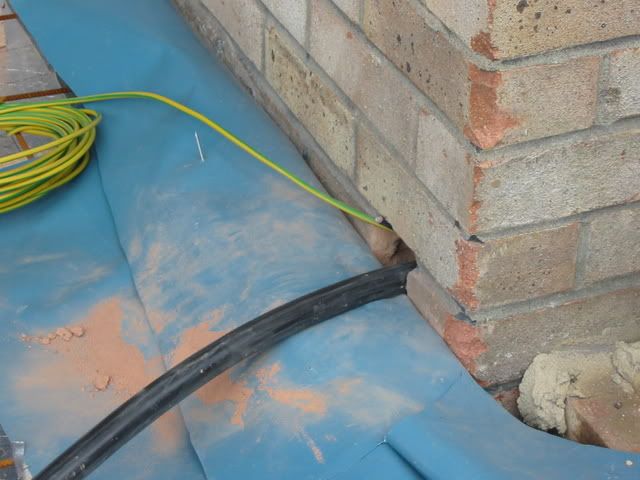
Introducing Graham – a top bloke and an excellent spark – cutting in the armoured cable to run to the new isolating switch in the house
Which will be here
Why the hell didn’t I buy bolt-cutters?
There! All nice and tidy!

The last little bit
Definitely the wrong shoe size for this job (UK12 – US 14 – Eur 47!)
Tie-in to make safe for Pete and Span tomorrow
I could almost do this for a living (Not!). Steel in top third of the concrete, bricks lying parallel to the concrete flow.
Feeling a bit chuffed with myself, to be honest!
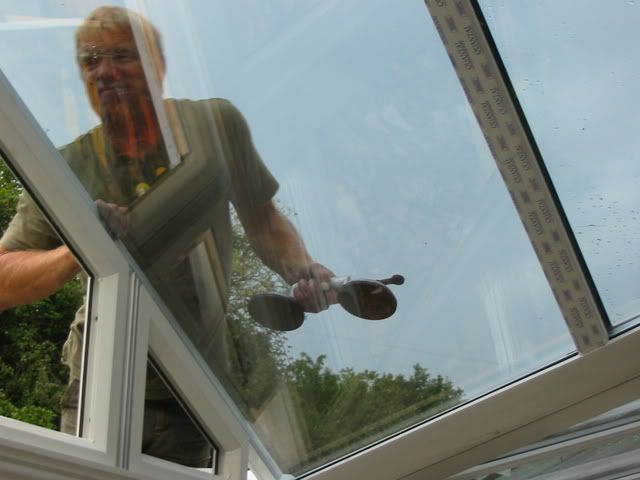
All chill out area glass in and weatherproofed
Armoured cable now running back from studio to isolating switch
As shown
All guttering now fitted including the downpipe to the soakaway we dug a couple of weeks ago
And finally, my friends, the mandatory arty shot of the chill out area roof, which, if you don’t mind me sharing, I designed!

And that’s it for now, guys. The concrete goes in tomorrow and I will finally have my isolated (hopefully well-engineered), ducted slab. Off out now with Sarah for a well-earned relaxing evening.
Stay tuned
Regards
Lou
Thanks for the comments Chaps – always nice to know that people are interested.
Geoff………………….Hey! Of course Dude, as you’ll see, but many thanks for the thought.
Joey – Thanks for the tip Mate, but to be honest, as lots of people up here know it’ll be many many weeks, probably even months before I need to start pulling cables through my ducting. When I do need to do that, I’ll use a simple steel tape (as shown in my previous post) to push through each duct, then attach two draw chords and pull them back through so that they both overlap either end by 300mmm or so. I then intend to pull my cables one at a time from each end of the duct as follows:
Attach the first cable to one of the draw cords and pull through, then, attach second cable together with the cord just pulled to the cord still in the duct and pull back from the other end. This ensures that there’s always one draw cord in the duct until you’re finished, and furthermore makes it much easier to pull since you’re not trying to pull 32 cables in one go!
John – nice to hear from you Buddy, in fact we were up your neck of the woods last Sunday! I decided to take heed of some of Len Morgan’s great advice in his sticky by remembering that my loved ones will far outlive any studio I build, so we all went for a day out to here:
Warwick Castle – a really great time! (Americans love English Castles!)
Unfortunately, my miserable neighbour followed us!
And, She had the last laugh!
Seriously John to your points, I’m real glad you’ve decided to go down the legit route with an Architect and planning permission etc, I promise it will potentially save you no end of grief, could I also suggest that you get him to draw up your regulations drawings for building control as well? He’ll probably cut you some sort of deal if he’s doing these as well as your site plan, location plan, elevations and floor plans! Yes Mate you need plenty of drawings but it’s worth it. One word on building control in the U.K. Just keep playing dumb, keep telling them that you’re just trying to get everything right, that you’ve never done this before etc (basically make them feel like a superior band of civil servants) and they will be oh so, so helpful.
Good luck – you’ll be fine.
As for my supplier – yes, I do indeed use Travis Perkins for all my materials. I opened an account with them. I would suggest you open an account with whoever is nearest to you, Travis, Jewsons, Elliots, Builder Center etc. I say this because you’ll then know that when it comes to delivery times you’ll always be first or last drop of the morning or afternoon. I could walk to my local TP in 15 minutes! Very handy indeed.
Re the ducting – as I said in my last post, a Mate literally dropped it free of charge on my driveway! I’ve checked for you, and there’s no brand name, but it is the same stuff as the cable TV guys use!!
Air – Con? Well, like you, it confuses me somewhat but I am finding that Rod’s book is helping. I have decided that I will need two systems; one for my control room and a separate system feeding both my live room and iso booth. As for make and model, I haven’t got that far yet but am very seriously looking at 3 or 4 solar panels on the roof to provide the power for it. I’ll let you know more when I’ve done more research!
OK, guys, here comes the update:
Especially for Geoff
Then, an unintended cock-up. Trev and I painstakingly cut Thermolite blocks to act as supports for the steels (the ‘chairs’ are £5.60 each), only to be told by good old Span that we can’t use them as they could well float in the concrete.
Chillout glass starts to arrive – this is the solar control tinted stuff for the roof
Phil and Steve crack on with the flashing
And pause for the obligatory photo call
The glass starts to go in
Steve – the ‘Mission Impossible’ shot!
Trev and I start assembling the steel – but this time supported with bricks
Introducing Graham – a top bloke and an excellent spark – cutting in the armoured cable to run to the new isolating switch in the house
Which will be here
Why the hell didn’t I buy bolt-cutters?
There! All nice and tidy!
The last little bit
Definitely the wrong shoe size for this job (UK12 – US 14 – Eur 47!)
Tie-in to make safe for Pete and Span tomorrow
I could almost do this for a living (Not!). Steel in top third of the concrete, bricks lying parallel to the concrete flow.
Feeling a bit chuffed with myself, to be honest!
All chill out area glass in and weatherproofed
Armoured cable now running back from studio to isolating switch
As shown
All guttering now fitted including the downpipe to the soakaway we dug a couple of weeks ago
And finally, my friends, the mandatory arty shot of the chill out area roof, which, if you don’t mind me sharing, I designed!
And that’s it for now, guys. The concrete goes in tomorrow and I will finally have my isolated (hopefully well-engineered), ducted slab. Off out now with Sarah for a well-earned relaxing evening.
Stay tuned
Regards
Lou
-
sandledfoot
- Posts: 181
- Joined: Wed Sep 13, 2006 2:40 am
- Location: Morgantown WV
lou,
your threads been just great to keep up with. the glass roof is just awesome, beautiful work there. keep up the progress updates.
(and yes, we americans do love castles)
heres proof
http://www.cnn.com/2007/TRAVEL/getaways ... newssearch
cheers
kevin
(ps... i'm not english by any stretch, however, since i work in a university, there are many brit and ozians prof here, and i've picked up "cheers" from them)
studio construxcion.... it hurts my brain.
-
TomVan
- Senior Member
- Posts: 412
- Joined: Sat Nov 19, 2005 2:30 am
- Location: Gresham OR
- Contact:
-
sharward
- Moderator
- Posts: 4281
- Joined: Mon Jan 03, 2005 4:08 pm
- Location: Sacramento, Northern California, USA
- Contact:
Awesome, Lou!!
That 3D glass roof design is downright beautiful!!
I'm utterly disgusted with the speed and quality of your work. Disgusted because I wish I could be doing the same!
Take all the arty shots you wish, my friend.
--Keith
That 3D glass roof design is downright beautiful!!
I'm utterly disgusted with the speed and quality of your work.
Take all the arty shots you wish, my friend.
--Keith
"Converting a garage into living space requires a city permit . . . homeowners insurance won't cover a structure that's been changed without a building permit . . ." --Sacramento Bee, May 27, 2006
-
SquarePants
- Posts: 66
- Joined: Thu Aug 02, 2007 7:44 am
- Location: NSW Australia
-
joey
- Posts: 185
- Joined: Mon Aug 21, 2006 3:43 am
- Location: south london uk
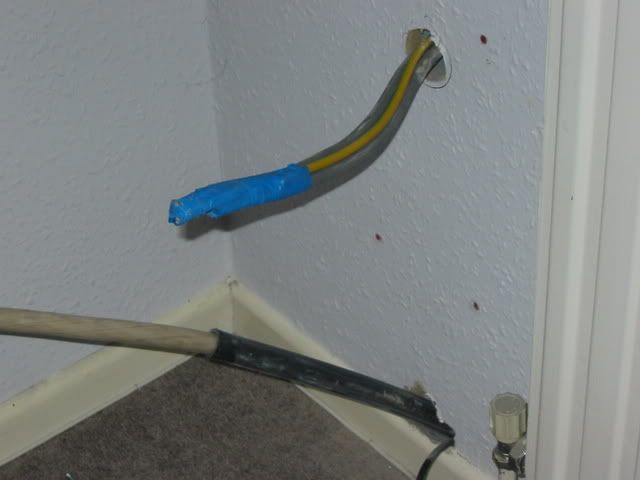
hey man looks good to me. could you tell me how many cores are in the armoured cable? and does it get power from the twin earth above in the isolation box in pic? is it single phase. just asking because ill be running power to my outbuildig from my house with armoured cable but theres loads of different cores you can get. (wont be doing this my self any way just tring to understand). thanks
-
Lou
- Senior Member
- Posts: 401
- Joined: Thu Dec 28, 2006 1:03 am
- Location: Hampshire, United Kingdom
- Contact:
Hi Guys – How y’all doin’? It’s Bank Holiday Sunday here in the U.K. – Sarah and I went to a party yesterday afternoon (late one!), and we’re off to another one in a bit, so I thought I’d get this post in before we go.
Firstly, chaps, what a great set of posts and compliments, thank you all very much indeed. God! Don’t I just sound so English!
Kevin – So good to hear from you, mate, and thank you for the kind words. Your curved wall is a joy to the eye, but I don’t think it’s possible for anyone to top the ‘Rock Wall’ – incredible! Well done.
Tom – I’ve been following your thread as well, mate. Could you please let me know where you got your neon sign from? Contact details of where your wife purchased it would suffice. As for the photos-to-work ratio, nothing clever here at all, other than always having the camera to hand. Thanks for the encouragement, kind Sir.
Keith – as always, mate, very many thanks. (Glad you, too, like the ‘arty shots’.)
Geoff – Thank you, too, buddy.
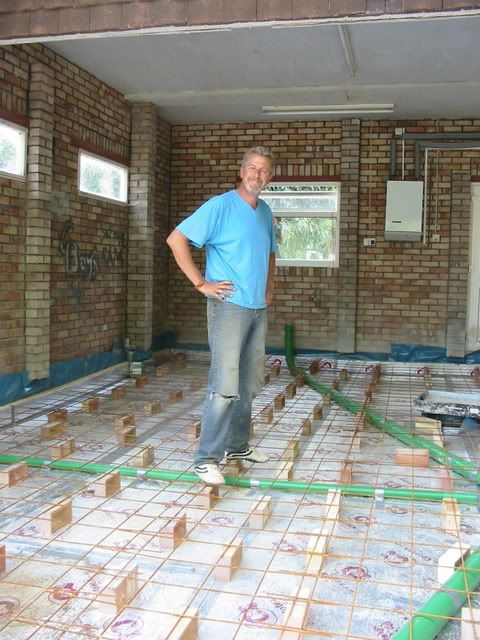
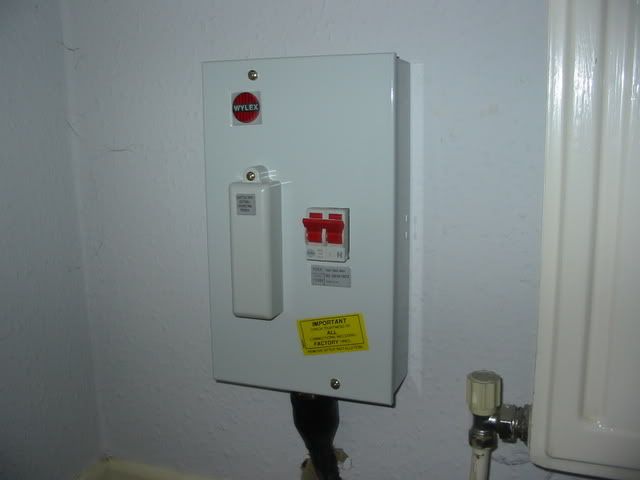
Joey – I’ll tell you it’s 3 core, but that is somewhat misleading since there’s about 15 strands of heavy duty copper in each core, it’s around 25mm in diameter, and yes it is powered from the ‘twin and earth’ pictured above the isolating switch, but that’s not twin and earth you see, my friend! Now, I’ll try and clarify this for you if I can, but get a spark*, dude, trust me you won’t get this one right on your own. (Yes, I know you said you were going to get someone – but hey, just making sure).
U.K. regulations dictate that you cannot have the ‘tails’ (that’s what you’re actually seeing) from your meter to your consumer unit longer than 3 meters without an isolating switch. If you recall my previous posts, the new meter box is now on the front of the property, pretty much on the other side of the wall to the new isolating switch. So, yes the armoured cable is being powered by those tails, it’s now running back through the studio (in the screed level) to the new consumer unit location inside the house, from there a separate feed will be fed back to the studio for power. I’m sorry if you’re still confused, but Graham (my spark) is here all day today, I’ve taken pictures of course, and will update when I have more time.
* for overseas readers “Spark” = Electrician!
So now to the update – yesterday, frankly Gentlemen, was the pinnacle of the project so far! An almost monumental milestone was reached, the bonding of human understanding was ‘cemented’ forever! Boy, what a ‘bitch’ and not without complications……………………….here it comes!
TTP (time to pour) -1hr 40 mins and I’m instructed by phone to set up the ‘Dumpy level’
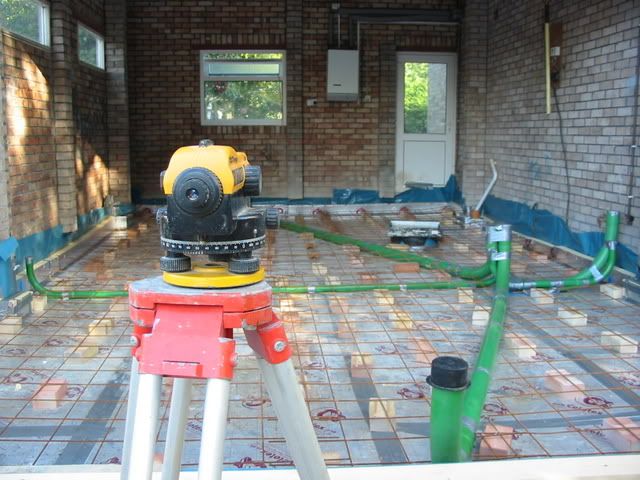
The bubble in the center of the circle is proof that I got that bit right… phew!
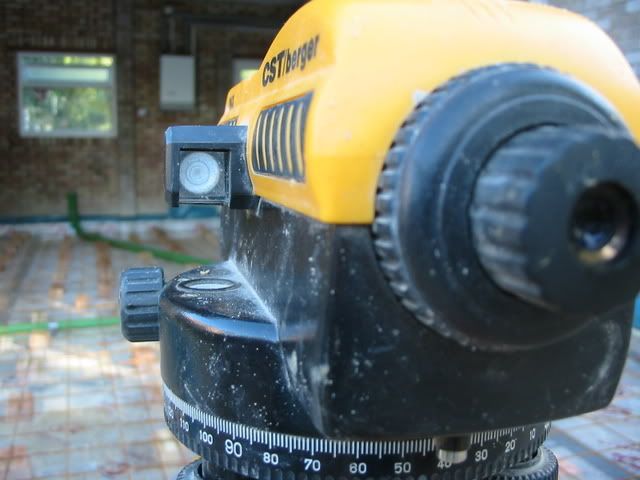
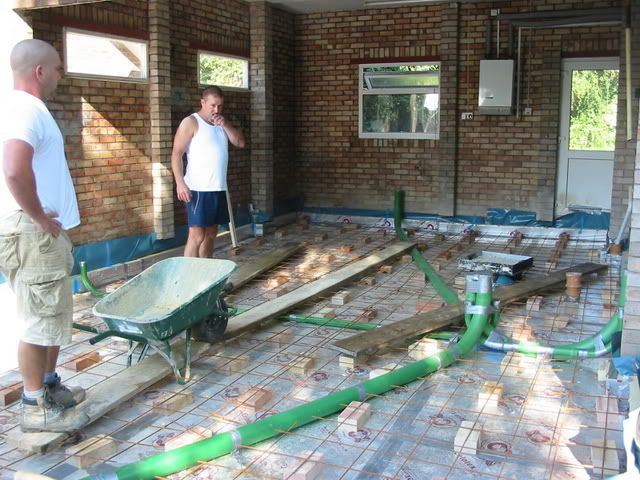
Using this preset level and the staff, pins are then placed all around the perimeter of the studio floor area so that we basically know where we are when the concrete arrives.
Then using a piece of hand picked 2” x 4”, a tamp is put together in an instant.
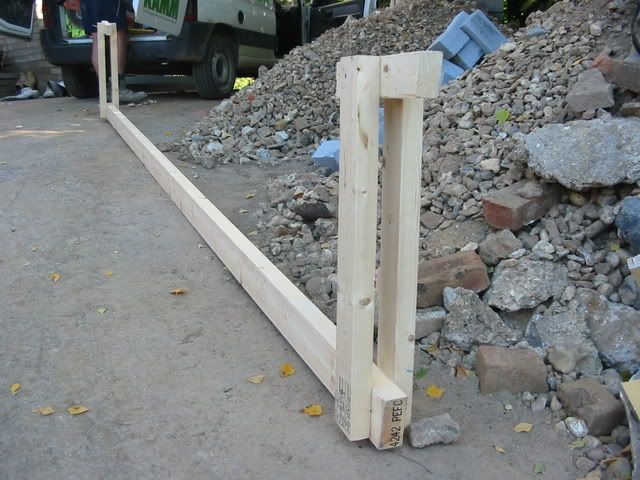
Finally – the ‘running boards’ are strategically placed over the pour area.
TTP -30mins, and it’s clearly the calm before the storm. (More like a bloody Hurricane!)

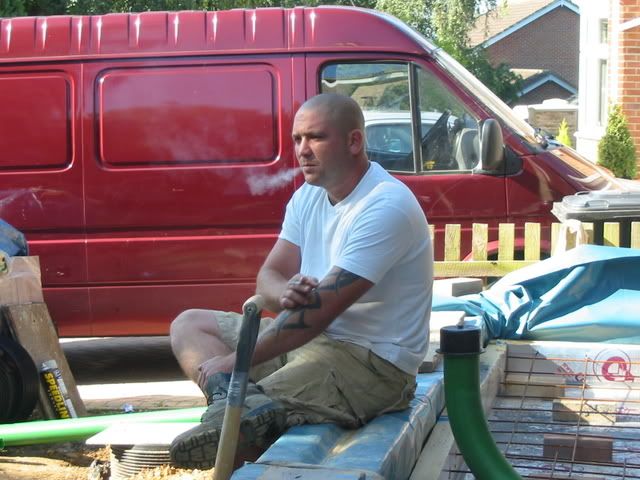
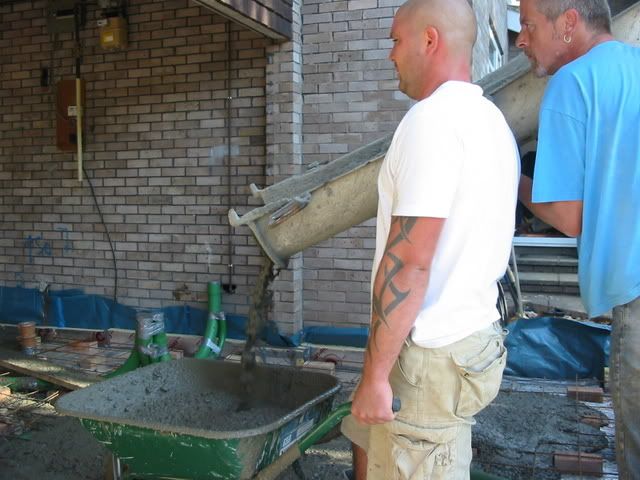
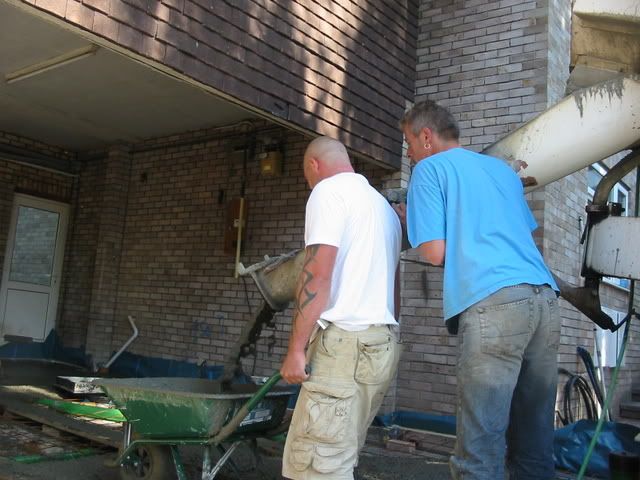
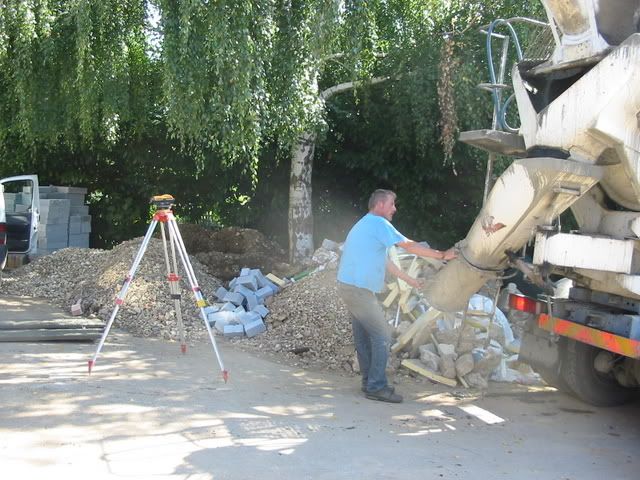
TTP -5mins and 16 tonnes of Fibred RC35 slump 70 reverses up our driveway.
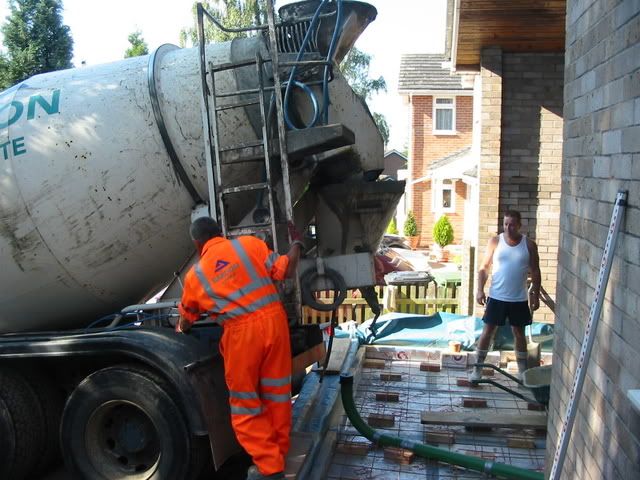
This is a big wagon, carrying a shed-load of concrete which has to be placed in exactly the right place.
TTP Now! It starts, I mean really starts. It was impossible to accurately photograph everything that happened in the next hour and 15 minutes, but I’ll do my best.
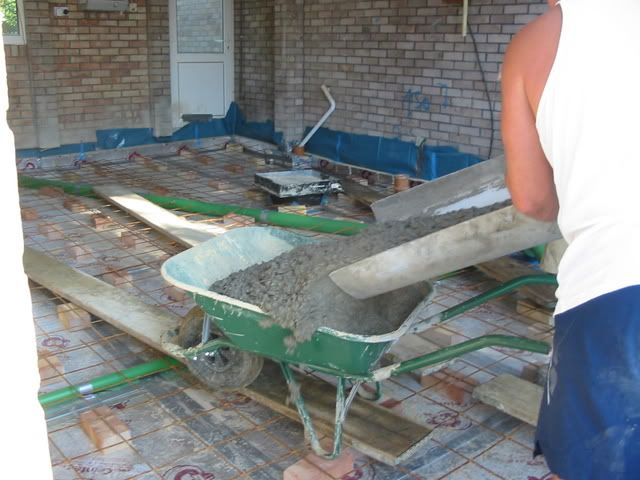
As the concrete came out it was too thick – practically unworkable! No probs, concrete trucks always carry a full tank of water, don’t they? Not this Guy – we drained him in 2 minutes flat! “Go get the bloody hose, Lou, and quick, Mate, or we’re screwed!”
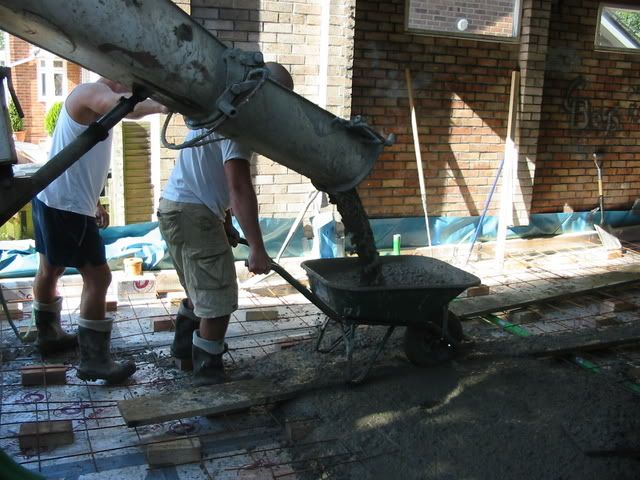

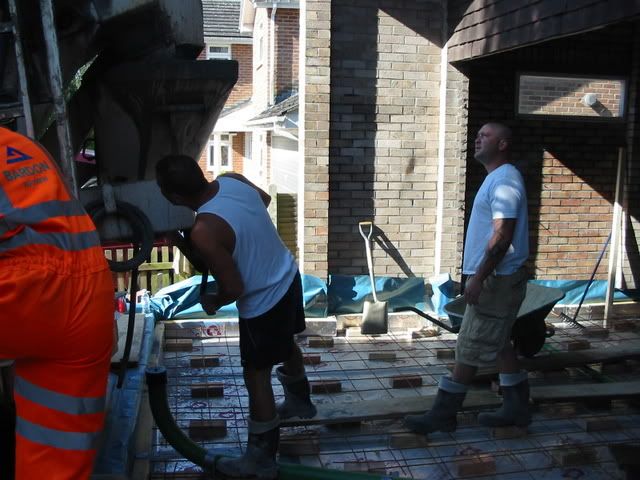
Then I get assigned to ‘chute duty’ which is basically holding the chute over Pete’s barrow until he’s full and then swinging it out of his way so that he can pour!
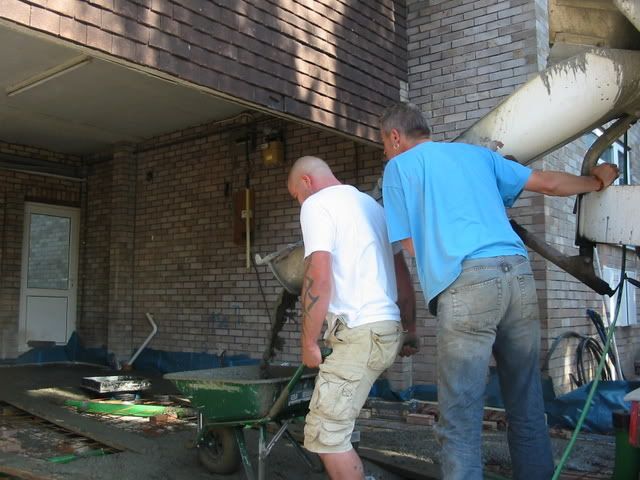
Span checking as we go – everyone working hard and really concentrating.

Timing is everything on this, and I actually feel like I’m helping!
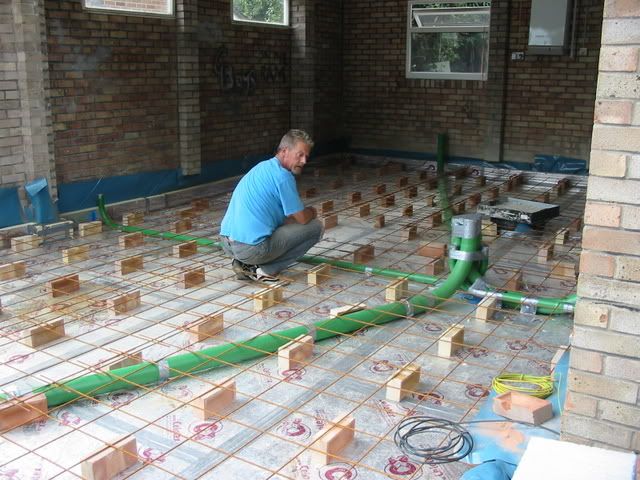
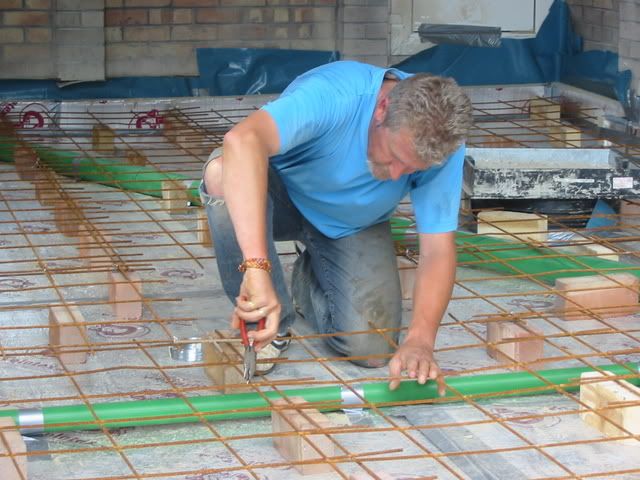
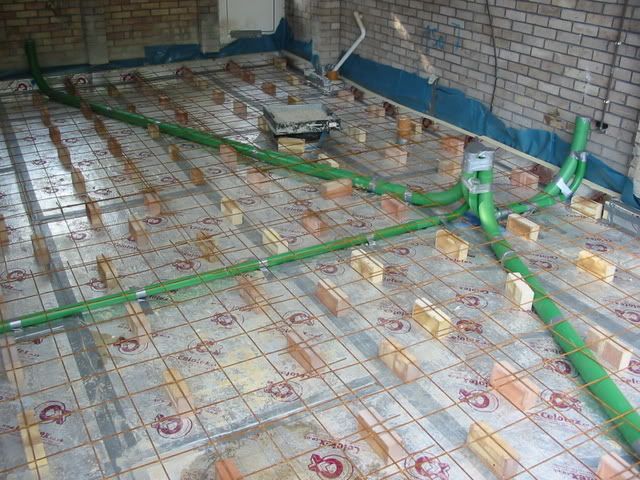
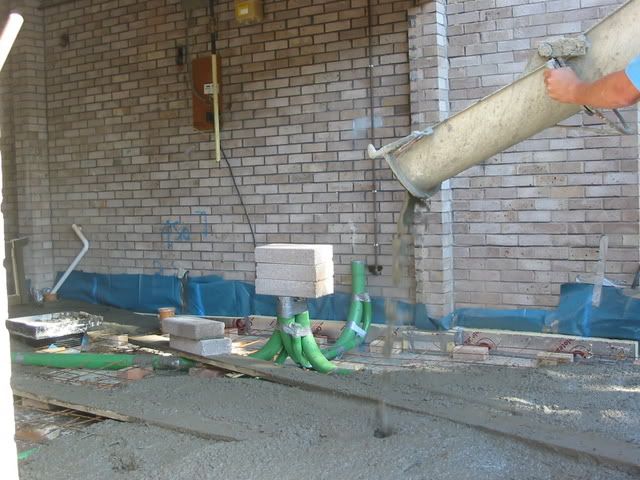
Then unexpected complication no 2, and an almost unbelievable disaster – the ducting starts to float out of the concrete – no, I’m not kidding, the mix was so heavy, hard and strong etc that it was basically getting under the ducting and lifting it and the steel. Also, of course, plastic ducting pipes, when not full of ducting…are full of air! Span says “Go get a load of concrete blocks to hold the $””%%^$& down!”
Final bit.
We barely had half a wheelbarrow left over, so that was another cause for concern!
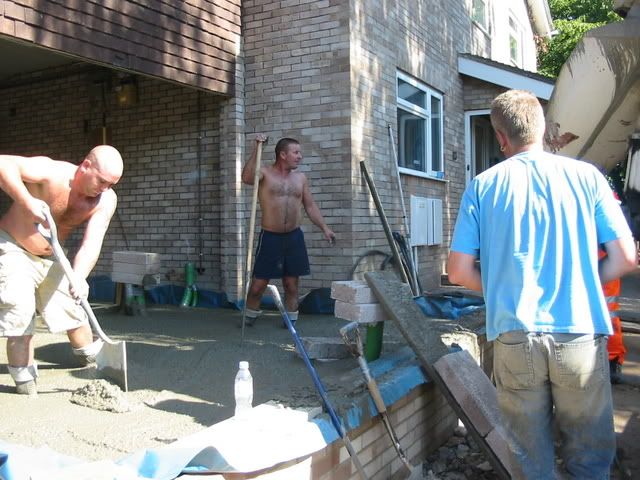
Then on to the fine art of ‘tamping’ which is, of course, what the tamp was made for.
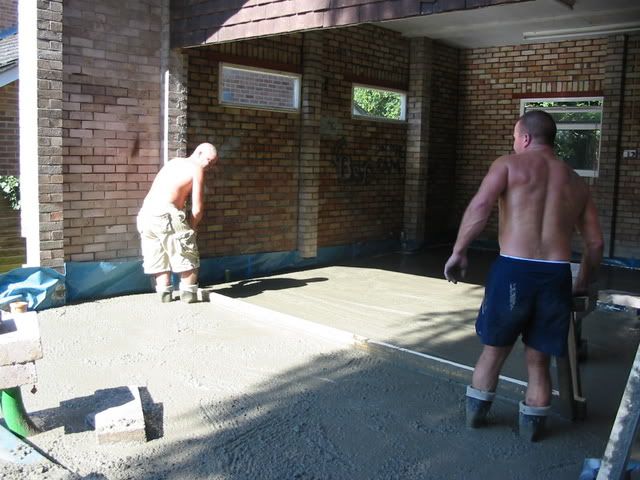
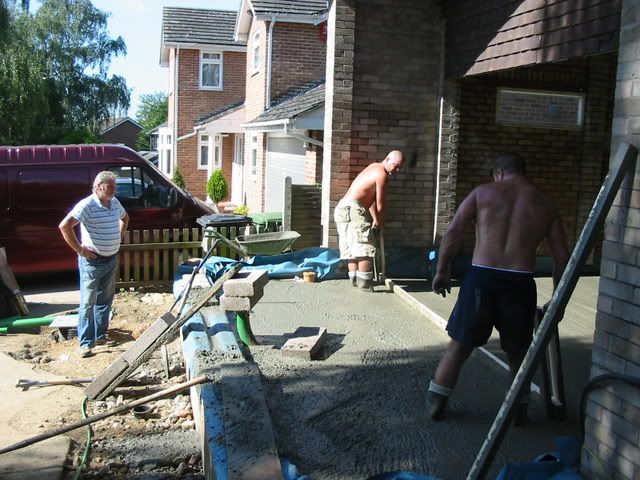
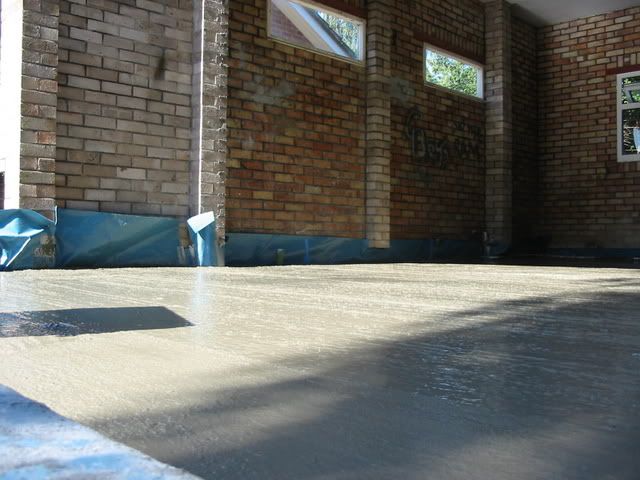
Then, after just an hour and a half of sheer brute force, determination and male camaraderie, ‘Studio 4’s’ 6” steel reinforced ducted, and isolated concrete slab is down! Guys, I can’t tell you how good that felt, but those of you who have done it will know exactly what I mean.
Then a ‘stroll in the park’ dig for gas and electric to come back in to the house. (Electric is being relocated Tuesday morning)
Then, a very well earned beer with the workforce. One thing that I didn’t mention was that, despite the totally crap weather we’ve had generally this year, yesterday was an absolute scorcher – up in the nineties! In other words, exactly the sort of weather you don’t need when you’re laying 16 tonnes of concrete. So, rather than stay celebrating with Span, Pete and Trev, I decided to get back and keep an eye on the slab. Well, at least until the sun had moved around the back of the house!
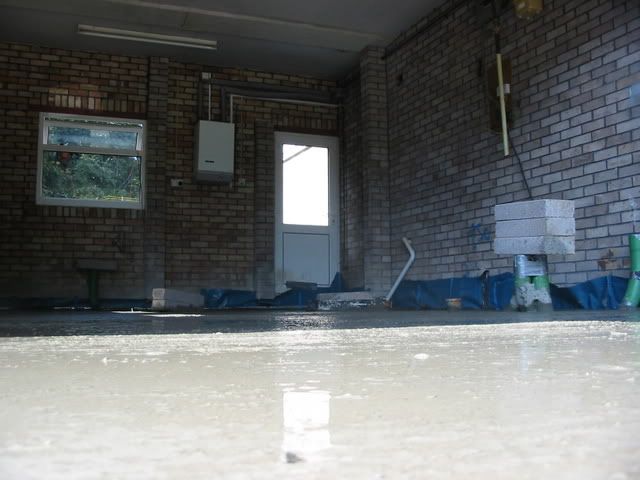
Sad, I know – 2 ½ hrs watching concrete set whilst the sun moves off it, but I have to report that I was able to sleep last night, and when I woke early this morning, I went out to inspect the slab (before I’d put any shoes or socks on) and all was well; solid, level, no cracks anywhere.
That’s it for this one, guys. Thanks as always for reading.
Phil and Dave are back off holiday tomorrow and start here 7.30 Tuesday morning to get the rest of the front brickwork done.
Regards
Lou
Firstly, chaps, what a great set of posts and compliments, thank you all very much indeed. God! Don’t I just sound so English!
Kevin – So good to hear from you, mate, and thank you for the kind words. Your curved wall is a joy to the eye, but I don’t think it’s possible for anyone to top the ‘Rock Wall’ – incredible! Well done.
Tom – I’ve been following your thread as well, mate. Could you please let me know where you got your neon sign from? Contact details of where your wife purchased it would suffice. As for the photos-to-work ratio, nothing clever here at all, other than always having the camera to hand. Thanks for the encouragement, kind Sir.
Keith – as always, mate, very many thanks. (Glad you, too, like the ‘arty shots’.)
Geoff – Thank you, too, buddy.
Joey – I’ll tell you it’s 3 core, but that is somewhat misleading since there’s about 15 strands of heavy duty copper in each core, it’s around 25mm in diameter, and yes it is powered from the ‘twin and earth’ pictured above the isolating switch, but that’s not twin and earth you see, my friend! Now, I’ll try and clarify this for you if I can, but get a spark*, dude, trust me you won’t get this one right on your own. (Yes, I know you said you were going to get someone – but hey, just making sure).
U.K. regulations dictate that you cannot have the ‘tails’ (that’s what you’re actually seeing) from your meter to your consumer unit longer than 3 meters without an isolating switch. If you recall my previous posts, the new meter box is now on the front of the property, pretty much on the other side of the wall to the new isolating switch. So, yes the armoured cable is being powered by those tails, it’s now running back through the studio (in the screed level) to the new consumer unit location inside the house, from there a separate feed will be fed back to the studio for power. I’m sorry if you’re still confused, but Graham (my spark) is here all day today, I’ve taken pictures of course, and will update when I have more time.
* for overseas readers “Spark” = Electrician!
So now to the update – yesterday, frankly Gentlemen, was the pinnacle of the project so far! An almost monumental milestone was reached, the bonding of human understanding was ‘cemented’ forever! Boy, what a ‘bitch’ and not without complications……………………….here it comes!
TTP (time to pour) -1hr 40 mins and I’m instructed by phone to set up the ‘Dumpy level’
The bubble in the center of the circle is proof that I got that bit right… phew!
Using this preset level and the staff, pins are then placed all around the perimeter of the studio floor area so that we basically know where we are when the concrete arrives.
Then using a piece of hand picked 2” x 4”, a tamp is put together in an instant.
Finally – the ‘running boards’ are strategically placed over the pour area.
TTP -30mins, and it’s clearly the calm before the storm. (More like a bloody Hurricane!)
TTP -5mins and 16 tonnes of Fibred RC35 slump 70 reverses up our driveway.
This is a big wagon, carrying a shed-load of concrete which has to be placed in exactly the right place.
TTP Now! It starts, I mean really starts. It was impossible to accurately photograph everything that happened in the next hour and 15 minutes, but I’ll do my best.
As the concrete came out it was too thick – practically unworkable! No probs, concrete trucks always carry a full tank of water, don’t they? Not this Guy – we drained him in 2 minutes flat! “Go get the bloody hose, Lou, and quick, Mate, or we’re screwed!”
Then I get assigned to ‘chute duty’ which is basically holding the chute over Pete’s barrow until he’s full and then swinging it out of his way so that he can pour!
Span checking as we go – everyone working hard and really concentrating.
Timing is everything on this, and I actually feel like I’m helping!
Then unexpected complication no 2, and an almost unbelievable disaster – the ducting starts to float out of the concrete – no, I’m not kidding, the mix was so heavy, hard and strong etc that it was basically getting under the ducting and lifting it and the steel. Also, of course, plastic ducting pipes, when not full of ducting…are full of air! Span says “Go get a load of concrete blocks to hold the $””%%^$& down!”
Final bit.
We barely had half a wheelbarrow left over, so that was another cause for concern!
Then on to the fine art of ‘tamping’ which is, of course, what the tamp was made for.
Then, after just an hour and a half of sheer brute force, determination and male camaraderie, ‘Studio 4’s’ 6” steel reinforced ducted, and isolated concrete slab is down! Guys, I can’t tell you how good that felt, but those of you who have done it will know exactly what I mean.
Then a ‘stroll in the park’ dig for gas and electric to come back in to the house. (Electric is being relocated Tuesday morning)
Then, a very well earned beer with the workforce. One thing that I didn’t mention was that, despite the totally crap weather we’ve had generally this year, yesterday was an absolute scorcher – up in the nineties! In other words, exactly the sort of weather you don’t need when you’re laying 16 tonnes of concrete. So, rather than stay celebrating with Span, Pete and Trev, I decided to get back and keep an eye on the slab. Well, at least until the sun had moved around the back of the house!
Sad, I know – 2 ½ hrs watching concrete set whilst the sun moves off it, but I have to report that I was able to sleep last night, and when I woke early this morning, I went out to inspect the slab (before I’d put any shoes or socks on) and all was well; solid, level, no cracks anywhere.
That’s it for this one, guys. Thanks as always for reading.
Phil and Dave are back off holiday tomorrow and start here 7.30 Tuesday morning to get the rest of the front brickwork done.
Regards
Lou
-
joey
- Posts: 185
- Joined: Mon Aug 21, 2006 3:43 am
- Location: south london uk
you must be happy now that the pour is done mate. thanks for explaining
about the armoured cable i will with out a doubt be geting a sparkey to do
the job. its just that for us in the uk it seems to be different to the us as in rod s book.(just trying to understand so when i do finally get mine done i dont sound like a plumb refering to the us way of working. thanks and good luck with the rest of the build.
-
Lou
- Senior Member
- Posts: 401
- Joined: Thu Dec 28, 2006 1:03 am
- Location: Hampshire, United Kingdom
- Contact:
-
sharward
- Moderator
- Posts: 4281
- Joined: Mon Jan 03, 2005 4:08 pm
- Location: Sacramento, Northern California, USA
- Contact:
Excellent!!! Wow, that "empty plastic conduit floats during concrete pour" situation was a close call indeed!
Congratulations on a job well done, my friend.
Great pictures, especially considering the frantic pace of work and related disaster avoidance activities.
--Keith
Congratulations on a job well done, my friend.
Great pictures, especially considering the frantic pace of work and related disaster avoidance activities.
--Keith
"Converting a garage into living space requires a city permit . . . homeowners insurance won't cover a structure that's been changed without a building permit . . ." --Sacramento Bee, May 27, 2006
-
TomVan
- Senior Member
- Posts: 412
- Joined: Sat Nov 19, 2005 2:30 am
- Location: Gresham OR
- Contact:
Lou,
Oh how fun it is to pour concrete.
Glad you had Span with the quick thinking to get you back on track.
Now the fun begins. I love framing
As ar as the Neon sign goes this is the outfit that made mine. http://greshamneonsigns.com/
Just a small neon sign maker here in town. Nothing special. And I would assume you could find one locally in your neck of the woods.
Looking forward to the next pictures keep up the good work
Tom